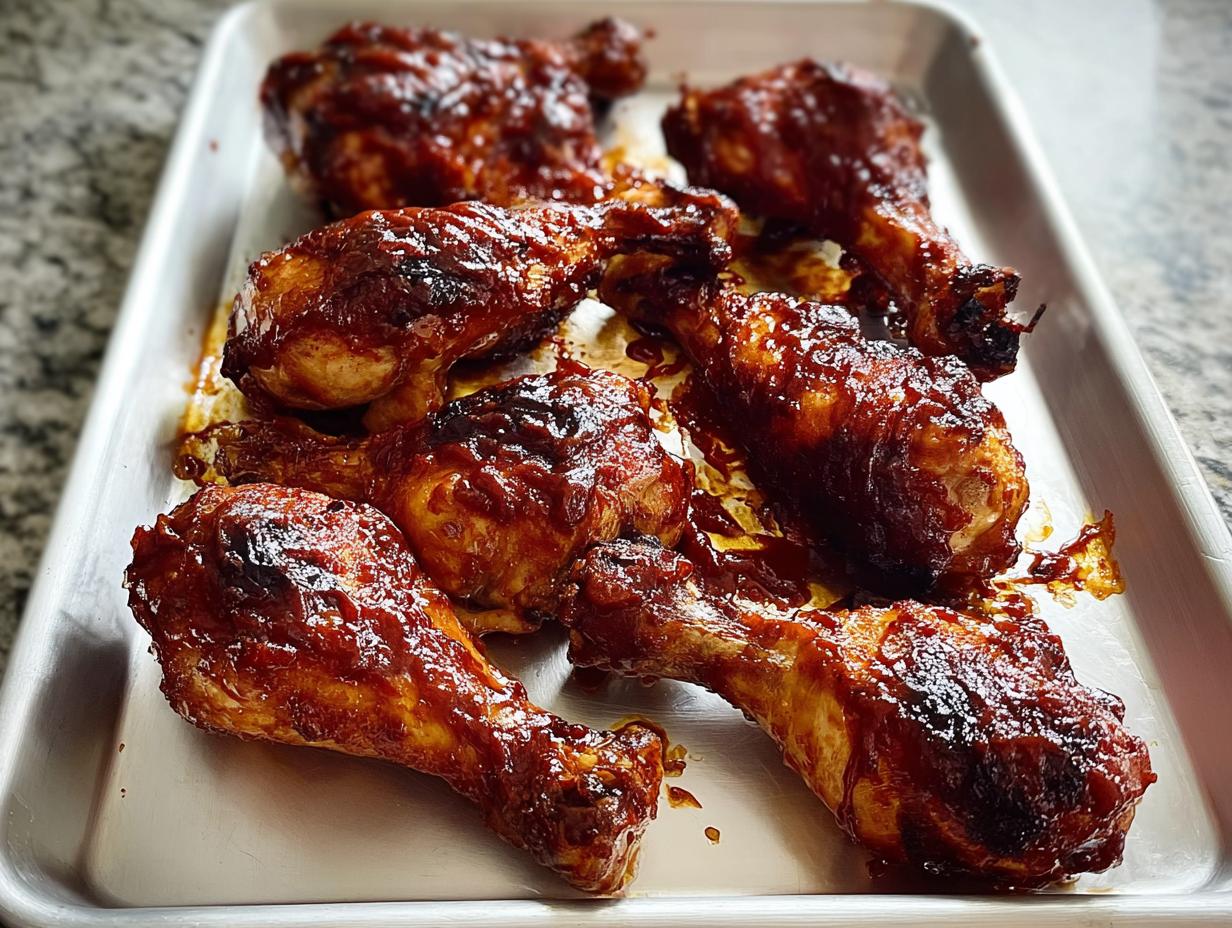
Are you tired of thinking that deep, sticky, melt-off-the-bone BBQ flavor has to mean loading up on sugar and carbs? Me too! That’s why I am absolutely thrilled to share my go-to recipe for Honey BBQ Baked Chicken Legs. These aren’t just any chicken legs, trust me; they are perfectly tender on the inside with that incredible caramelized glaze we all crave when we think of summer cookouts or epic game day dinners. And the best part? We nail that perfect sweet and smoky flavor while keeping things light enough for virtually any healthy eating plan, even keto!
I still remember the first time I made these for a family gathering. It was a sunny Saturday afternoon, and I was determined to impress my relatives who were skeptical about my newfound keto lifestyle. I combined classic BBQ flavors with a sugar-free twist, and when those chicken legs emerged from the oven, glistening and perfectly caramelized, I felt a rush of excitement. As my family gathered around the table, the compliments flowed, and I could see that I had won them over with flavors they thought they’d never enjoy again. That moment reinforced my belief—that with the right ingredients and a little creativity, anyone can enjoy delicious meals that celebrate both health and happiness. For more ideas on making healthier versions of your favorite dishes, check out these lightened-up dinner ideas!

Why You Will Love This Honey BBQ Baked Chicken Legs Recipe
Seriously, what’s not to adore about this bbq chicken recipe? It ticks every single box for a perfect weeknight win or a big gathering success. I promise these will be your new go-to for easy, flavor-packed meals.
- They deliver that incredible craveable sweet and smoky flavor without all the fuss.
- Super simple prep means you are done in ten minutes, leaving you more time for everything else.
- Perfect for busy weeknights or loading up the oven for epic game day dinners!
- The final broiler step gives you that irresistible, sticky coating on these sticky baked legs.
If you need more inspiration for fast weeknight cooking, take a peek at my guide to meal prep-friendly dinners; these chicken legs fit right in!
Essential Ingredients for Perfect Honey BBQ Baked Chicken Legs
Keeping the ingredients simple is half the battle won here! The beauty of this recipe is that it relies on standard pantry spices plus a good-quality BBQ sauce to really shine. You only need one group of ingredients to make this magic happen. I always keep the dry seasonings mixed ahead of time so they are ready to go.
For the chicken itself, grab about a pound and a half of drumsticks. Don’t skip that little bit of olive oil—it helps our spices stick beautifully. The star, of course, is the BBQ sauce. Remember, if you’re focusing on low-carb or keto eating like I do, you absolutely must check the label on that bottled sauce. Many traditional sauces load up on sugar, but you can easily find amazing sugar-free or low-carb options now! These essential keto pantry items list has helped me stock up.
- Chicken Drumsticks: 1.5 pounds is perfect for about three servings.
- Olive Oil: Just 1/4 cup to coat everything nicely.
- Seasonings: Salt, pepper, paprika (for color!), garlic powder, onion powder, and just a tiny pinch of cayenne to wake things up.
- Barbeque Sauce: 1.5 cups, or more if you love it extra saucy! Make sure it fits your healthy eating plan.
Equipment Needed for Your Honey BBQ Baked Chicken Legs
You won’t need a fancy smoker or grill for these! Trust me, keeping the equipment simple is what makes this recipe so great for weeknights. We’re relying on some basic tools to get that amazing texture.
- The Oven, of course! Set at 400 degrees F to start.
- A sturdy Baking Sheet, make sure you line that foil!
- A Large Bowl for tossing everything so your hands don’t get too messy initially.
- An Instant-Read Thermometer—this is essential for hitting that perfect internal temperature safely.
Step-by-Step Instructions for Sticky Baked Legs
Okay, this is where the action happens! Don’t be intimidated by the multiple steps; they are all designed to build that incredible texture we’re after. Think of these stages as building blocks for the best bbq chicken recipe you’ve ever made. You’ll want to monitor these closely, especially during the broiling stage, because caramelized BBQ sauce can go from perfect to burnt in a flash! Check out my general guide on temperatures and timing if you ever get unsure about cooking times.
Prepping the Oven and Chicken for Honey BBQ Baked Chicken Legs
First things first: we need heat! Preheat your oven to 400 degrees F (200 degrees C). I always use foil to line my baking sheet; it saves so much scrubbing time later, trust me! In your large bowl, combine that olive oil with all your spices—salt, pepper, paprika, garlic powder, onion powder, and that tiny kick of cayenne. Dump your chicken drumsticks in there and roll them around until every lovely piece is coated. Then, spread them out on that prepared sheet. Don’t let them touch! Overcrowding is the enemy of crispy skin, even when we are baking.
Baking and Initial Sauce Application
Pop those beautifully seasoned legs into the preheated oven for 20 minutes. They need this initial bake time without any sauce to start getting cooked through. When the timer goes off, pull the sheet out carefully. Now, grab that BBQ sauce and brush a generous layer over the top of every drumstick. Put them back in the oven and bake them for another 7 to 8 minutes. You’ll notice the sauce already starting to get sticky and deep in color!
Flipping and Final Broiling for Caramelization
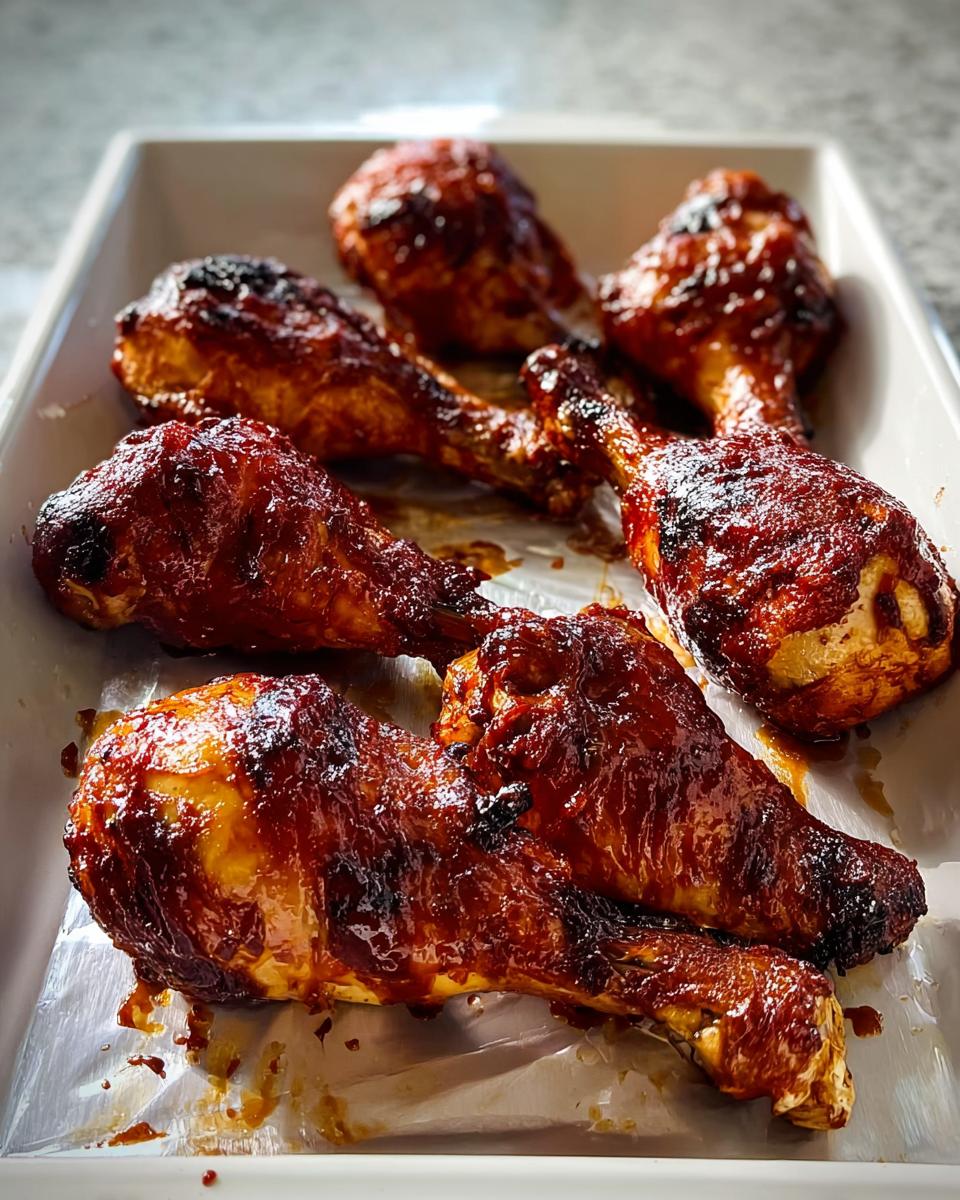
Time to flip! Turn those drumsticks over, brush them with more of that glorious sauce, and pop them back in for another 7 to 8 minutes. This is building the layers we love in truly sticky baked legs. Now, we kick it up a notch: move an oven rack up high—about 6 inches from the heat source—and switch your oven setting to the broiler. Brush them one last time, and broil for about 3 to 4 minutes. Flip, sauce again, and broil for 3 to 4 more minutes.
This final blast gives you that perfect caramelized crust! During this time, use your instant-read thermometer. Chicken is safe when the thermometer inserted near the bone reads 165 degrees F (74 degrees C), and the juices are running totally clear. If you love crispy wings, you might also want to check out my tips for crispy baked chicken wings, as the broiling method is similar!

Tips for Success with Honey BBQ Baked Chicken Legs
I’ve learned a few things over the years making these wings, especially since that first time I was trying to win over the skeptics with my healthier versions! These little tricks turn a good batch of Honey BBQ Baked Chicken Legs into an absolute showstopper. It’s all about layering that rich flavor and nailing the texture so they are perfectly moist inside but gloriously sticky outside beneath that glaze.
Here are the things I always stick to:
- Spacing is Everything: This is non-negotiable! When you put those seasoned drumsticks down before the first bake, make absolutely sure there is space between every single piece. If they are touching, they steam instead of roast, and we lose that good crisping potential. We want baked, not boiled!
- Don’t Skip the Broiler Stage: I know the broiler seems scary—it heats up fast! But that quick, high heat blast right at the end is what caramelizes the honey/sweetener in your BBQ sauce, giving you that beautiful, dark, sticky coating. It takes practice to watch it, but it’s worth the attention.
- Sauce Incrementally: Resist the urge to slather on all the sauce at the beginning. If you do that, the sugar burns long before the chicken is cooked through. The multiple, thinner layers of sauce—baking bare, saucing, baking, flipping, saucing again—that’s how you build deep, robust flavor. It’s how I managed to wow the family that day!
- Pat Them Dry First: Before you even add the oil and seasoning in the first step, give the chicken legs a quick pat down with a paper towel after rinsing. Removing surface moisture helps the spices adhere better and starts the roasting process sooner rather than steaming off water content.
If you follow those crucial steps, your meal prep or game day dinners will be legendary. For more simple advice on making sure your dinners are totally foolproof every single time, I have a great guide here!
Ingredient Substitutions for Honey BBQ Baked Chicken Legs
Part of loving a recipe, especially one you plan to make over and over, is knowing you have wiggle room if you’re missing an item or trying to stick to specific dietary needs. This bbq chicken recipe is pretty flexible, but some swaps work better than others, especially when we’re trying to maintain that amazing sticky coating!
The biggest question I always get is about the BBQ sauce. If you aren’t grabbing a sugar-free option or if you need to make your own, you can absolutely still get that amazing sweet and smoky flavor. If you are strictly keto, you’ll need a sweetener like erythritol or monk fruit mixed into your base ingredients (ketchup, vinegar, spices) at the same ratio of 1.5 cups. But if you just ran out of your favorite brand, any thick, tangy BBQ sauce will coat these beautifully in the oven.
For the spices, feel free to play around a bit, but be mindful of leaving the paprika in—it gives the glaze that beautiful color that makes these Honey BBQ Baked Chicken Legs so appealing!
- Spice Adjustment: If you’re worried about the heat from the cayenne pepper, just leave it out! The flavor will still be there, just without the kick. Or, conversely, if you want more fire, use a dash of your favorite hot sauce mixed into the initial oil coating.
- Chicken Cut Swaps: If you don’t have drumsticks, thighs work beautifully as a substitute for sticky baked legs! They cook a little slower and are fattier, so they stay super moist. You’ll need to add maybe 5-10 extra minutes to the initial bake time.
- Oil Alternatives: If you’re out of olive oil, melted butter works just fine for mixing the spices in, though butter might brown faster under the broiler, so watch it closely!
We love simple swaps around here! If you’re looking for easy sides to go with these, you might love looking at my short list for 5-ingredient Caprese Skewers—they’re quick and offer a fresh counterpoint to the rich BBQ flavor.
Health Benefits of These Honey BBQ Baked Chicken Legs
This whole recipe really proves you don’t have to compromise joy for health! Chicken legs are an absolutely fantastic source of lean, satisfying protein. Protein keeps you feeling full way longer, which is perfect if you’re watching your macros.
The real health win here, especially for my keto friends, is leveraging a low-carb or sugar-free BBQ sauce. By doing that, we lock in all that incredible sweet and smoky flavor without spiking blood sugar. It makes these Honey BBQ Baked Chicken Legs perfect for calorie-smart eating. If you’re tracking, check out these calorie-smart recipes for more guilt-free meals!
Serving Suggestions for Game Day Dinners
When you’re serving up these magnificent, sticky Honey BBQ Baked Chicken Legs, you need sides that can stand up to that bold flavor without competing or weighing everyone down. Since these are perfect for casual nights and especially wonderful for game day dinners, I always keep the supporting cast simple, fresh, and keto-friendly!
You want vibrancy next to that rich, smoky glaze. Forget heavy starches; we’re going for bright flavors that slice right through the sweetness. Here are the two sides I whip up almost every single time:
- Bright Green Veggies: You need something green and crisp! I absolutely adore tossing some asparagus with olive oil, salt, and grated parmesan cheese, then roasting it right alongside the chicken during the first phase of baking. It comes out slightly tender-crisp and fantastic. If you want the full recipe for that lovely side, check out my Roasted Asparagus with Parmesan guide.
- A Cool Creamy Dip: A good bowl of fresh, zesty guacamole is non-negotiable at a gathering in my house. The cool avocado and sharp lime juice are the perfect antidote to the sweet heat of the BBQ sauce. It’s fast to mix up and everyone dives into it! Grab my favorite recipe for Guacamole with Lime and Cilantro.
These two sides give you color, crunch, and freshness, making your plate balanced and super satisfying. Who says healthy eating can’t be the star of your next watch party?
Frequently Asked Questions About Honey BBQ Baked Chicken Legs
I always get asked the same things when people first try to nail this recipe for their own game day dinners or busy weeknights. It’s good to know the little details that make the difference between good sticky baked legs and *perfect* sticky chicken!
Can I make these Honey BBQ Baked Chicken Legs ahead of time?
Yes, you absolutely can prep them ahead! You can rub the chicken with the dry spices and oil mixture and store it covered in the fridge for up to 24 hours. I wouldn’t sauce them until you are ready to bake, though, because the sauce needs to hit that hot oven to caramelize properly. Store your leftover cooked chicken in an airtight container in the fridge for about three days. They are still great the next day!
What is the best way to reheat sticky baked legs?
My biggest tip here is to avoid the microwave if you can! Microwaving works fast, but it steams the glaze, and suddenly your beautiful sticky coating gets gummy and soft. To keep that caramelized exterior, I highly recommend reheating them in the oven at about 350 degrees F for about 10 minutes, or even better, throw them in an air fryer for 5-7 minutes. That gives them a little crisp back!
What internal temperature ensures these chicken legs are safe?
Food safety is everything, especially with poultry! While the recipe instructions mention it, I want to stress this point: always trust your thermometer over the clock. Chicken is safely cooked when the internal temperature, inserted right next to the bone (but not touching it!), reads a solid 165 degrees F (74 degrees C). If you see that number, the juices will run clear, and you know you’ve got perfectly cooked, safe meat!
If you are looking for more pointers on making quick, customized meals, my guide on quick keto dinner recipes has tons of helpful hints!
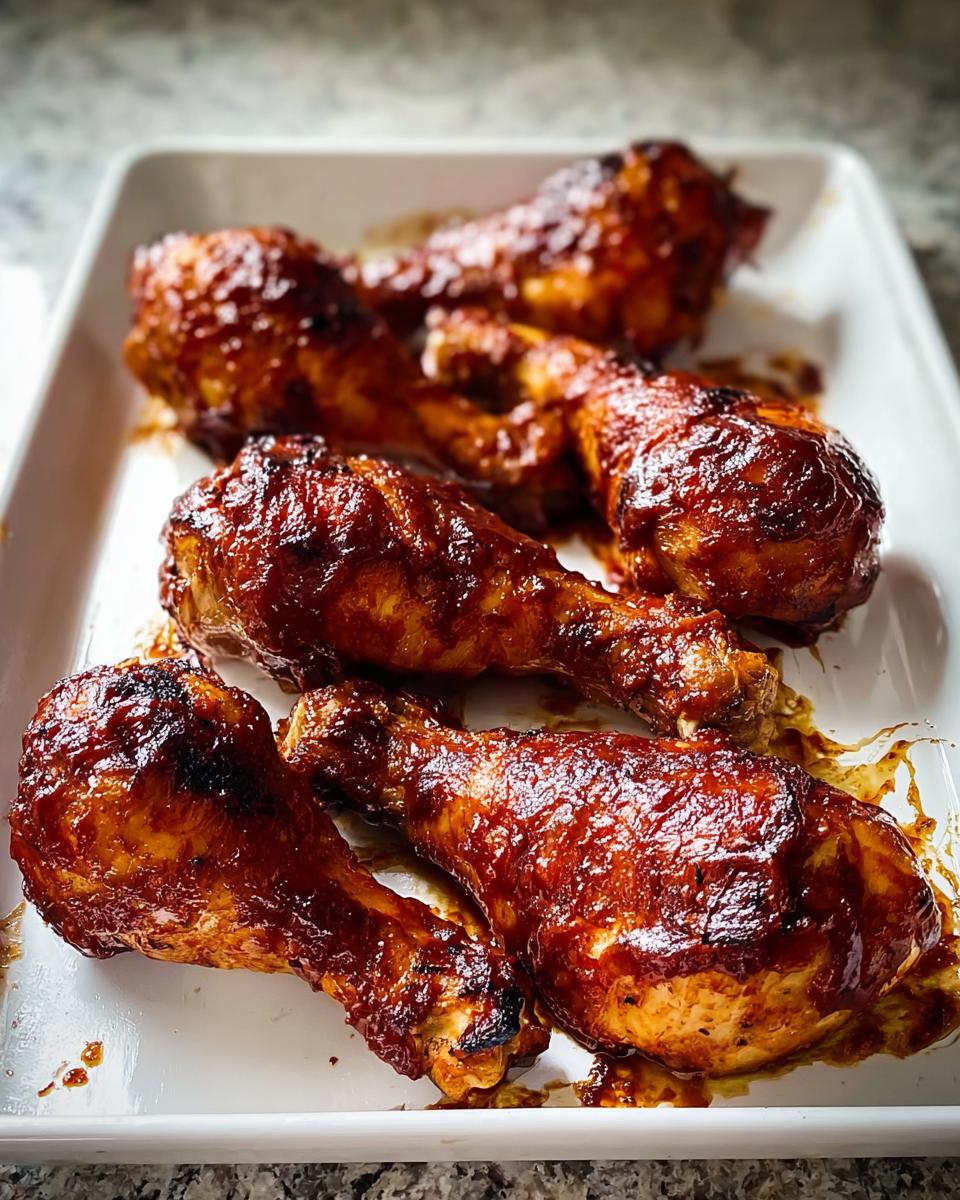
Share Your Perfect Honey BBQ Baked Chicken Legs
That’s truly it, friends! We’ve gone from raw chicken to these gorgeous, glistening, competition-worthy Honey BBQ Baked Chicken Legs. I’m so excited for you to try them, whether you’re making a weeknight meal or prepping for a huge watch party!
Once you’ve whipped up a batch of these sticky baked legs, I seriously want to hear all about it. Did you try the sugar-free sauce swap? Did the keto version fool your friends? Let me know in the comments below! Rate the recipe right here on the page if you can—your feedback really helps other cooks know they’re on the right track with this amazing flavor profile.
And please, if you take a picture of your glistening drumsticks, tag me on social media! I absolutely love seeing your kitchen victories. You can always reach out directly through my contact page if you have any super specific questions while you’re cooking. Happy eating, everyone!

Honey BBQ Baked Chicken Legs
Ingredients
Equipment
Method
- Preheat your oven to 400 degrees F (200 degrees C). Line a baking sheet with foil.
- Mix olive oil, salt, pepper, paprika, garlic powder, onion powder, and cayenne in a large bowl. Add the drumsticks and toss to coat them completely. Spread the coated chicken out on the prepared baking sheet.
- Bake in the preheated oven for 20 minutes. Remove the sheet from the oven and brush the chicken with barbeque sauce. Return it to the oven and bake for 7 to 8 minutes.
- Flip the drumsticks, brush them again with barbeque sauce, and bake for an additional 7 to 8 minutes.
- Set an oven rack about 6 inches from the heat source and turn on the oven’s broiler.
- Brush the drumsticks with more barbeque sauce and broil for 3 to 4 minutes. Flip the drumsticks, brush with barbeque sauce, and broil for 3 to 4 more minutes, until the chicken is no longer pink at the bone and the juices run clear. Check the internal temperature with an instant-read thermometer inserted near the bone; it should read 165 degrees F (74 degrees C).