
Get ready to wow your party guests with the most adorable little treats – my Strawberry “Pumpkins” (Chocolate-Dipped)! Seriously, these are so much fun to make and even more fun to eat. They’re the perfect no-bake addition to your fall or Halloween spread, and trust me, they’re way simpler than they look. I first whipped these up for a neighborhood party, and they were an instant hit – kids adored them, and everyone was asking for the recipe! As someone who dabbles in Keto Confectionery Arts, I especially love finding ways to make festive treats like these super accessible and adaptable.
Why You’ll Love These Strawberry “Pumpkins” (Chocolate-Dipped)
Oh, you are going to adore these little guys! Here’s why:
- Totally No-Bake: Perfect for when you don’t want to heat up the oven.
- Super Easy Peasy: Seriously, even the kids can get in on the action!
- So Festive!: They scream fall and Halloween without being *too* spooky.
- Visually Stunning: They look like you spent hours, but shhh, it’s our secret!
- Diet-Adaptable: Easily made low-sugar or keto-friendly so everyone can indulge.
Gather Your Ingredients for Strawberry “Pumpkins” (Chocolate-Dipped)
Alright, let’s round up everything we need! The magic really happens with a few key players. You’ll want the freshest strawberries you can find – try to get ones with nice little green tops still attached, they look so cute! For the chocolate, I’m a big fan of orange candy melts because they’re super easy to work with and give us that perfect pumpkin color without any fuss. If you’re going keto or low-sugar, definitely grab sugar-free options; they work just as beautifully. For the frosting, real butter makes all the difference, and Nutella adds this wonderful richness that pairs so well with a good brownie base. Oh, and crushed Oreos are a must for that “dirt”!
Here’s the full rundown:
Brownies
- 1 box brownie mix (plus ingredients required on the package – eggs, oil, etc.)
Chocolate Covered Strawberry Pumpkins
- 16 oz fresh strawberries
- 12 oz orange candy melts (or sugar-free white chocolate chips tinted orange with candy color)
Frosting
- 2 sticks unsalted butter, softened
- 1 cup Nutella (make sure it’s softened, not hot!)
- 2 cups powdered sugar (or your favorite keto powdered sweetener blend)
- 1 teaspoon pure vanilla extract
- 1/8 teaspoon salt
- 2 tbs heavy whipping cream (or a keto-friendly milk alternative)
Oreo Crumb Dirt Topping
- 15 Oreos, crushed (or about 1.5 cups of crushed keto chocolate cookies)
Pumpkin Patch Leaves & Vines
- 1 package fresh mint leaves (these look just like little pumpkin leaves!)
For those aiming for a keto lifestyle, remember to check your labels on the brownie mix, candy melts, and even the Nutella to ensure they fit your macros!
Essential Equipment for Making Strawberry “Pumpkins”
To get these adorable little guys made, you won’t need a whole lot of fancy gadgets. The main players are a standard 9×13 baking pan – that’s for our yummy brownie base. You’ll also need a couple of microwave-safe bowls for melting your orange candy melts and softening that glorious Nutella. A piping bag comes in handy for those cute pumpkin lines, but honestly, a zip-top bag with a tiny corner snipped off works like a charm too! And of course, parchment paper is your best friend for easy cleanup and keeping those dipped strawberries from sticking.
Step-by-Step Guide to Crafting Your Strawberry “Pumpkins”
Alright, let’s get these adorable little pumpkin patches ready to grace your dessert table! You’ll want to follow these steps carefully to get that perfect, festive look. It’s easier than you think, I promise!
Baking the Brownie Base
First things first, let’s get that yummy chocolatey base ready. Preheat your oven according to the brownie box instructions and give your 9×13 pan a good spray with non-stick coating. Mix up your brownie batter just like the package says, pour it evenly into the pan, and bake away! The most important part here? Let them cool COMPLETELY before you even *think* about frosting them. Patience is key!
Preparing the Chocolate-Dipped Strawberries
Now for the stars of the show! Give your strawberries a good wash and make sure they’re completely dry – seriously, water and melted chocolate are not friends! Line a baking sheet with parchment paper because these guys will need a little time to chill and set. Melt your orange candy melts in the microwave, stirring every 30 seconds until they’re smooth and silky. Hold each strawberry by its leafy green top, give it a good dip into that bright orange chocolate, letting any excess drip off, and place it gently on your parchment paper. Let them hang out at room temp until they’re firm.
Once they’re solid, it’s time for the pumpkin lines! If you have a piping bag with a small tip (like a #4 Wilson tip), fill it with any leftover melted chocolate. If not, a zip-top bag with a tiny corner snipped off works like a dream! Gently squeeze out thin, vertical lines from the top to the bottom of each strawberry to create those classic pumpkin ridges. Pop them back on the parchment to let those lines set up fully.
Making the Nutella Frosting
While our little pumpkins are getting their stripes, let’s whip up that dreamy frosting. Pop your Nutella in the microwave for just about 15 seconds – you want it soft and spreadable, not hot enough to melt butter! In your mixer, cream the softened butter until it’s light and fluffy. Then, add in that softened Nutella and mix it all up. Gradually add the powdered sugar, mixing until it’s combined. Finally, stir in the vanilla extract, salt, and heavy cream. Just mix until everything is smooth and delicious. If you’re making a keto version, make sure your sweetener is finely powdered and your milk is keto-friendly!
Assembling the Pumpkin Patch
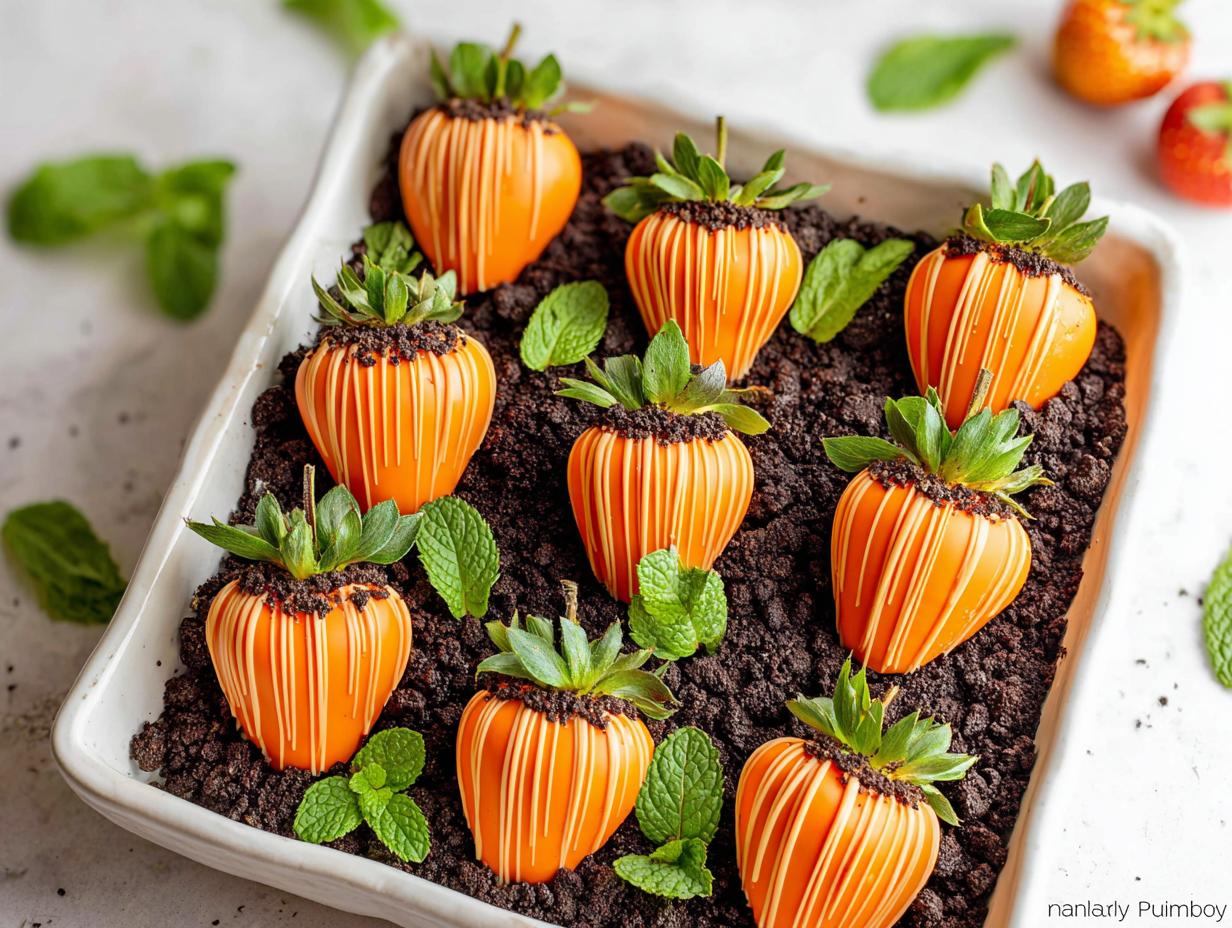
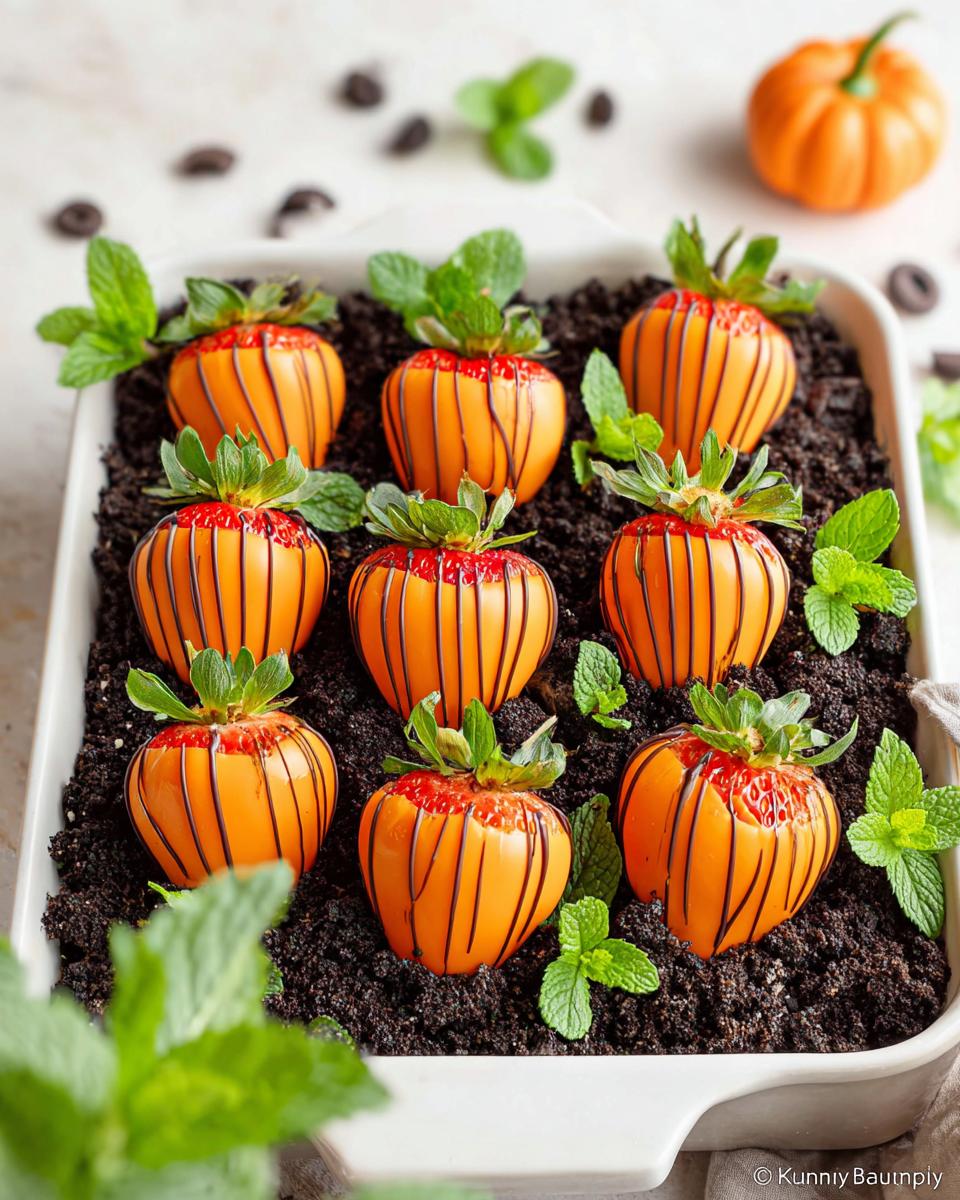
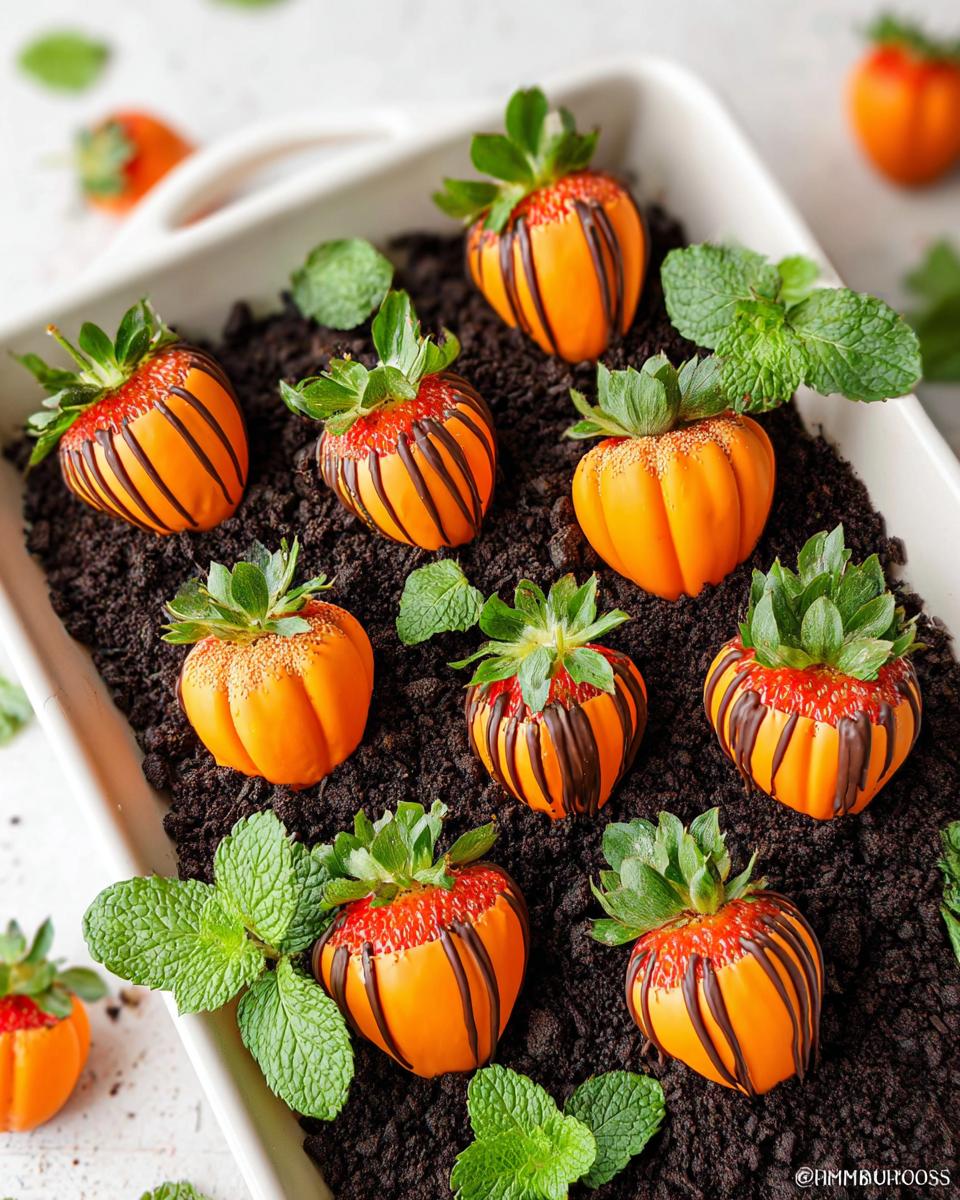
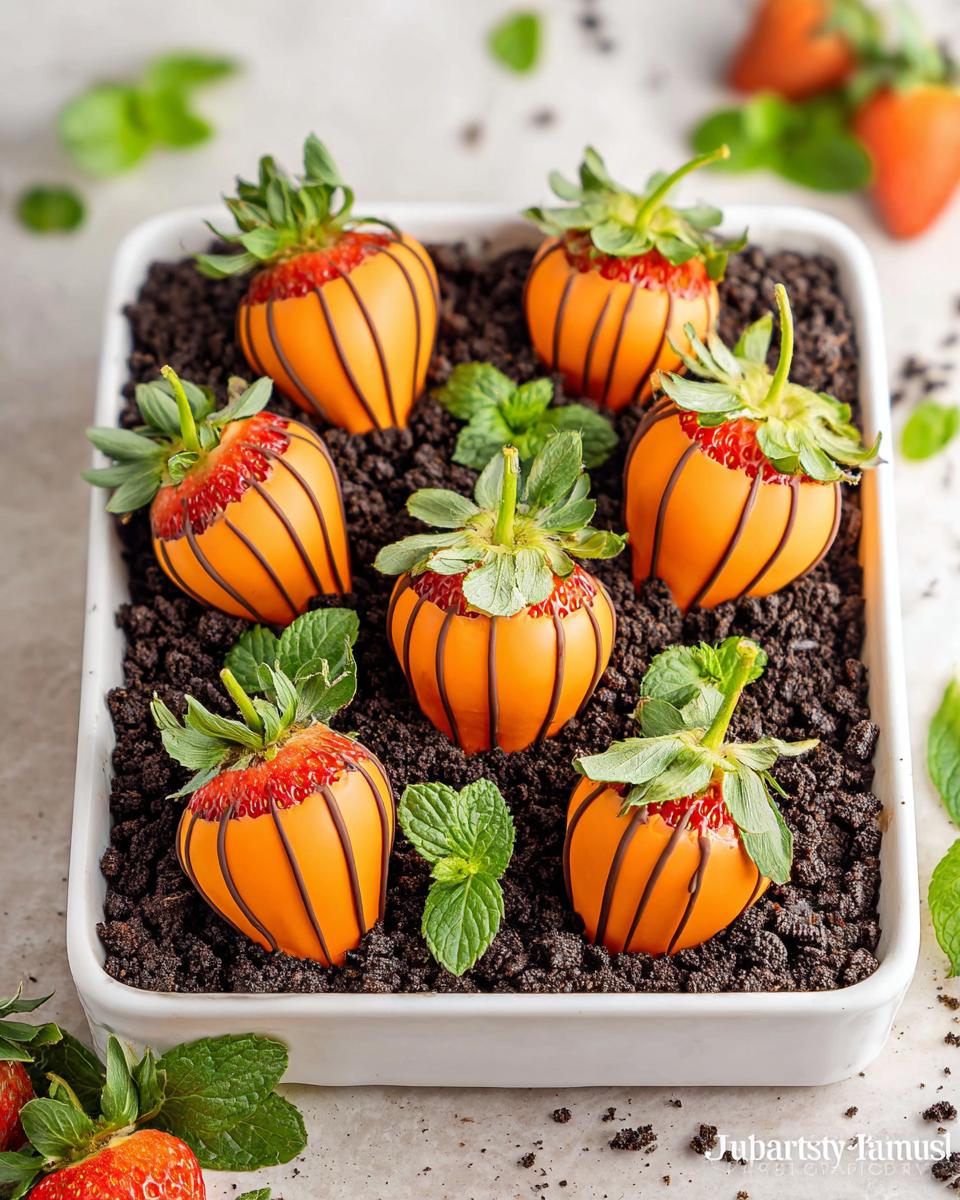
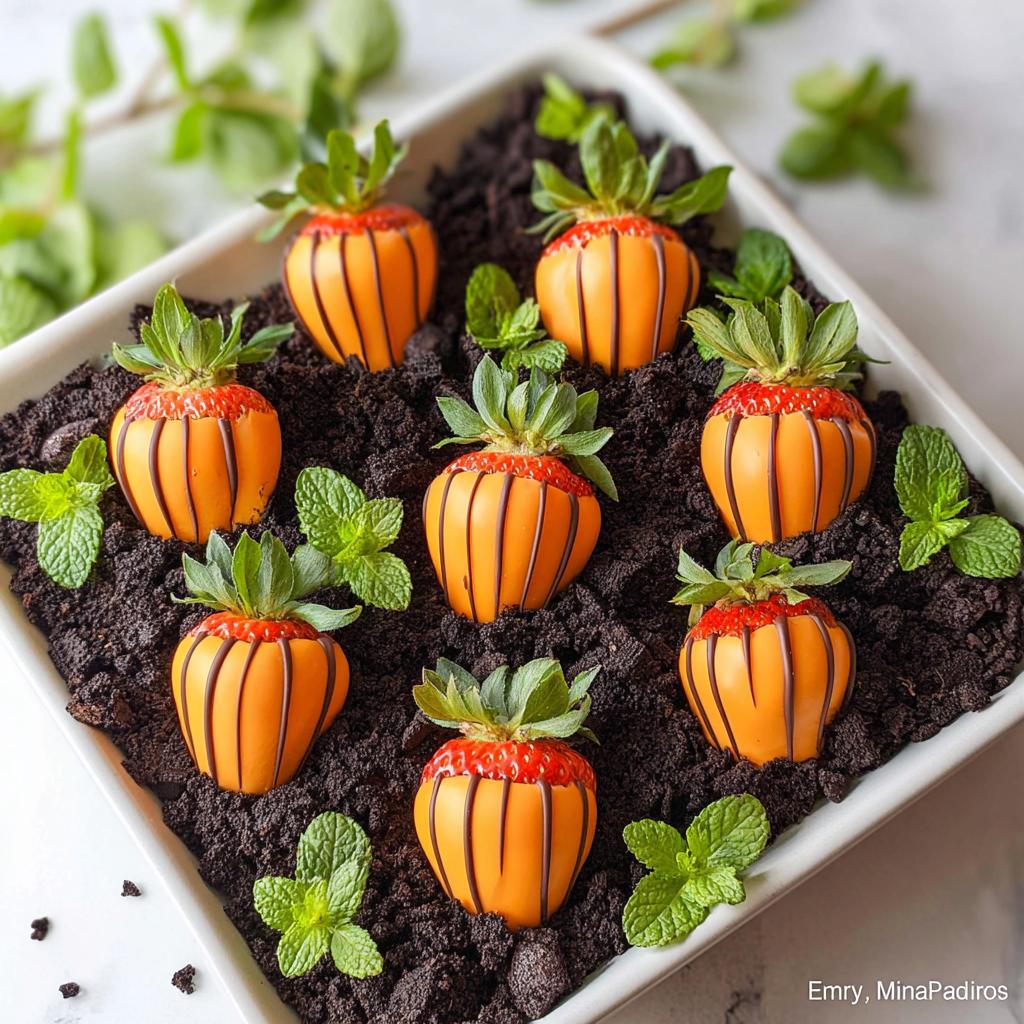
Okay, this is the fun part where it all comes together! Take your completely cooled brownies and slather that gorgeous Nutella frosting all over the top. Press down gently as you spread it. Now, sprinkle your crushed Oreo crumbs (or keto cookie crumbs) evenly over the frosting. This is our spooky, delicious “dirt”! Arrange your pretty strawberry pumpkins right on top of the “dirt.” Don’t they look amazing? Finally, tuck in a few fresh mint leaves around the strawberries – they look just like cute little pumpkin leaves and vines, completing our adorable pumpkin patch scene. Ta-da!

Tips for Perfect Strawberry “Pumpkins” (Chocolate-Dipped)
Okay, so making these little guys is pretty easy, but a few tricks can make sure they turn out absolutely perfect every single time. First off, and I can’t stress this enough: DRY STRAWBERRIES! Even a tiny bit of water can make your candy melts seize up and get all clumpy, which is a nightmare. I usually pat them down really well with paper towels and then let them air dry for a bit. Also, when you melt your candy melts, stir them gently and don’t overheat them. I once microwaved mine a bit too long and they got super thick, making them hard to dip smoothly. Just melt, stir, and if needed, add a tiny bit of coconut oil for extra smoothness. Trust me, takes them from “okay” to “wow!”
Ingredient Notes and Substitutions
We can totally tweak these little pumpkins to fit your needs! For the brownie base, if you’re keeping it keto or low-sugar, grab a keto brownie mix. It’s a lifesaver! And those orange candy melts? You can totally use sugar-free white chocolate chips and tint them orange with a little bit of oil-based candy coloring if you can’t find them already colored. For the frosting, if Nutella isn’t your jam or if you’re going strictly keto, you can swap it out for a keto-friendly chocolate spread or even just use more butter and a keto powdered sweetener. And for that yummy “dirt” topping, regular Oreos are great, but crushed keto chocolate cookies work like a charm!
Frequently Asked Questions About Strawberry “Pumpkins”
Got questions about these adorable little edible gems? I’ve got you covered! These sweet treats are pretty straightforward, but a little clarification never hurt anyone.
Can I use regular chocolate instead of candy melts?
You sure can! If you’re not a fan of candy melts or can’t find them, regular chocolate chips (milk, semi-sweet, or dark) will work. Just make sure to melt them carefully, maybe with a touch of coconut oil, to get that smooth dipping consistency. If you’re aiming for that true pumpkin orange, you’ll need to melt some white chocolate and tint it with a good quality oil-based food coloring specifically for confectionery. Regular food coloring won’t mix well!
How do I store these Strawberry Pumpkins?
These are best enjoyed the day they’re made, especially since they’re a no bake wonder and fresh berries are involved. But, if you need to make them a day ahead, store them in a single layer in an airtight container in the refrigerator. Just know that the condensation can sometimes make the chocolate coating a little less shiny. Bringing them back to room temp for about 15-20 minutes before serving helps them taste their best.
Can kids help make these?
Absolutely! These Strawberry “Pumpkins” are fantastic for getting little hands involved. They can help wash and dry the strawberries (with supervision!), stir the softened Nutella into the frosting, sprinkle the Oreo “dirt” on top, or even carefully place the mint leaves. Just make sure an adult handles the melting chocolate and piping part!
Make-Ahead and Storage Instructions
Want to get a head start on your party prep? You can totally bake the brownies and let them cool completely a day ahead. Store them in an airtight container at room temperature. The frosting can also be made ahead and kept in the fridge, just give it a good whisk before spreading it on the cooled brownies. For the strawberry “pumpkins” themselves, it’s best to dip them the day you plan to serve them for the shiniest chocolate, but they’ll hold up in the fridge for about 24 hours in a single layer. Just be aware condensation can sometimes make them a bit less sparkly! If you’re looking for more make-ahead ideas, check out my keto crockpot recipes!
Estimated Nutritional Information
While these Strawberry “Pumpkins” (Chocolate-Dipped) are a delight, keep in mind that nutritional values are approximate! They can really change depending on the specific brownie mix, candy melts, or sweeteners you use. As a general idea, one serving (which is about one chocolate-dipped strawberry on a piece of brownie) might run around XXX calories, XXg fat, XXg carbs, and Xg protein. For precise numbers, especially if you’re following a keto or low-sugar plan, it’s best to plug your exact ingredients into a nutrition calculator!
Share Your Festive Creations!
Did you whip up these adorable Strawberry “Pumpkins” (Chocolate-Dipped)? I’d absolutely LOVE to see your creations! Snap a pic and share it with me, or let me know how they turned out. Your feedback means the world!
Strawberry “Pumpkins” (Chocolate-Dipped)
Ingredients
Equipment
Method
- Preheat your oven according to the brownie package directions. Prepare a 9×13 baking pan with non-stick cooking spray.
- In a large bowl, prepare the brownie mix according to the package directions. Pour the batter into the prepared pan and spread it evenly. Bake the brownies as instructed and let them cool completely before frosting and decorating.
- Wash and dry the strawberries thoroughly. Line a large baking sheet with parchment paper.
- Place the orange candy melts in a microwave-safe bowl and microwave according to package instructions until smooth and creamy.
- Hold each strawberry by its leaves, dip it into the melted chocolate, and place it on the parchment-lined baking sheet. Let the strawberries sit at room temperature until the chocolate hardens.
- Pour any leftover chocolate into a piping bag fitted with a #4 Wilson tip. Squeeze the chocolate slowly to the tip and pipe small vertical lines around each strawberry to create the pumpkin ridges. Return the strawberries to the baking sheet to fully set.
- Microwave the Nutella in a microwave-safe bowl for about 15 seconds and stir. It should be softened but not fully melted. If it feels hot, let it cool slightly to avoid melting the butter.
- In a large mixing bowl, cream the butter until smooth and fluffy. Add the softened Nutella and mix until combined. Gradually add the powdered sugar and mix to combine.
- Add the vanilla extract, salt, and heavy whipping cream. Mix until everything is well combined. Set the frosting aside.
- Spread the Nutella frosting evenly over the cooled brownies.
- Sprinkle the crushed Oreo crumbs over the frosting to create an even layer of “dirt.”
- Arrange the strawberry pumpkins on top of the Oreo “dirt.”
- Place fresh mint sprigs between the strawberry pumpkins to resemble leaves and vines, completing your pumpkin patch scene.


