
Are you ever just craving a dessert that absolutely stops conversation when you bring it to the table? Me too! That’s why I’m so thrilled to share this recipe that merges deep, rich Devil’s Food flavor with the elegant luxury of Champagne Buttercream. We’re talking about the spectacular Gold-Dusted Bundt Cake, friends.
I still remember the first time I attempted a Bundt cake for a family gathering. It was a bright spring afternoon, and I wanted to impress my loved ones with something unique. I decided on this cake, inspired by my passion for both flavor and presentation. As the cake baked, the warm, sweet aroma filled my home, and I couldn’t help but feel the joy of creating something special.
When I unveiled it at the table, the golden shimmer really captured everyone’s attention, and the first slice revealed a moist, tender crumb that left everyone craving more. That day I learned that the right recipe—backed by sound technique—can elevate any occasion, making it memorable and delicious. I’m Mark Williams, The Keto Performance Chef, and while I usually focus on leaner cooking, mastering structure and flavor in traditional baking is truly satisfying!

Why This Gold-Dusted Bundt Cake Recipe Stands Out
Honestly, there are a million chocolate cake recipes out there, but this one is special. Trust me, you won’t want to skip the details here because they make the difference between a good cake and an unforgettable one.
- You get that super moist, intensely chocolatey Devil’s Food base that just melts in your mouth.
- The Champagne Buttercream? Wow! It adds a delicate, celebratory fizz that white cakes usually miss out on.
- Visually, it’s a showstopper! Once you add that edible gold dust, it just screams ‘special occasion.’
- It really is the perfect centerpiece for holidays or any time you want to feel fancy without spending all day fussing.
Essential Equipment for Your Gold-Dusted Bundt Cake
Before you even think about mixing that gorgeous batter, let’s chat tools! Getting your equipment ready is half the battle, especially with a detailed Bundt cake. You really don’t want to stop mid-mix because you can’t find your offset spatula.
Since we are baking this stunner in a Bundt pan, that’s your first requirement! But you’ll also need a few other key items from the kitchen arsenal to pull off the smooth finish and those delicate roses.
Here’s what you absolutely need on your counter:
- A sturdy Bundt cake pan—no shrinking from this one!
- Your stand mixer is going to do heavy lifting for the buttercream.
- Mixing bowls, of course, for keeping things separate until the right moment.
- A double boiler setup for that smooth Swiss meringue base.
- Specialty decorating tools like a pastry bag, a rose tip, and a rose nail if you want those pretty piped flowers.
- Don’t forget a small, clean fine paintbrush for applying that magic edible gold!
Ingredients for the Devil’s Food Cake Base
Okay, let’s get down to business! Before we talk about that fancy Champagne Buttercream, we have to nail the foundation. This Devil’s Food base is rich, deeply dark, and incredibly moist—no dry chocolate cake allowed in my kitchen, ever! It’s got a few liquid elements that might seem unusual, but trust me, they are responsible for that stunning texture.
When gathering your dry goods, make sure your cocoa powder is sifted. Seriously, it saves headaches later! Also, having both buttermilk and hot coffee in this recipe is the secret handshake for maximum deep chocolate flavor delivery, so don’t swap them out unless you absolutely have to.
For the cake component, here’s what you’ll need:
- One tablespoon of unsalted butter, just for greasing up our beautiful Bundt pan.
- One and a half cups of granulated sugar (about 300g).
- One and a half cups of all-purpose flour (that’s 150g, weighed out is best!).
- Half a cup of Dutch-processed cocoa powder, and make sure it’s sifted, plus a little extra for dusting the prepared pans.
- One and a quarter teaspoons of baking soda—our main lift here.
- Three-quarters of a teaspoon of kosher salt to balance all that richness.
- One large egg; room temperature is always preferable for mixing!
- Three-quarters of a cup of buttermilk for that essential tang and tenderness (180ml).
- One-third of a cup of a mild-flavored oil, like vegetable oil (80ml); this helps keep it moist for days.
- One teaspoon of pure vanilla extract—flavor boosters!
- Half a cup of hot coffee (120ml). Yes, hot! It blooms the cocoa!
- And finally, a quarter cup of rum or brandy (60ml). This adds such a subtle depth that nobody can quite place, but they’ll definitely notice it missing if it’s gone!
Once your ingredients are ready, head over to my recipe index for general tips on ingredient measurements if you need a refresher on conversions, like my general baking guide!
Crafting the Champagne Buttercream for Your Gold-Dusted Bundt Cake
Now we move on to the star of the show, the crowning glory that makes this dessert truly spectacular: the Champagne Buttercream! This isn’t just any frosting; we’re making a Swiss Meringue Buttercream here, which is why it pipes so beautifully and holds its shape on your Gold-Dusted Bundt Cake. It requires heating the egg whites and sugar gently, which stabilizes the meringue before we whip in gallons of butter.
The Champagne extract is the little wink of elegance in this recipe. It gives that festive, slightly fruity note without bringing extra liquid into the system. If you need a refresher on how temperature affects butter in frosting, check out my guide on temperatures before you start!
Here are the star players for the frosting:
- Two cups of granulated sugar (that’s 400g—yes, it’s a lot, but that’s how Swiss meringue works!).
- One cup of egg whites—try to keep the yolks out completely!
- Three cups of unsalted butter (680g), cut into pieces. It needs to be room temperature but still feel slightly cool to the touch.
- One teaspoon of pure vanilla extract.
- Five glorious drops of Champagne extract—this is the special flavor!
- Just a tiny pinch of kosher salt to keep things interesting.
For the full background on this stunning frosting combination, you can actually peek at the original inspiration from Zoë Francois, which I referenced heavily for this part of the cake: her take on the pairing.
Ingredients for Filling and Decorating the Gold-Dusted Bundt Cake
The cake layers are frosted with a slightly tart filling, and then we get to the fun part: making it shine! These elements are totally optional, but why would you skip the bling when you’re going to this much trouble? This is where your Gold-Dusted Bundt Cake really gets its dramatic flair.
You’ll need these for the decorative accents:
- One-quarter cup of cherry preserves—it’s perfect for drizzling between layers for a pop of color and tartness.
- If you want pretty pink roses, grab one small amount of pink gel-paste food coloring; just a drop or two is plenty.
- For that true shimmer, you need a small amount of edible luster dust. Gold is the winner here, obviously!
- And finally, some decorating pearls to scatter around the base for extra texture!
Don’t feel pressured; even a plain frosted cake is delicious, but these little optional extras make this Gold-Dusted Bundt Cake truly elegant.
Step-by-Step Instructions for Baking the Gold-Dusted Bundt Cake
I know the ingredient list looks long, but trust me, the actual process flows really nicely if you break it down. We start with the cake layers, then tackle that amazing Champagne Buttercream, and finally, put it all together to create our magnificent Gold-Dusted Bundt Cake. Remember, precision in your prep means less stress while baking!
First things first: let’s get those chocolate layers baked. You’ve already gathered your materials—if you’re looking for a breakdown on best practices for mixing techniques overall, refresh yourself with my guide on foolproof method execution.
- You have to start by preheating your oven to 350°F (175°C). This is non-negotiable! And remember those pans? Butter them well, then line the bottoms of your three 6-inch round cake pans with parchment paper rounds.
- In your largest bowl, whisk together the dry stuff: the sugar, flour, sifted cocoa powder, baking soda, and salt. Just get them nicely unified. Keep this aside.
- In a separate spot, whisk up the egg, buttermilk, oil, and vanilla extract. You want that to be creamy and happy before introducing it to the dry mix.
- Now, slowly add that wet mix to the dry ingredients and start stirring just until it comes together smoothly. Don’t overdo it here!
- Here comes the magic sauce: slowly pour in that hot coffee and the rum or brandy. Whisk gently until everything is totally smooth and blended. Don’t panic—this batter is supposed to be thin, almost like a heavy cream.
- Dust those prepared pans with cocoa powder now—this prevents the dark chocolate from showing white streaks of flour later.
- Divide your thin batter evenly between your three prepared pans. An offset spatula helps make the tops look flat before they go in.
- Bake for about 35 minutes. How do you know they’re done? Insert a tester; if it comes out clean, you’re good to go!
- Let them cool completely in the pans. Seriously, don’t rush this part, or they’ll crumble when you try to flip them out. Once cool, invert them gently onto 6-inch cardboard cake rounds.
Next up, that glorious Swiss Meringue Buttercream. This is where the technique really pays off. We’re whipping egg whites until they’re pale and glossy, but here’s the golden rule:
Expert Tip: When you put the sugar and egg whites over the double boiler, you MUST heat them until the sugar is totally melted. If you think it’s melted, heat it for another minute! If the mixture isn’t warm enough when you start whipping, or if it cools off too much before you add the butter, your buttercream will curdle and look soupy. It happens to everyone!
- On your stand mixer, combine the sugar and egg whites and set the bowl over your simmering double boiler, stirring constantly until the sugar dissolves completely (check for graininess!).
- Once smooth, immediately move the bowl to the mixer base and whip it on medium-high until it’s light, glossy, and cool to the touch—this can take a while!
- Once whipped and cooled, start adding your room-temperature butter, just a little bit at a time. Yes, it will look messy and curdled after about half the butter is in—keep beating! It will miraculously come back together into creamy perfection.
- When it’s smooth and gorgeous, mix in the vanilla, the special champagne extract, and that pinch of salt.
- Split the frosting: put about 2 cups in a separate bowl and mix in the cherry preserves. This is your filling! The rest stays vanilla for the exterior coat.
Assembling and Frosting the Gold-Dusted Bundt Cake
We are so close to having that show-stopping Gold-Dusted Bundt Cake ready to impress everyone. Assembly is all about neat layers. We are moving away from the classic Bundt shape here, opting for a stacked layer cake look that really shows off the frosting design later.
Take your first layer, spread about a quarter-inch layer of that cherry preserve filling right to the edge. Repeat this process for the next layer, ending with the final cake layer on top.
Time for the crumb coat! This is what guarantees that Easy Elegant finish. Slather a very thin layer of your reserved vanilla buttercream—just enough to trap those crumbs—all over the top and sides. Pop the whole thing in the freezer for about 20 minutes. It sets up fast!
After its quick chill, bring the cake out and apply a thicker, generous coat of the remaining vanilla buttercream. Now, use your metal spatula or cake comb—this is where you practice your smoothing skills! Get those sides as straight and smooth as you can manage. It’s amazing how a clean surface makes the final decoration pop.
Applying the Edible Gold and Final Touches
This is the payoff, the moment your hard work turns into an actual piece of art! We are turning this beautiful cake into a true Gold-Dusted Bundt Cake centerpiece.
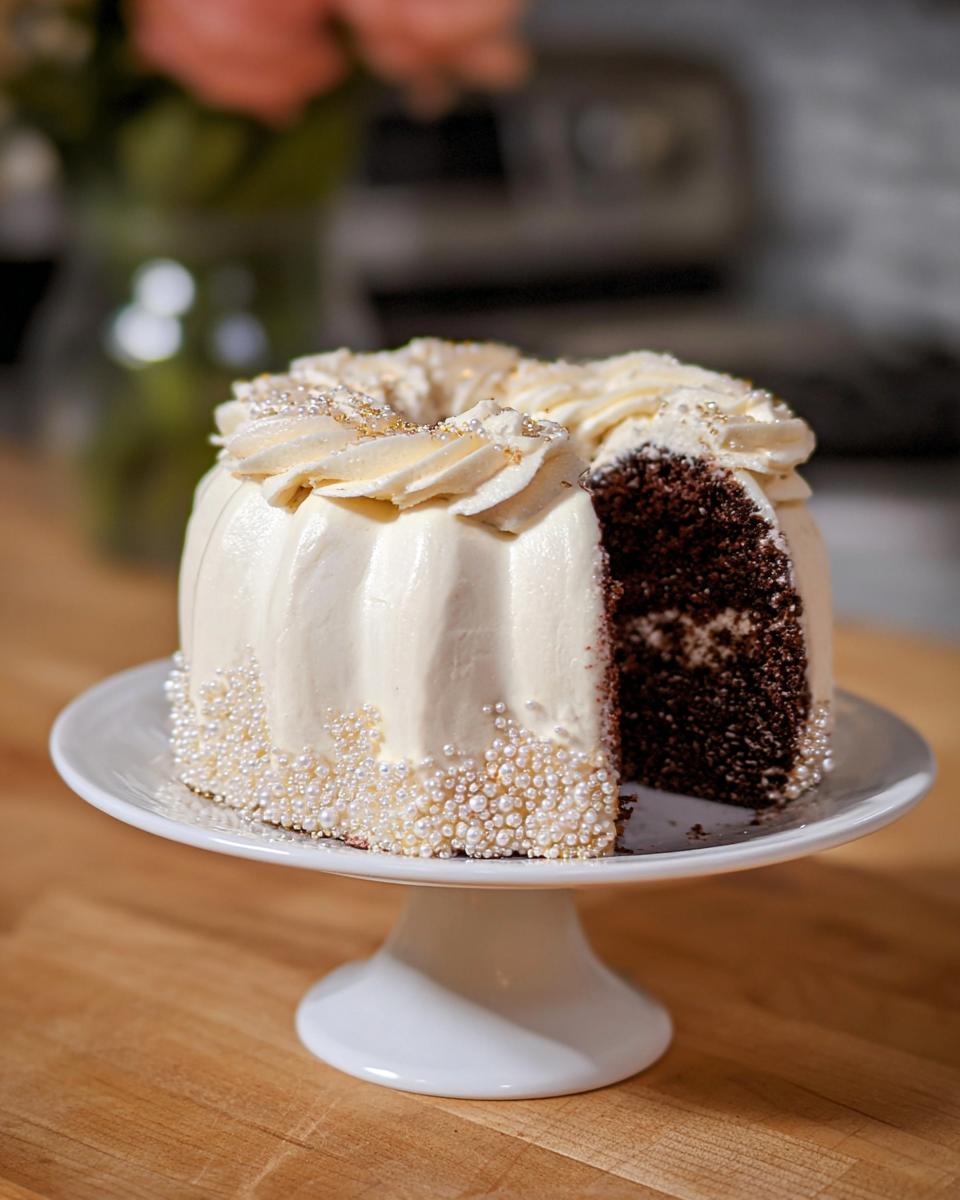
Grab your pastry bag fitted with that star tip. Pipe a neat, decorative border right around the top edge of the cake. It frames the design beautifully.
Next, the roses! Take a small bit of the remaining buttercream, tint it pink with a drop of gel coloring. Line the inside seam of your piping bag with this colored frosting before filling it with the white buttercream—this gives the roses a beautiful two-tone effect, a little trick I picked up years ago!
Use your rose tip and the rose nail to form small roses. Lift them carefully with shears and place them clustered on the top center of your cake. Don’t worry if they aren’t perfect; homemade roses are charming! If you want to stick to a simpler look, a simple glaze cascading down the sides also looks amazing.
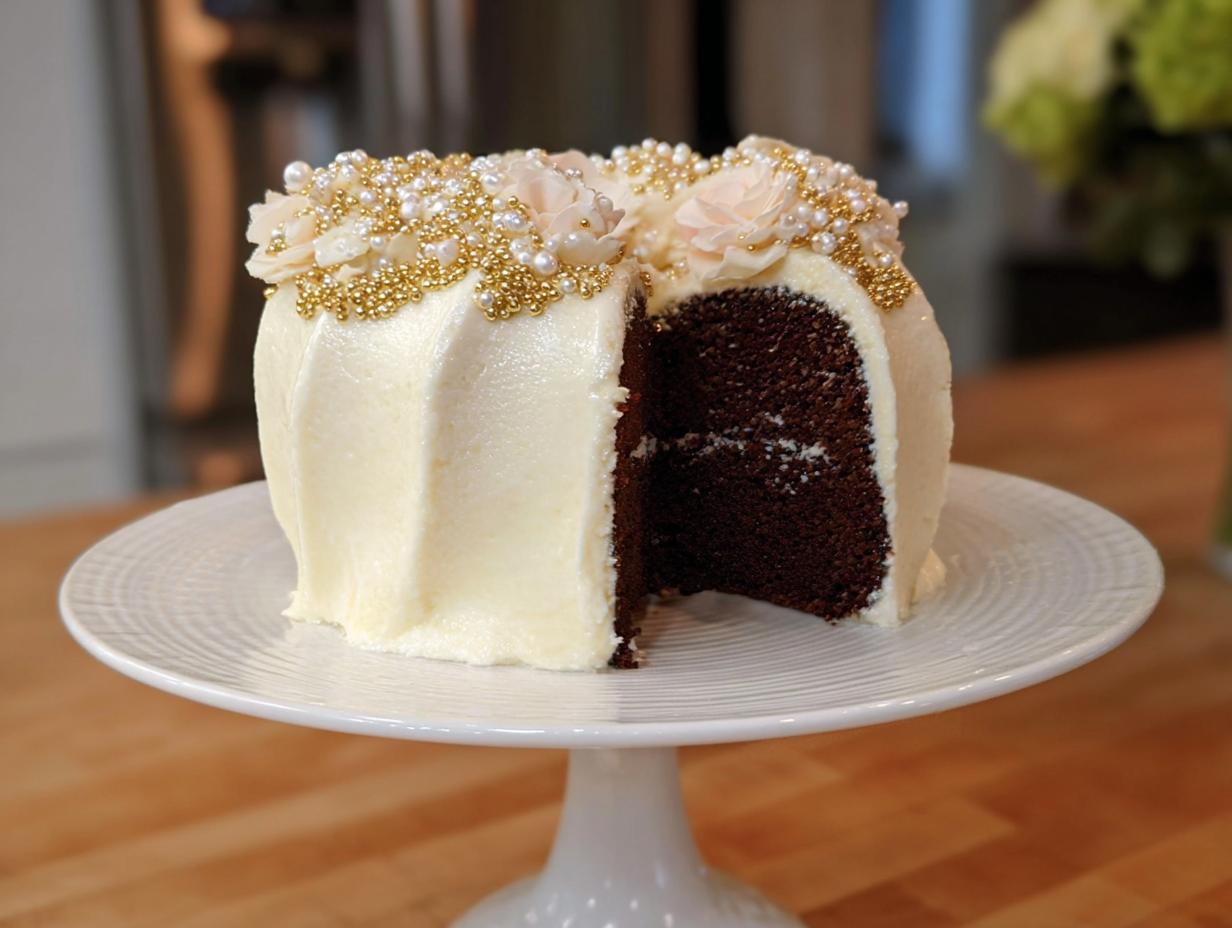
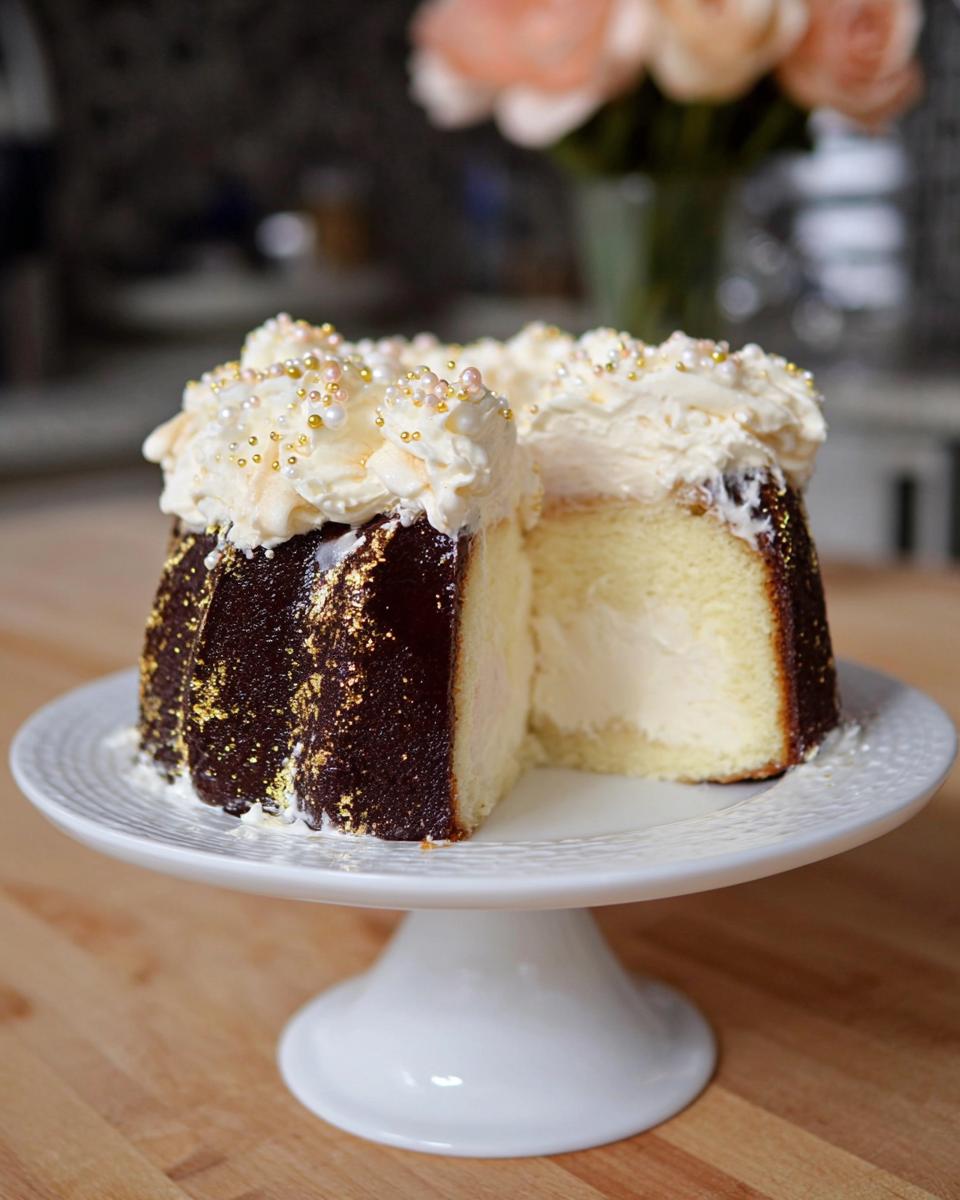
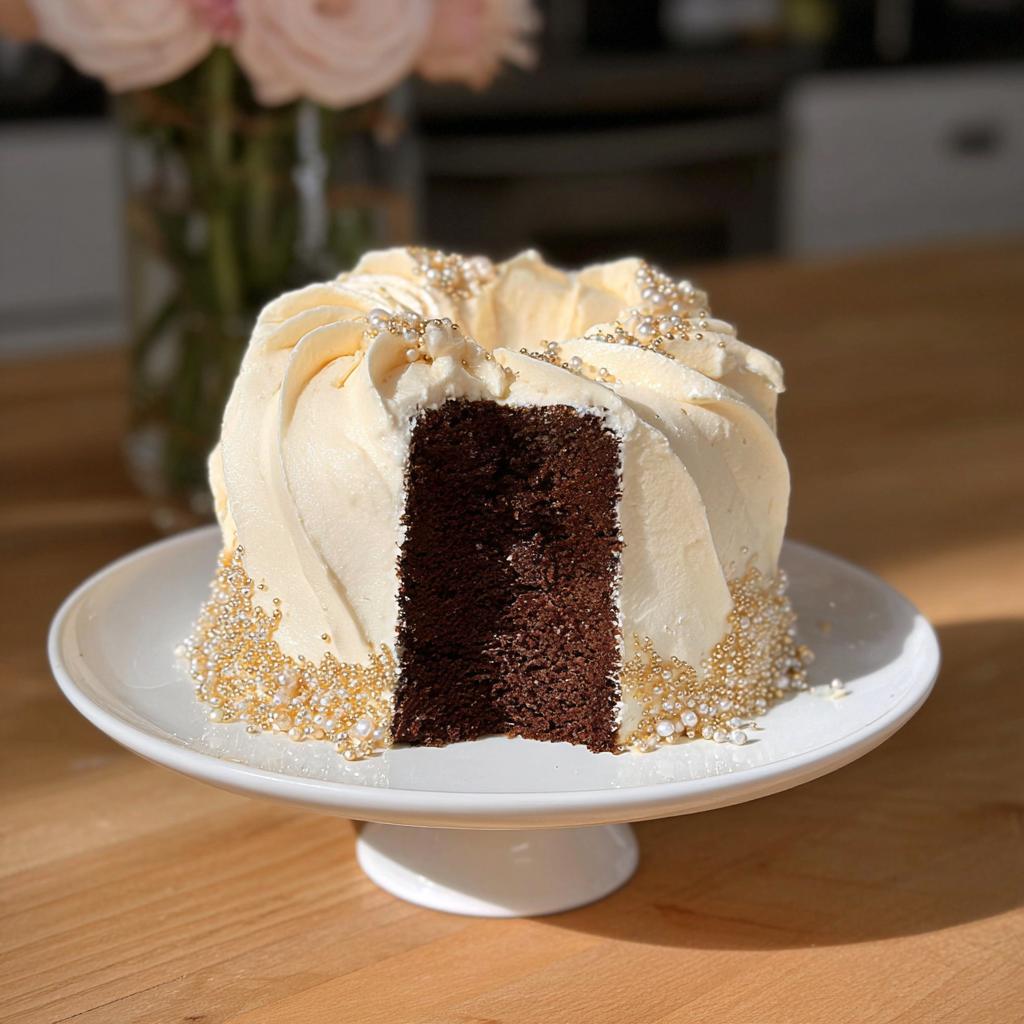
Finally, the dazzling part for your Gold-Dusted Bundt Cake: Dip your clean, fine paintbrush into the edible luster dust. Gently tap or brush the gold dust lightly over the roses and maybe a light shimmer across the top edge. Scatter those decorating pearls around the base for one last touch of luxury. Perfection!

Tips for a Perfect Gold-Dusted Bundt Cake Presentation
Look, achieving that flawless look takes a few little secrets I’ve picked up over the years. It’s not about spending more money; it’s about being smart with the time you spend. Since this cake is designed to be elegant, those small details really matter, but they don’t have to be hard!
Here are the techniques I always rely on when I want my frosted cakes to look like they came straight from a professional bakery case:
- Pan Prep is Everything: For a clean release, forget just spraying the Bundt pan. Make a paste using equal parts softened butter, shortening, and flour (some folks call it ‘cake goop’). Use a pastry brush to get this mixture into every single crevice of that pan. Then, dust heavily with cocoa powder before pouring the batter in. If you do this, the cake should practically jump out when cool!
- Buttercream Temperature Check: The number one reason a frosting job looks choppy is that the buttercream is too warm. If it starts dragging or looking oily while you’re smoothing it, just pop the whole world—cake and frosting—back into the fridge for 10 minutes! It stiffens up, and you can get those crisp, smooth sides finally.
- Applying Luster Dust Like a Pro: When you are ready to add that shimmering edible luster dust, don’t just shake it on! You need a tiny amount of an extract, like lemon or vodka, mixed with the dust to create a paint. Use that fine paintbrush I talked about earlier and glide it over the raised areas. It gives you way more control than just dusting, resulting in targeted sparkle instead of a hazy look.
- Use Your Tools Right: When smoothing the final coat, don’t press too hard on the cake. Hold your metal spatula or cake comb at a slight angle against the side of the cake, and let the tool do the work while you rotate the cake stand. If the frosting starts pulling, you’re pressing too hard. For more on technique refinement, check out my methods for executing steps flawlessly!
Serving Suggestions for Your Elegant Gold-Dusted Bundt Cake
The best part about finishing a masterpiece like the Gold-Dusted Bundt Cake is getting to share it! This cake is so rich and beautiful that it really doesn’t need much company, but I always love making a little spread to accompany it, especially when I’ve put in all that effort piping roses and glittering gold.
Because the Devil’s Food cake is so decadent and the Champagne Buttercream is sweet and bubbly, you want pairings that cut through the richness or complement that celebratory feel. This is truly my go-to idea when I need a stunning Holiday Dessert that everyone talks about.
Here are the simple things that make serving this cake feel extra special:
- Fresh Berries are a Must: I always arrange a beautiful pile of fresh raspberries and slices of ripe strawberries around the base of the cake stand. Their tartness is the perfect counterpoint to the rich chocolate.
- Coffee Hour Perfection: This cake pairs unbelievably well with a really strong cup of dark roast coffee. It grounds the sweetness of the buttercream beautifully. If you are hosting later in the day, I highly recommend checking out my thoughts on easy evening drink pairings!
- Go Bubbly: Since we used Champagne extract in the frosting, serving slices alongside a chilled glass of Prosecco or real Champagne is just a natural fit. It just elevates the whole experience.
When you slice into that Gold-Dusted Bundt Cake and everyone sees the contrast between the dark chocolate, the vanilla frosting, and maybe a flash of pink from the cherry filling, you’ll know you nailed it!
Storage and Make-Ahead Instructions for the Gold-Dusted Bundt Cake
Baking a showstopper like the Gold-Dusted Bundt Cake often means you want to do as much ahead of time as possible, right? I get it! Luckily, both the cake layers and the Swiss Meringue Buttercream are surprisingly durable, which makes planning for big events so much easier. You can definitely bake this thing a day or two ahead of your party!
If you’re planning ahead, here is my absolute favorite way to tackle this without any last-minute panic. Remember that 20-minute freezing step after the crumb coat? That’s your secret weapon for a stress-free decorating day!
Storing the Baked Cake Layers
Once those three chocolate cake layers are fully cooled—and I mean truly cool, not just room temp warm—they need to be wrapped tightly. I’m talking plastic wrap cocoon status here!
- Wrap each layer individually in plastic wrap, and then follow that up with a layer of aluminum foil. This double barrier keeps any fridge or freezer odors out and locks in that rich moisture from the oil and coffee.
- These wrapped layers keep perfectly well at cool room temperature for a full day, or you can freeze them for up to a month. Freezing is great because it actually makes the cake a little sturdier for handling during the assembly process!
If you get busy, you can check out my prepping guide for holiday sweets for inspiration on how to organize your baking schedule.
Handling the Finished Gold-Dusted Bundt Cake
Once the cake is fully frosted with the thick vanilla buttercream and decorated, we have to be a little more careful because of that delicate frosting. The structure itself is sturdy, but the decorations need care!
- Short-Term Storage (1-2 Days): If you’re just keeping it cool until the party, I find storing the assembled Gold-Dusted Bundt Cake works best in a cake carrier or a large, cool, dry spot away from direct sunlight or heat. Buttercream sometimes sweats if it goes straight into the fridge, especially with all that sugar!
- Refrigeration: If your kitchen is warm, or if you need to store it for more than two days, you’ll need the fridge. Cover it loosely with cling film, but don’t press it against the decorations. When you take it out before serving, let it sit on the counter for at least an hour so the cake layers can soften up again. Nobody likes cold, hard cake!
I usually avoid freezing the fully frosted cake simply because the buttercream and the edible gold can sometimes get a little strange looking when they thaw out, but the layers freeze like a dream!
Frequently Asked Questions About This Bundt Cake
I know diving into a fancy recipe like this often brings up a few last-minute worries. Don’t sweat it! I’ve pulled together the questions I hear most often from folks preparing to tackle this showstopper. A little planning goes a long way toward that stunning final result we’re aiming for!
Hopefully, these quick answers will give you the last little bit of confidence you need to get baking. If you have a question I missed, feel free to drop it in the comments below, or you can always reach out via my contact page!
Can I substitute the Champagne extract in the Glaze?
Absolutely, you can! If you can’t find Champagne extract or just aren’t a big fan, that’s totally fine. You can substitute it with an equal amount of clear vanilla extract or even almond extract. Just know that the flavor profile will change slightly—you’ll lose that specific lightness the Champagne adds, but it will still be delicious Swiss Meringue Buttercream. It just won’t have that “bubbly” hint!
How do I ensure my cake releases cleanly from the Bundt pan?
This is the make-or-break moment for any Bundt cake! My biggest advice is to triple-check your pan prep. Don’t just use cooking spray. You need to grease and dust it thoroughly. My favorite technique is using what I call “cake goop”—equal parts shortening, butter, and flour mixed into a paste. Use a pastry brush to physically scrub that paste into every single little groove of the Bundt pan. Then, dust it really well with cocoa powder (not flour, since this is a dark cake!). If you prep it right, the cake should practically fall out once it’s cooled down enough to handle.
Share Your Stunning Gold-Dusted Bundt Cake Creation
Wow, we made it! You have baked a rich, moist chocolate cake, whipped up delicate Champagne Buttercream, and managed to apply edible gold dust—you are officially an incredibly talented baker!
Now that your magnificent Gold-Dusted Bundt Cake is resting on your prettiest cake stand, I absolutely want to see it. Seriously, tag me! Sharing your results helps me know what recipes you love and lets others see how amazing your creation turned out.
If you tried this recipe, please take a moment to leave a rating right here on the page. Even a quick star rating helps so much! And if you have any tips or tricks you discovered along the way while decorating, drop them in the comments below—we’re all friends here, learning from each other.
I can’t wait to see your shimmering, delicious cakes!
Gold-Dusted Bundt Cake
Ingredients
Equipment
Method
- Preheat your oven to 350°F (175°C). Butter three 6-inch round cake pans and line each with a parchment paper round.
- In a large bowl, combine the granulated sugar, all-purpose flour, sifted Dutch-processed cocoa powder, baking soda, and kosher salt. Whisk together until combined. Set aside.
- In a separate bowl, whisk together the egg, buttermilk, oil, and vanilla extract until well combined. Add this egg mixture to the dry ingredients and mix until smooth. Slowly add the hot coffee and rum to the batter and whisk until totally blended and smooth, about 2 minutes. The batter will be quite thin.
- Dust the prepared pans with cocoa powder. Divide the batter evenly into the prepared pans. Spread evenly using an offset spatula. Bake until a tester inserted into the center comes out clean, about 35 minutes. Allow to cool completely in the pans. Keep covered until ready to fill and frost.
- Remove the cakes from the pans and invert onto 6-inch cardboard cake rounds.
- In the bowl of a stand mixer, combine the granulated sugar and egg whites. It will be very thick and grainy.
- Place the mixer bowl over a double boiler and stir the mixture with a rubber spatula until the sugar is completely melted. Brush down the sides of the bowl with the spatula to ensure all sugar is melted. Feel the egg mixture between your fingers to check for graininess. Once it is completely smooth, place the bowl on the stand mixer and beat with the whisk attachment on medium-high speed until it is light, fluffy, and glossy, and the bowl feels just about room temperature. If the egg whites are not cooled sufficiently, they will melt the butter when you add it.
- Once the egg whites are whipped and cooled, add the butter, 2 tablespoons at a time, beating on medium speed to combine. The mixture may look curdled and runny after adding about half of the butter; this is normal. Continue adding the rest of the butter. Once all butter is added and mixed on medium speed for about a minute, the buttercream will be creamy and glossy.
- Add the vanilla extract, champagne extract, and salt. Mix until combined.
- Place about 2 cups of the buttercream in a separate mixing bowl. Stir in the cherry preserves. Reserve the remaining buttercream for the exterior coat.
- Place one cake layer in the center of a cake turntable. Spread a 1/4-inch-thick layer of the cherry buttercream over the first layer. Repeat this with the other layers of cake and cherry buttercream, stacking them on the first layer and ending with cake.
- For the crumb coat, spread a thin layer of the reserved vanilla buttercream over the top and sides of the cake. Freeze the cake for about 20 minutes.
- Place the cake back on the turntable. Ice the cake with a thick layer of the reserved vanilla buttercream. Then, using a metal spatula or cake comb, smooth out the sides and top of the cake.
- Using a pastry bag fitted with a star tip, create a border around the top edge of the cake.
- To decorate the center of the cake with buttercream roses: Place about 2 tablespoons of buttercream in a small bowl and add a few drops of pink food coloring, if using. Fit a pastry bag with a rose tip. Use a fine paintbrush to paint a line of the colored buttercream down the seam inside the bag (for pink details on the roses). Fill the pastry bag with the plain white buttercream. Form each buttercream rose on a rose nail, then use kitchen shears to transfer it to the top of the cake. Repeat, creating as many roses as you like.
- If using, finish the cake with a light dusting of edible luster dust and a ring of edible sugar pearls around the base.


