
There’s something truly magical about a deeply rich, impossibly smooth dessert when you need a big moment of indulgence. I’ve always chased that elegant look you see in fancy bakeries, and I finally nailed it with this recipe for a show-stopping Chocolate Mousse Layer Cake. I still remember the first time I attempted this; it was for my husband’s birthday right after his diabetes diagnosis. It felt like a super late-night kitchen adventure, working with sugar alternatives, but watching those fluffy layers go together, I felt such hope!
That first slice was a complete revelation—totally decadent and satisfying. This cake proved to me that dietary shifts don’t mean waving goodbye to our favorite flavors. Now, this beautiful layered dessert is a staple in my home, reminding us that joy can always be found in the sweetest moments. Trust me, this elegant presentation is much easier than it looks!
Why This Chocolate Mousse Layer Cake Is Your Next Showstopper
You are going to absolutely love making this cake because it truly delivers that high-end bakery feel right out of your own oven. Forget complicated techniques; we are focusing on big flavor here. This recipe is designed to be your next great kitchen victory. When you see this finished and sitting on the counter, you’ll feel unstoppable!
- It’s the ultimate Crowd Pleaser; rich, dramatic, and deeply satisfying.
- The combination of moist cake and airy mousse makes for an incredible texture contrast.
- Best part? You can do most of the work ahead of time. It’s fantastic when you Make Ahead!
If you’re looking for more delicious dessert ideas, check out all my best recipes right here!
Essential Equipment for Your Chocolate Mousse Layer Cake
Okay, you absolutely need to have your tools ready for this one; being prepared makes everything smoother. We’re keeping this transparent so you know exactly what you need to gather before you even turn on the oven. I always make sure my mixing bowls are clean and my pans are ready to go.
You’ll want your oven, of course, along with eight or nine-inch cake pans lined with parchment paper circles. Don’t forget your cooling rack, a couple of large bowls for mixing, and your handheld or stand mixer for that glorious mousse! We also need a small saucepan and a bench scraper for a beautiful finish.
Ingredients Needed for the Perfect Chocolate Mousse Layer Cake
Gathering your ingredients is almost as fun as the baking itself! Getting everything measured out first, or “mise en place” like the fancy chefs say, is my secret weapon for keeping my kitchen calm. We need three major sets of ingredients for this showstopper, plus a little something extra if you want to dress it up at the end. You’ll want to see how the right items create this incredible Chocolate Mousse Layer Cake.
You can peek at other amazing recipes online, like this great dark chocolate mousse cake guide for inspiration, if you want to see alternative ideas. But honestly, stick to these measurements, and you won’t regret it!
For the Cake Layers
For the cake, room temperature ingredients are an absolute must—I mean it! This helps the batter emulsify perfectly and creates that beautifully dense but tender crumb we are looking for. You need flour (spooned and leveled, please!), sugar, cocoa powder, baking soda, baking powder, and salt. Then, we bring in the wet elements: full-fat sour cream (also room temp!), vegetable oil, eggs (room temp too!), buttermilk (room temp!), and vanilla extract. Don’t forget the hot water or coffee, which really blooms the chocolate flavor. Tossing your semi-sweet mini chocolate chips in a bit of flour first stops them from sinking to the bottom!
For the Chocolate Mousse Filling and Frosting
This mousse is what makes the cake truly luxurious! You’ll need some hot water and cocoa powder to make a thick base for the chopped quality semi-sweet chocolate. The real magic, though, comes from the heavy whipping cream—make sure it’s cold—whipped up with confectioners’ sugar and vanilla extract. We gently fold everything together, but remember, this component needs a good solid chill time before assembly!
For the Chocolate Ganache Drip
This is our final crowning glory! It’s super simple: just high-quality semi-sweet chocolate, finely chopped, and heavy cream. You heat the cream, pour it over the chocolate, and then you just have to wait patiently! It needs time in the fridge to thicken up just right so it drips beautifully down the sides of your chilled cake.
We also have optional garnishes like fresh berries or chocolate shavings if you want that extra elegant touch when serving.
Step-by-Step Instructions to Bake the Chocolate Mousse Layer Cake
Now for the fun part! Putting it all together is where you really see the magic happen. We’re breaking this down into four clear phases, so you don’t feel overwhelmed by the layers. Remember, even though this is an elegant cake, we’re keeping the process straightforward enough for a cozy weekend baking session. If you need a little extra help with organization, I wrote a fantastic guide on foolproof meal planning that totally applies to baking prep, you can check that out here!
Baking the Moist Cake Layers
First thing’s first: set your oven to 350°F (177°C). I always grease my pans really well, line them with parchment paper rounds, and then grease the parchment too—better safe than sorry! Whisk all your dry ingredients together in a big bowl. In a separate bowl, mix the sour cream, oil, eggs, buttermilk, and vanilla until they look connected. Then, slowly pour the dry stuff into the wet stuff, adding the hot coffee or water last. Mix just until it comes together—don’t grab that electric mixer and go crazy! Divide that batter carefully between your pans and bake for about 19 to 23 minutes. They’re done when the toothpick comes out clean. Don’t panic if they sink a tiny bit as they cool; that little dip will be perfect for holding the mousse later. Let them cool in the pans for a full hour before you try to pull them off the parchment paper.
Creating the Rich Chocolate Mousse
While those cakes are chilling, let’s make the mousse happen. First, whisk that cocoa powder into hot water until it’s smooth—we’re making a thick slurry. Melt your quality chocolate gently, either over a double boiler or in the microwave (watching it closely in 20-second bursts). Pour that cocoa slurry into the melted chocolate and stir it until it gets thick and shiny. Now, in a separate, clean, cold bowl, whip your heavy cream with the sugar and vanilla until you hit medium peaks—you want it fluffy but not stiff! The most important part? Gently fold that chocolate mixture into the whipped cream. You have to be gentle here so you don’t knock out all that air! Pop this wonderful mousse in the fridge for at least two hours. Seriously, don’t skip the chill time!
Assembling Your Chocolate Mousse Layer Cake
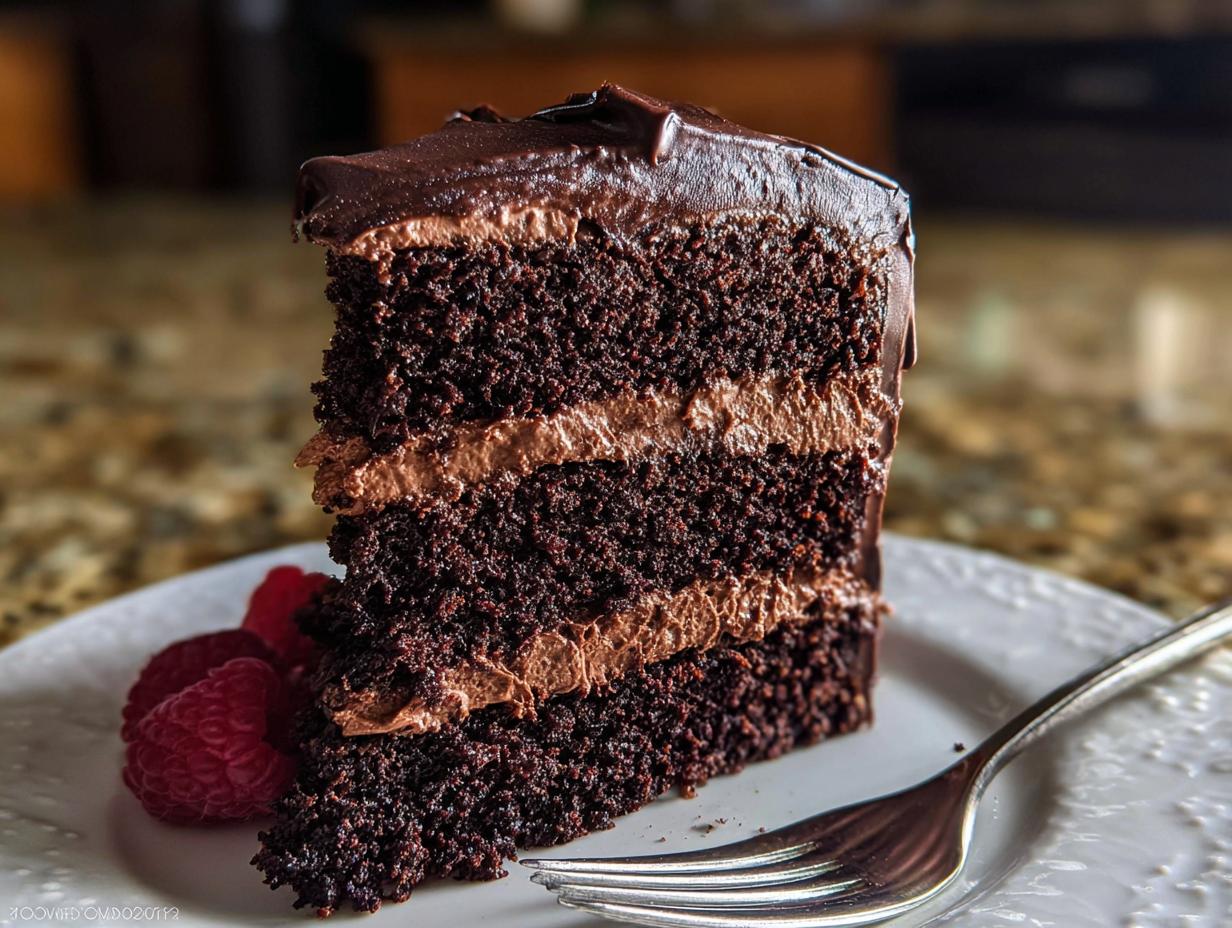
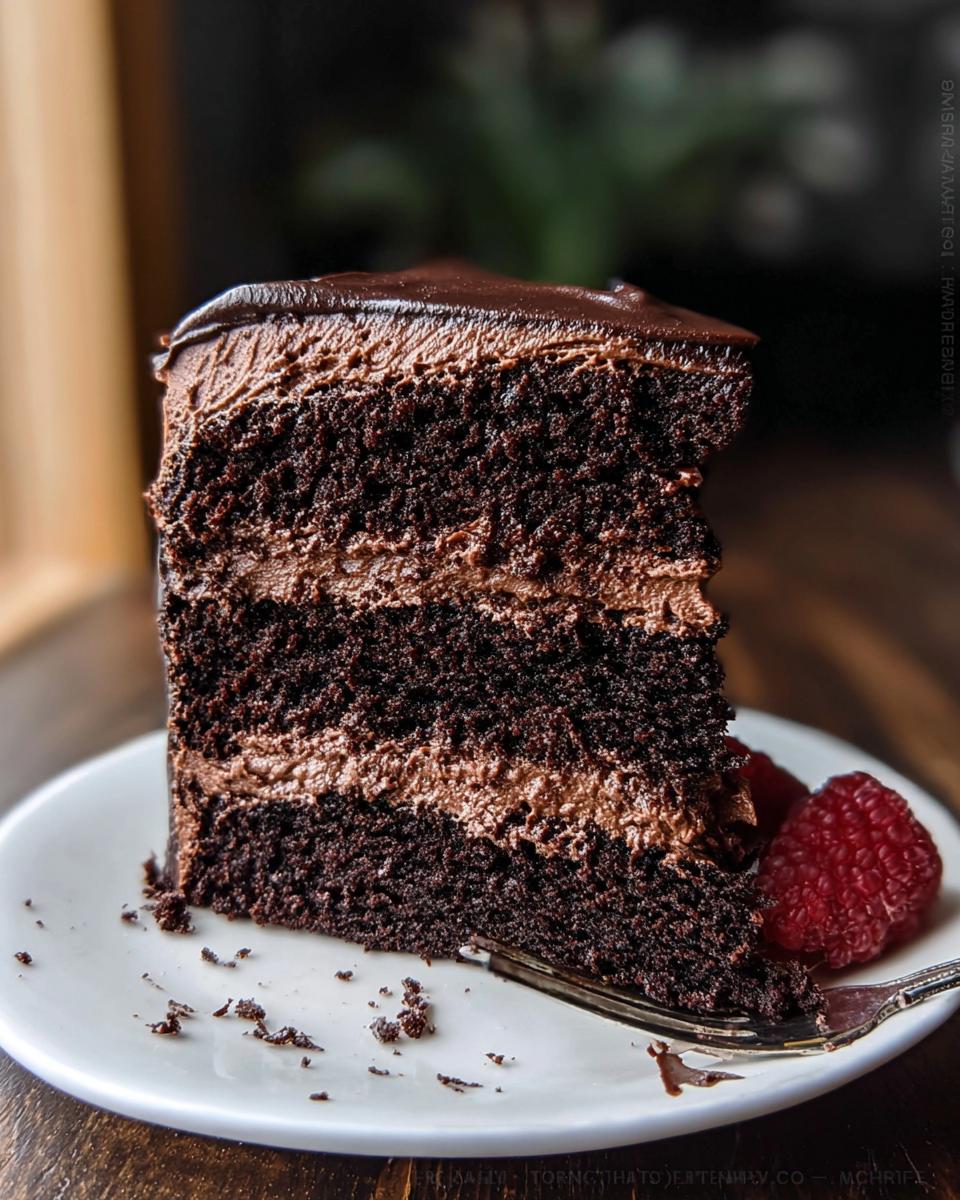
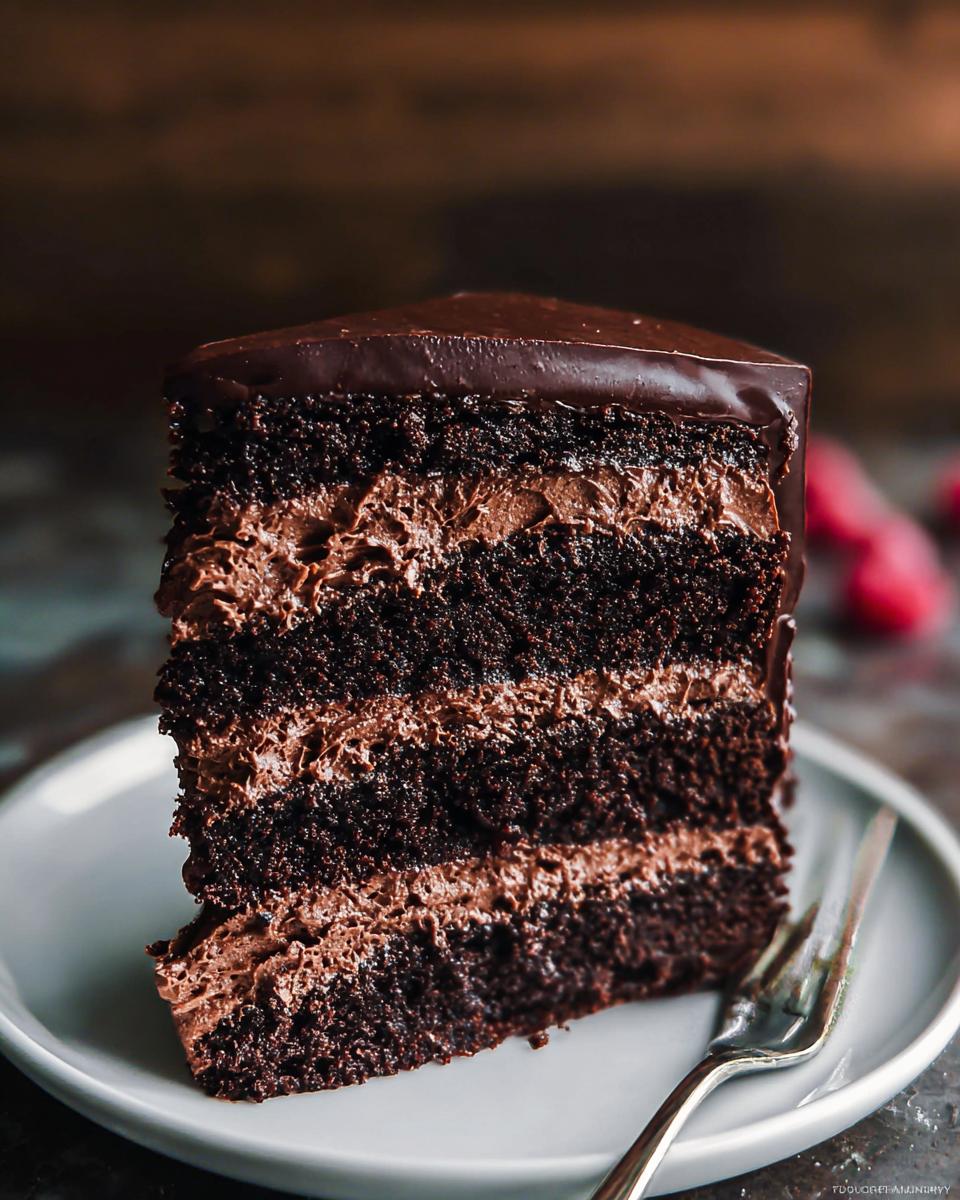
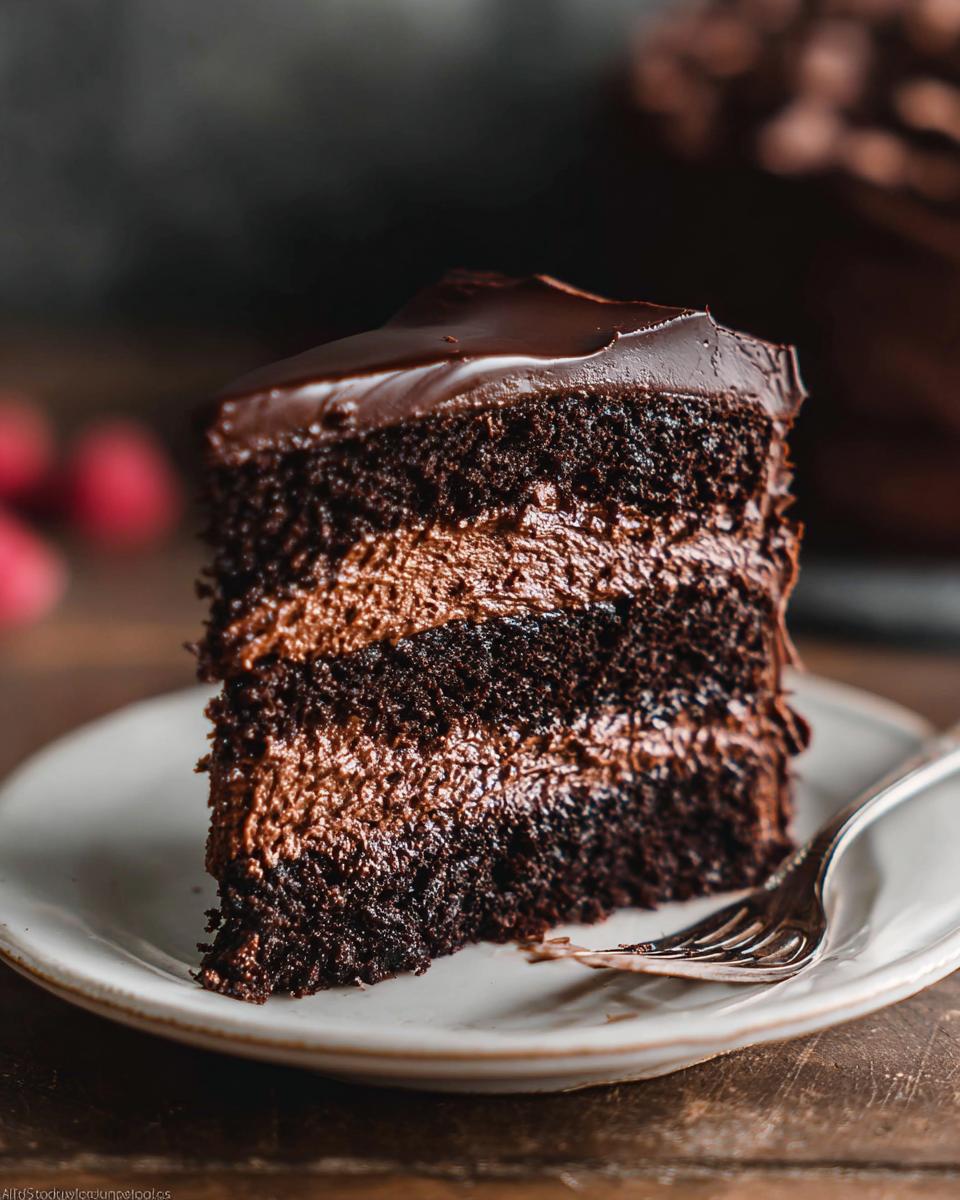
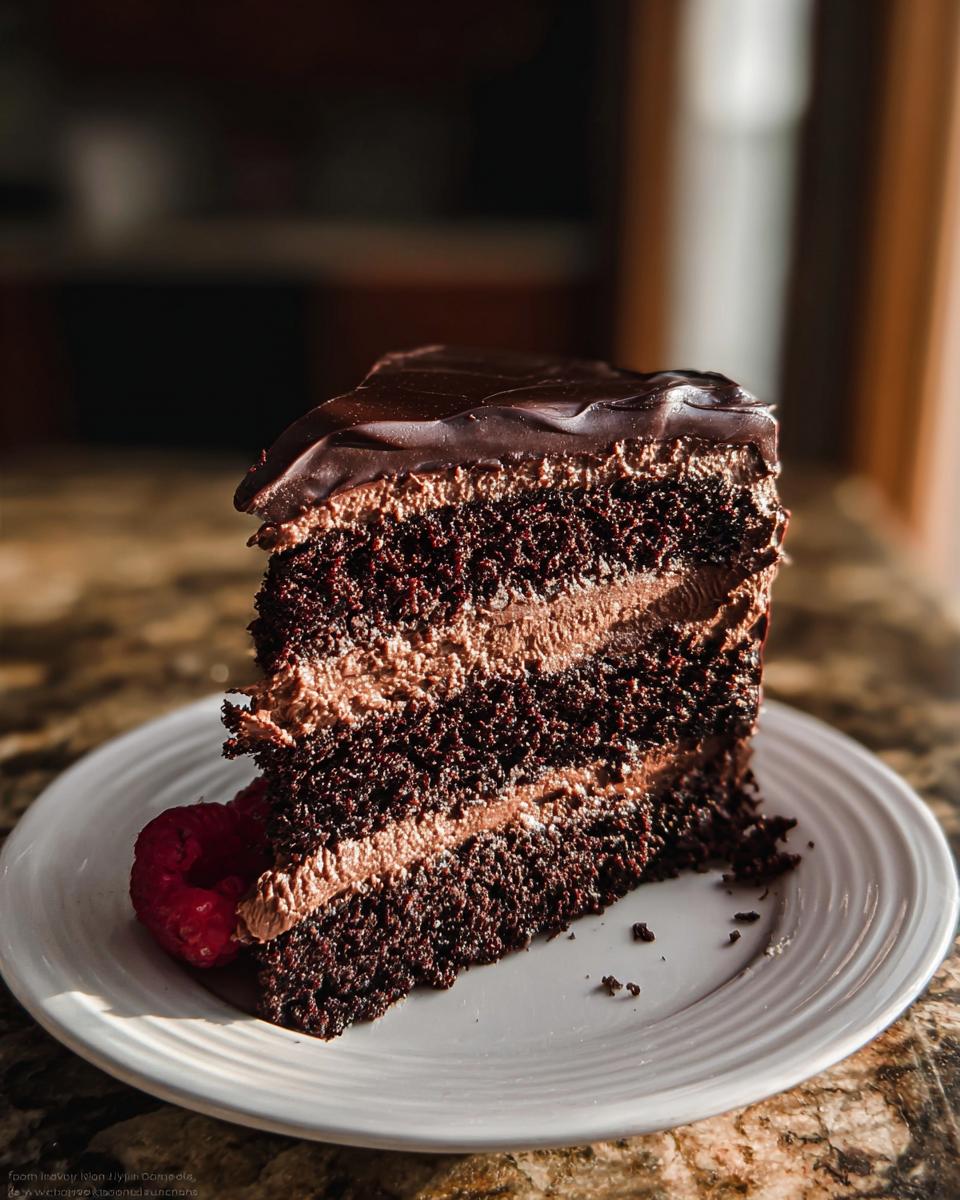
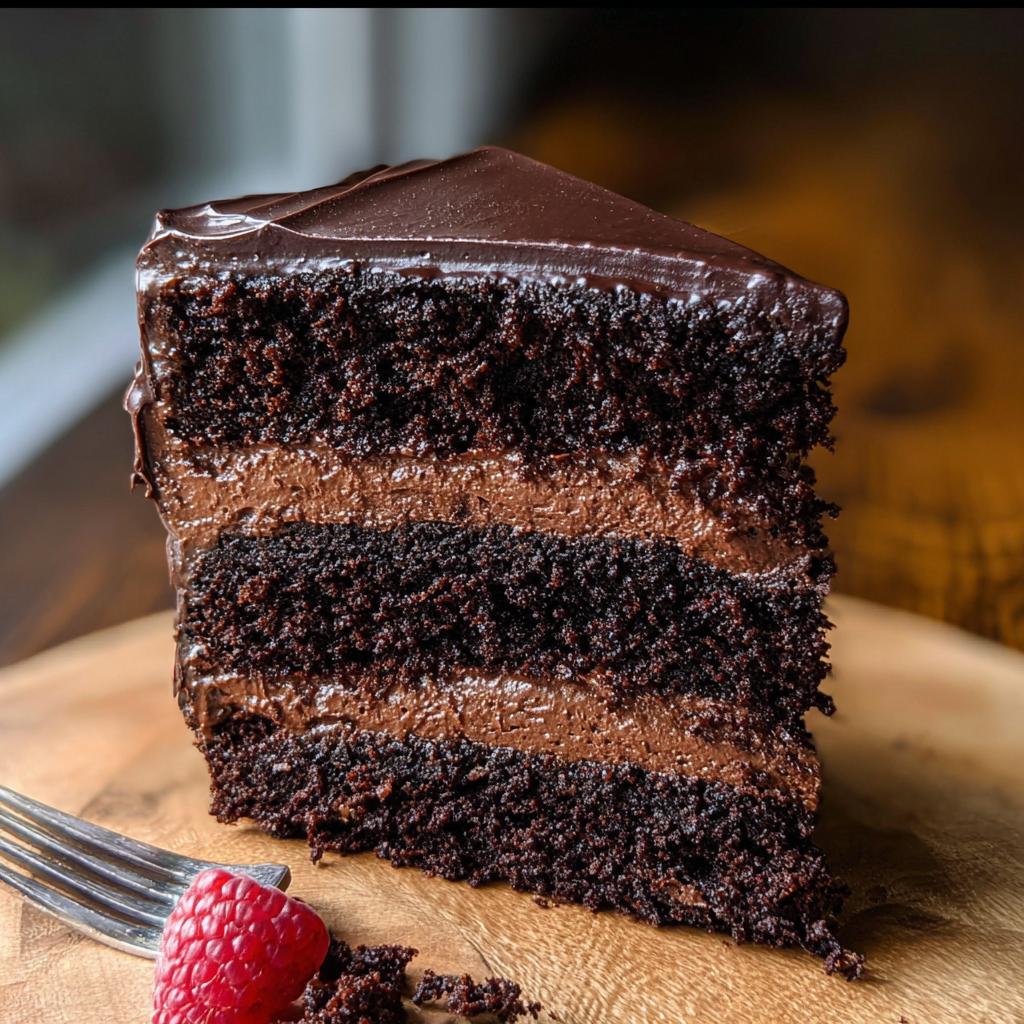
Once the cake layers are totally cool, use a serrated knife to level off any domed tops so your layers sit flat—this is crucial for stability. Place your first layer on your serving plate. Spread about 1.5 cups of chilled mousse over it perfectly. Place the next layer on top, upside down this time, and top with another big layer of mousse. Repeat this until all four layers are stacked. Now, take the remaining mousse and spread a thin layer over the very top and sides. This is the crumb coat! It traps any loose crumbs. Pop the whole thing back in the fridge for at least an hour, or until that coat is firm to the touch.
Finishing with Smooth Chocolate Ganache
While your cake is firming up its crumb coat, we make the ganache. Heat up your heavy cream until it barely simmers—don’t let it boil over! Place your chopped chocolate in a bowl and pour that hot cream right over the top. Let it sit for a few minutes undisturbed so the heat can do the work. Then, start stirring slowly from the center until it’s completely smooth and glossy. It will look too thin at first, but you need to pop it in the fridge for about 30 minutes so it thickens up nicely. Once it’s the right consistency—drizzly but not watery—pour it right over the center of your chilled cake. Use your icing spatula to gently push it to the edges so it flows down nicely. Add your fresh berries or shavings now, while you still can!
Tips for a Perfect Chocolate Mousse Layer Cake Every Time
Baking this kind of elegant cake can feel intimidating, but I promise you, a few small details are the difference between good and *spectacular*. I pored over my notes to pull out the tips that ensure success, especially when dealing with special ingredients. You’ve got this!
First off, please don’t try to cheat on the cocoa powder in the cake layers. I recommend using natural cocoa powder; if you use Dutch-process only, the flavor profile totally changes. And remember that buttermilk? If you’re out, it’s so easy to whip up! Just put a teaspoon of white vinegar or lemon juice into your measuring cup, then fill it up to the half-cup line with regular milk. Let it sit for five minutes until it curdles a tiny bit. That’s your homemade substitute!
Also, let me quickly mention that quality counts for the chocolate in the mousse and ganache. If you can manage it, use baking bars instead of chips for the smoothest melt. For more of my deep dives into ingredient temperature and maximizing flavor, take a look at my guide on essential cooking temperatures here!
Make Ahead and Storage for Your Chocolate Mousse Layer Cake
The absolute best thing about this luxurious Chocolate Mousse Layer Cake is that it’s built for advance planning!
You can totally bake those cake layers up to two days ahead. Just wrap them tightly once they are cool—I mean really tight—and keep them in the fridge. If you’re planning way out, you can safely freeze the wrapped layers for up to three months! That’s my secret for stress-free holiday baking.
The mousse and the ganache can also be prepped a day or so ahead and stored cold. Just remember that when you go to assemble, you need to let those components warm up slightly so they aren’t rock hard. Getting ahead of the game means all you do on party day is stack and drizzle. You can find more of my best meal prep-friendly ideas in this guide!
Frequently Asked Questions About This Chocolate Mousse Layer Cake
It’s normal to have questions when you are tackling an Elegant Cake like this one, so let’s clear up a few things before you start layering! Don’t let the multiple steps scare you; once you see how each component comes together, you’ll realize this is a totally manageable recipe that will definitely be a Crowd Pleaser.
Can I substitute the heavy cream in the mousse?
You sure can try, but honestly, heavy cream is what gives you that light, airy texture we want in a true mousse! If you substitute it with a lighter cream or non-dairy alternative, your mousse will be denser and won’t whip up as high. It will still taste great, but the signature fluffy texture of this Chocolate Mousse Layer Cake might change.
How do I achieve a super smooth finish on my Chocolate Mousse Layer Cake?
This is all about temperature control! The absolute key is making sure your cake layers are completely chilled after you apply that first crumb coat of mousse. If the cake base is cold, the final layer of ganache goes on smoothly and sets up beautifully without melting or dragging the mousse underneath. A quick icing spatula helps too!
Is this Chocolate Mousse Cake suitable for large gatherings?
Yes, it absolutely is! This recipe is perfectly portioned to yield 12 generous servings of delicious Chocolate Mousse Cake. It looks so impressive once chilled and decorated that it easily serves as the stunning centerpiece for any birthday or gathering you host.
Serving Suggestions for Your Layered Dessert
Because this chocolate mousse layer cake is so rich, you want serving suggestions that cut through that decadence perfectly. I love keeping things simple so the cake remains the star of the show. A warm cup of black coffee or an espresso is just the ticket for balancing that deep chocolate flavor.
If you want to add something sweet on the side, a small dish of tart, fresh raspberries or strawberries really brightens up the plate. It’s elegant, simple, and lets the layers shine! For more ideas on creating a full dining experience around your dessert, you can see what I recommend in my guide to perfect pairings.
Sharing Your Chocolate Mousse Layer Cake Creation
Wow, you did it! You conquered the layers, you tamed the mousse, and now you have this incredible, elegant feast sitting in front of you. I’m honestly so proud of you for taking on this spectacular Chocolate Mousse Layer Cake. This is the moment where you get to relax and enjoy the fruits of all your careful labor.
Now, here’s the thing—I absolutely live to hear about your kitchen adventures! Don’t be shy; tell me how it went in the comments below. Did the ganache drip perfectly? Did your family freak out when they saw it? Please leave a rating for the recipe if you loved it!
And please, snap a picture of your finished layered dessert! I always love seeing how you all decorate, whether you stick to my simple garnish ideas or go all out with powdered sugar stencils. Tag me when you share it on social media so I can cheer you on!
Chocolate Mousse Layer Cake
Ingredients
Equipment
Method
- Preheat your oven to 350°F (177°C). Grease four 8-inch or 9-inch cake pans, line them with parchment paper rounds, and grease the parchment paper. This helps the cakes release easily.
- In a large bowl, whisk together the flour, sugar, cocoa powder, espresso powder (if using), baking soda, baking powder, and salt. Set this dry mixture aside.
- In another large bowl, use a mixer to combine the sour cream, oil, and eggs on medium-high speed until blended. Add the buttermilk and vanilla extract and mix until combined. Pour the dry ingredients into the wet ingredients, add the hot water or coffee, and mix on low speed until just combined. Gently fold in the floured mini chocolate chips, if you are using them. Divide the batter evenly among the prepared pans.
- Bake for 19–23 minutes. Baking times can vary, so check for doneness by inserting a toothpick into the center; it should come out clean. Let the cakes cool in the pans on a cooling rack for 1 hour. Run a knife around the edges to loosen the sides, then remove the cakes from the pans. Peel off the parchment paper and place the cakes on the rack to finish cooling completely. The cakes may sink slightly in the middle as they cool, which is normal.
- To make the chocolate mousse: In a small bowl, whisk the hot water and cocoa powder until smooth. Melt the chopped chocolate using a double boiler or in the microwave in 20-second intervals, stirring between each, until smooth. Pour the hot water and cocoa mixture into the melted chocolate and stir until thick and smooth. Set aside. In a large bowl, whip the heavy cream, confectioners’ sugar, and vanilla extract on medium-high speed until medium peaks form, about 3 minutes. Gently fold the chocolate mixture into the whipped cream until just combined; do not overmix. Cover the mousse and refrigerate for at least 2 hours or up to 2 days.
- Assemble the cake: Level the cake layers if needed by slicing off the tops with a serrated knife. Place one cake layer on your serving plate. Spread about 1.5 cups of chocolate mousse evenly over the top. Add the second cake layer, upside down, and spread another 1.5 cups of mousse. Add the third cake layer, right side up, and spread with mousse. Top with the final cake layer. Spread the remaining mousse over the top and sides of the cake for a crumb coat. Use a bench scraper to smooth the sides. Refrigerate the cake for at least 1 hour and up to 4 hours.
- While the cake is chilling, prepare the chocolate ganache: Place the chopped chocolate in a heat-proof bowl. Heat the cream in a small saucepan over medium heat until it just begins to simmer. Pour the warm cream over the chocolate and let it sit for 2–3 minutes. Stir slowly with a metal spoon or spatula until the chocolate is melted and the mixture is smooth. Refrigerate the ganache for at least 30 minutes or up to 1 hour to thicken.
- Pour or spoon the thickened ganache over the chilled cake. Smooth the top and sides with an icing spatula. Add optional garnishes like fresh berries or chocolate shavings. Serve the cake immediately or chill, uncovered, for up to 4–6 hours before serving. The cake can be served at room temperature or chilled. Cover any leftover cake tightly and store in the refrigerator for up to 5 days.


