
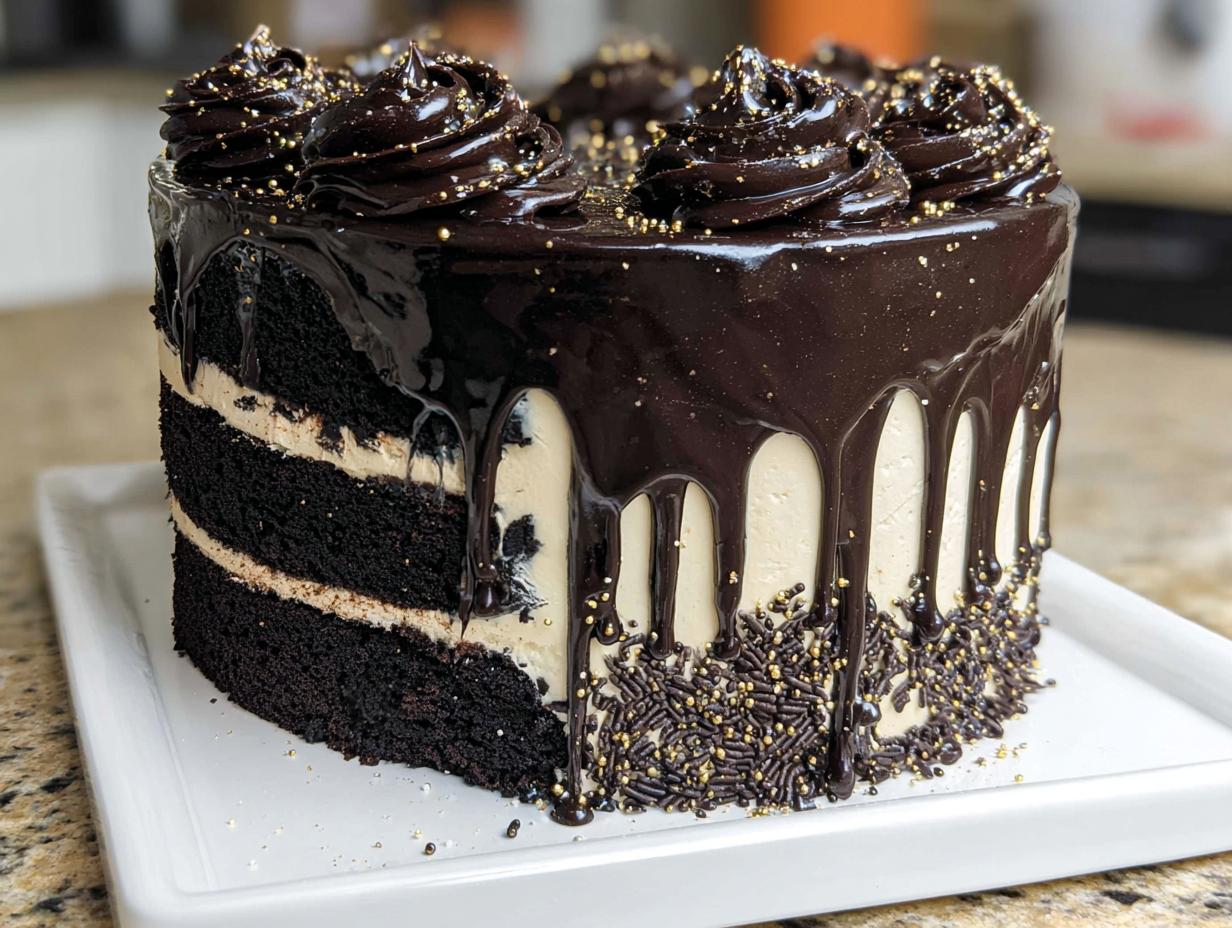
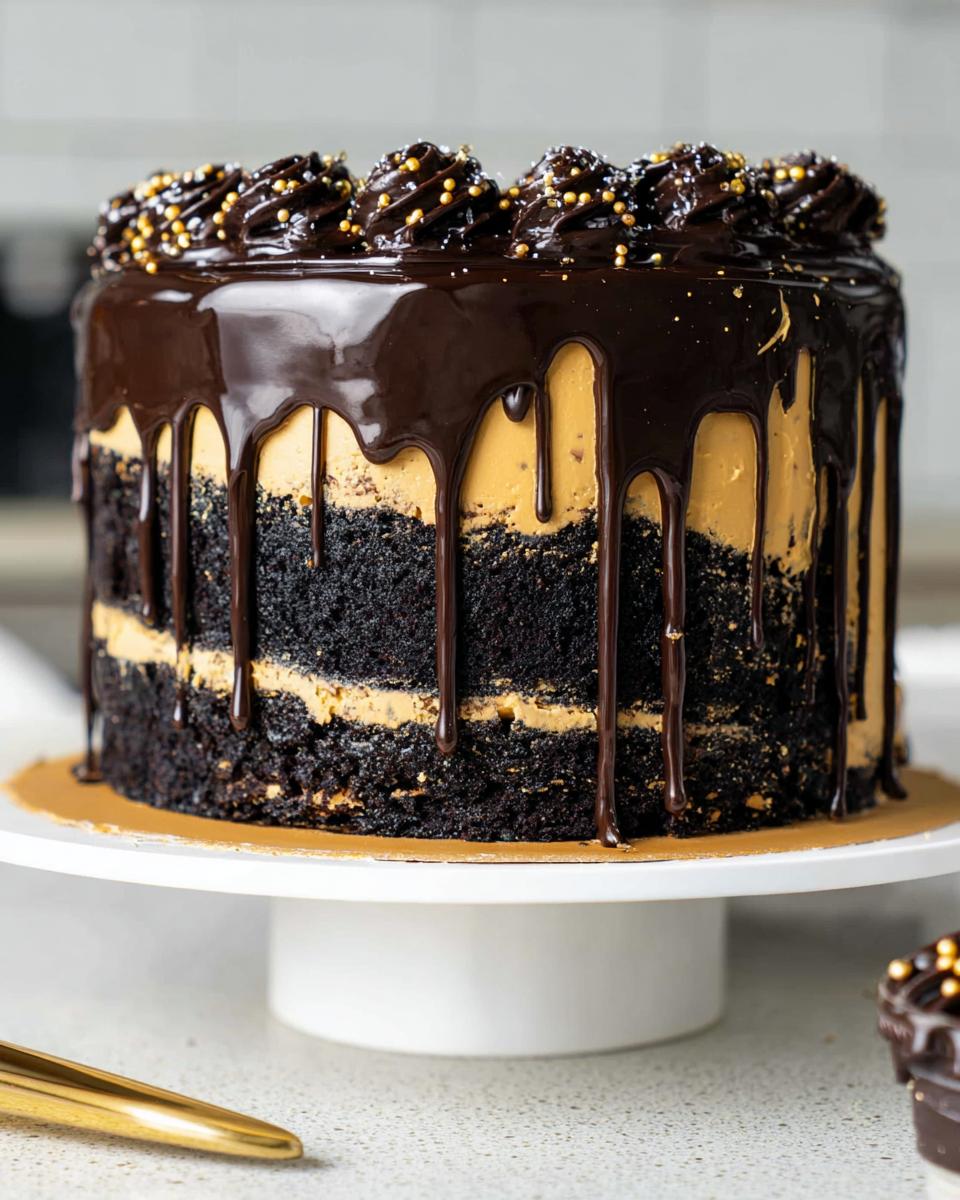
If you’re anything like me, you live for those show-stopping desserts—the ones that make everyone stop scrolling and say, “Wow, I need that recipe!” Well, today we’re diving into pure drama with a cake that’s guaranteed to be the centerpiece of any celebration: the luxuriously elegant **Black and Gold Drip Cake**. I still remember the day I decided to create my first Black and Gold Drip Cake for a friend’s milestone birthday. I was both nervous and thrilled as I carefully layered the cake and prepared the glossy ganache—it felt like a delicious science experiment! When I finally drizzled the gold and black chocolate over the top, I couldn’t believe how beautiful it looked. That cake not only tasted amazing but also became a lasting memory of our friendship. Trust me, you can master this look too!
Why This Black and Gold Drip Cake Recipe Stands Out
Look, there are beautiful cakes, and then there are cakes that bring the entire room to a hushed standstill. This recipe does that! We’re not just making cake here; we’re building a dramatic dessert experience. It’s perfect for those big moments when you want your baking to shout elegance.
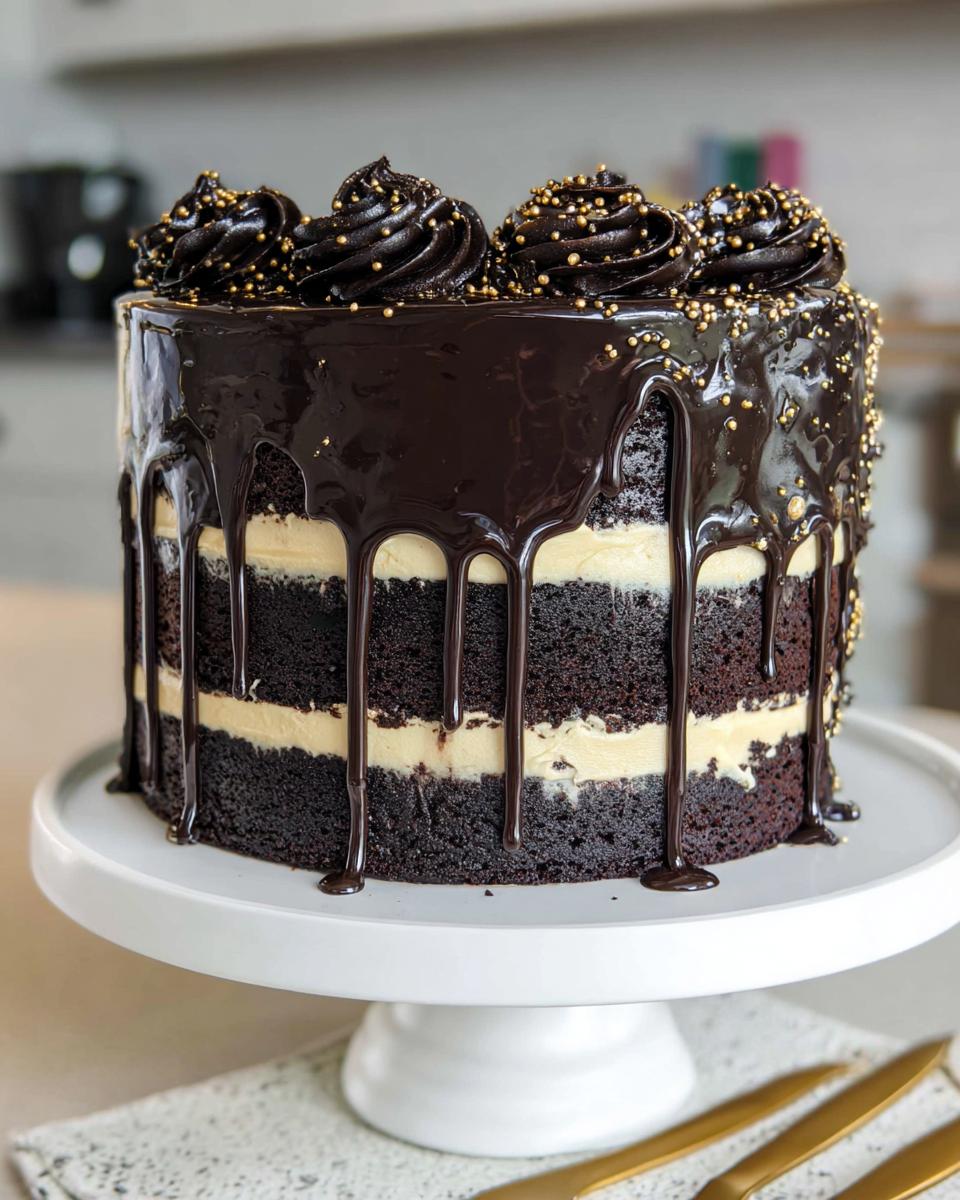
- Incredible Depth of Flavor: We use black cocoa powder, which sounds intense, but trust me, it gives the cake layers this deep, almost Oreo-like richness that pairs perfectly with dark chocolate buttercream. It’s sophisticated, not just sweet!
- The Showstopper Factor: Let’s be honest, the visual payoff is huge. This design looks like it came straight out of a high-end bakery, but you made it right in your own kitchen.
- Perfectly Balanced Textures: The cake layers are surprisingly moist, which sets up beautifully against that creamy, rich buttercream. Everything melts just right when you take a bite.
- Versatility for Any Event: Whether you’re celebrating a huge anniversary or looking for amazing New Year Cake Ideas—this dramatic look always fits the bill.
Stunning Presentation for Any Party Theme
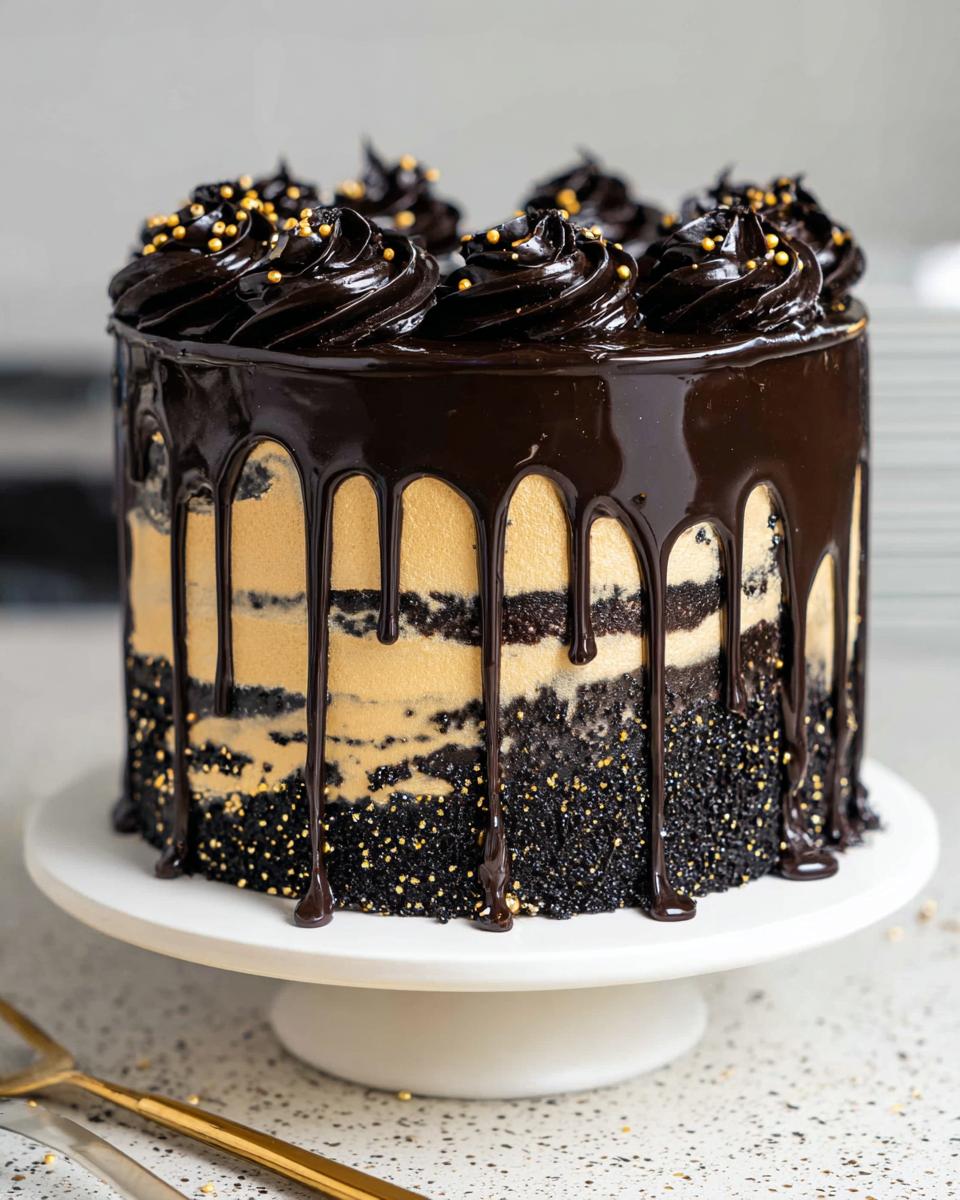
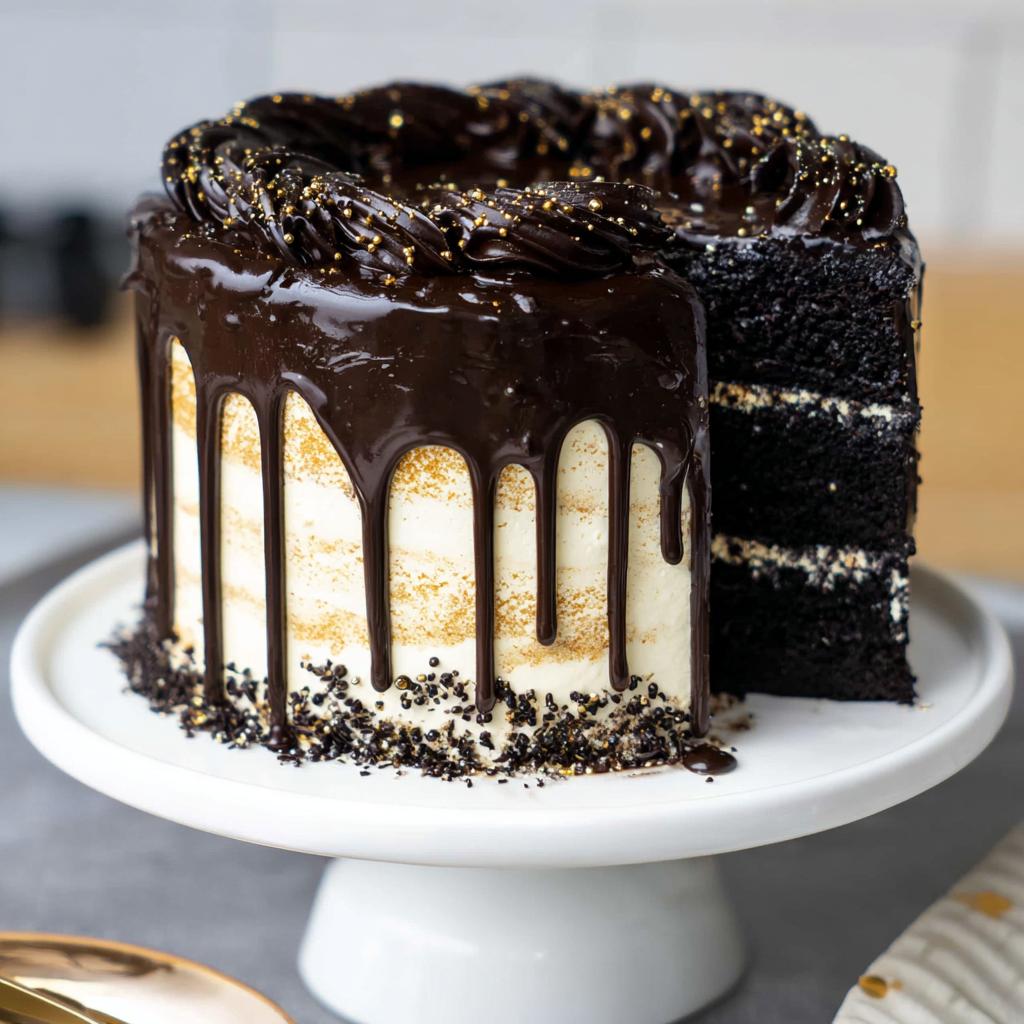
This cake is basically a blank canvas dressed in its finest attire. Because the colors are so classic—black and gold—it transforms to fit whatever mood you’re creating. Think New Year’s Eve glam, a fancy golden anniversary, or even a dramatic birthday bash. It becomes the immediate focal point on the dessert table. You don’t need much else when the cake itself is this striking!
Achieving the Perfect Black and Gold Drip Cake Finish
The real trick here is that luscious chocolate ganache drip. We want it glossy, we want it dark, and we want it to fall perfectly down the sides. Getting that smooth, controlled drip is the signature move for any successful Drip Cake. Once that dark base is set, the gold pops like magic. We’ll walk through exactly how to mix that ganache so it’s the perfect consistency for your Black and Gold Drip Cake.
Essential Equipment for Your Black and Gold Drip Cake
Now listen, you can have the best recipe in the world, but if your tools aren’t up to the job, you’ll get frustrated fast! For a showstopper like this, getting the right scaffolding in place makes all the difference. Think of these tools as your secret weapons for achieving that professional, clean finish. We need precision for decorating, especially for the drip effect!
Don’t worry if you don’t have a huge mixer; a strong hand mixer will work for the buttercream, but if you’re doing this often, investing in a stand mixer is a game-changer. For this project, you absolutely need the following items ready to go before you even preheat the oven:
- You’ll need 8-inch cake pans—three of them, so you can bake nice, even layers without stacking too much batter!
- A spinning cake stand. Seriously, this is non-negotiable for getting that gorgeous, even coat of frosting and perfectly placed drip line.
- A sturdy 10-inch greaseproof cake board to build your cake on; you need that extra space around the edges.
- A large offset spatula. This is how you get those smooth, gallery-worthy sides on the buttercream.
- A bench scraper. You use this right after the spatula to make the sides laser-straight before chilling.
- An electric hand mixer or stand mixer. Essential for creaming that butter properly for the frosting.
- A small piping bag and an open star frosting tip. These are for adding that pretty border swirl right on top where the gold accents shine.
Having this gear set up beforehand means less panic when you’re trying to work quickly with cold buttercream. Trust me, prepping your tools is just as important as prepping your ingredients!
Ingredients Needed for the Black and Gold Drip Cake
Okay, now let’s talk supplies! When you’re making something as dramatic as a Black and Gold Drip Cake, ingredient quality really shows through. Since we are going for that super dark color and rich flavor, the black cocoa powder is non-negotiable—it’s what makes the cake look so deep and moody! Remember, everything should be close to room temperature unless I specify otherwise; it helps everything combine beautifully, especially for the layers.
We’ve broken the list down so you know exactly what goes into the cake, what goes into the frosting, and what makes that shiny drip. Before you start shopping, check out this guide on ingredient temperatures—it makes a huge difference!
For the Black Cocoa Cake Layers
This is the base, and it comes together so fast! Just make sure you have your warm water ready to go.
- 2 cups (260g) all-purpose flour
- 2 cups (400g) granulated sugar
- 3/4 cup (75g) black cocoa powder
- 2 tsp baking powder (8g)
- 1 1/2 tsp baking soda (9g)
- 1 tsp fine salt (6g)
- 1 cup warm water (240g)
- 1 cup buttermilk, room temperature (240g)
- 1/2 cup vegetable or canola oil (110g)
- 2 large eggs, room temperature (112g)
- 2 tsp vanilla extract or vanilla bean paste (8g)
For the Black Dark Chocolate Buttercream Frosting
This frosting needs to be stiff enough to hold its shape, so don’t skimp on the chilling time later! The melted chocolate cools down and adds structure.
- 2 cups (4 sticks) unsalted butter, room temperature (454g)
- 1 cup black cocoa powder (100g)
- 1 tsp vanilla extract or vanilla bean paste (4g)
- 1/2 tsp fine salt (3g)
- 4 cups powdered sugar (500g)
- 1/2 cup heavy whipping cream, room temperature (120g)
- 1 cup semi-sweet chocolate chips, melted and cooled (180g)
For the Black Chocolate Drip
This is the star of the show! Getting the consistency right here is crucial so you get those lovely, controlled rivulets down the side of your cake.
- 1/2 cup semi-sweet chocolate chips (95g)
- 1/3 cup heavy whipping cream, room temperature (80g)
- 1 squirt black gel food coloring
Step-by-Step Instructions to Create Your Black and Gold Drip Cake
Alright, the planning is done, the ingredients are measured—now for the fun part! This is where we turn all those gorgeous ingredients into the show-stopping Black and Gold Drip Cake we dreamed about. Don’t rush the chilling phases, though; they are absolutely critical for that clean, professional look. This whole sequence might seem long, but each step flows right into the next. If you want a truly foolproof bake, I really recommend checking out this guide on making things foolproof; the principles of precision really apply here!
Baking and Cooling the Cake Layers
First things first, crank that oven up to 350 F/ 175 C. You’re going to prep and grease three of those 8-inch cake pans. In your biggest bowl, whisk together all your dry ingredients: flour, sugar, that deep black cocoa powder, baking powder, baking soda, and salt. Whisk it well so everything is happy and integrated!
In a separate bowl, mix together the wet stuff: warm water, room temperature buttermilk, the oil, your room temperature eggs, and the vanilla. Now, pour that wet mixture right into the dry. Don’t panic—the batter will be incredibly thin! That’s exactly what we want for a moist cake.
Divide the batter evenly across your three pans. If you have a kitchen scale like I use, weigh the batter going into each pan—this is my little secret for ensuring your layers bake up perfectly flat and even, saving you trimming time later. Bake time is usually around 24-27 minutes. Once they’re done, let them cool in the pans for ten minutes, then flip them onto wire racks to cool completely. Once cool—and I mean *completely* cool—use a serrated knife to level the tops. Don’t skip this, or your cake will lean!
Preparing the Dark Chocolate Buttercream
Time to make the rich dark chocolate frosting that holds everything together! Start by beating your room temperature butter until it’s super smooth. Add in the black cocoa powder, vanilla, and salt, and mix until it’s just combined. We need that intense color!
Now, add your powdered sugar and heavy cream slowly, mixing on low speed first until it comes together. Once it’s incorporated, turn the speed up. Next, pour in those semi-sweet chocolate chips that you melted and let cool down first. Mix until you reach the consistency you want. If you feel like you need a more dramatic, deep black, take a tiny bit of black gel food coloring and mix it in until you hit that perfect moody shade. Cover the frosting while you work on the drip component so it doesn’t crust over.
Making the Glossy Black Chocolate Drip
The drip needs to be perfect—shiny and fluid, but sturdy enough to hold its shape. This is basically a smooth ganache! Put your semi-sweet chocolate chips into a bowl that can handle heat. Heat your heavy cream until it’s steaming hot, then pour that right over the chips. Let it sit there, undisturbed, for a full minute or two—this lets the heat melt the chocolate evenly. No sneaking peeks!
Now, add your black gel food coloring—just enough to make it a rich, deep black—and stir until it’s completely smooth and glossy. The most important part: you have to let this mixture cool for about 10 minutes until it feels just slightly warm before you even think about putting it on the cake. If it’s too hot, it will run right off the chilled cake. If it’s too cool, it will look chunky.
Assembling and Crumb Coating the Black and Gold Drip Cake
This is where your spinning stand finally earns its keep! Place your first cake layer directly onto the cake board—a little dab of frosting underneath helps anchor it. Spread a generous, even layer of your dark chocolate buttercream over the top. Stack the next layer, frost it, and top it with the final layer. You’re building a beautiful, dark tower!
Now, take a small amount of frosting and apply a very thin layer all over the outside of the entire cake—this is your crumb coat. We need to trap all those loose crumbs so the final coat is spotless. Once that thin layer is on, you *must* chill the cake until that coat is firm to the touch. I mean firm! Then, apply your second, thicker layer of buttercream, using that offset spatula to smooth the top and the bench scraper to get those striking, straight sides. Chill it again until this final coat is rock solid.
Applying the Drip and Final Decoration
Once your cake is totally cold and firm, it’s drip time! Test your ganache by dipping a spoon in; it should coat the back of the spoon but still flow steadily. If it’s too thick, warm it for just a few seconds in the microwave. Use a squeeze bottle or a spoon to carefully add the drips around the top edge. Give the sides a little gentle push with the back of the spoon if you want them a bit longer. Don’t overthink it; drips look best when they look natural!
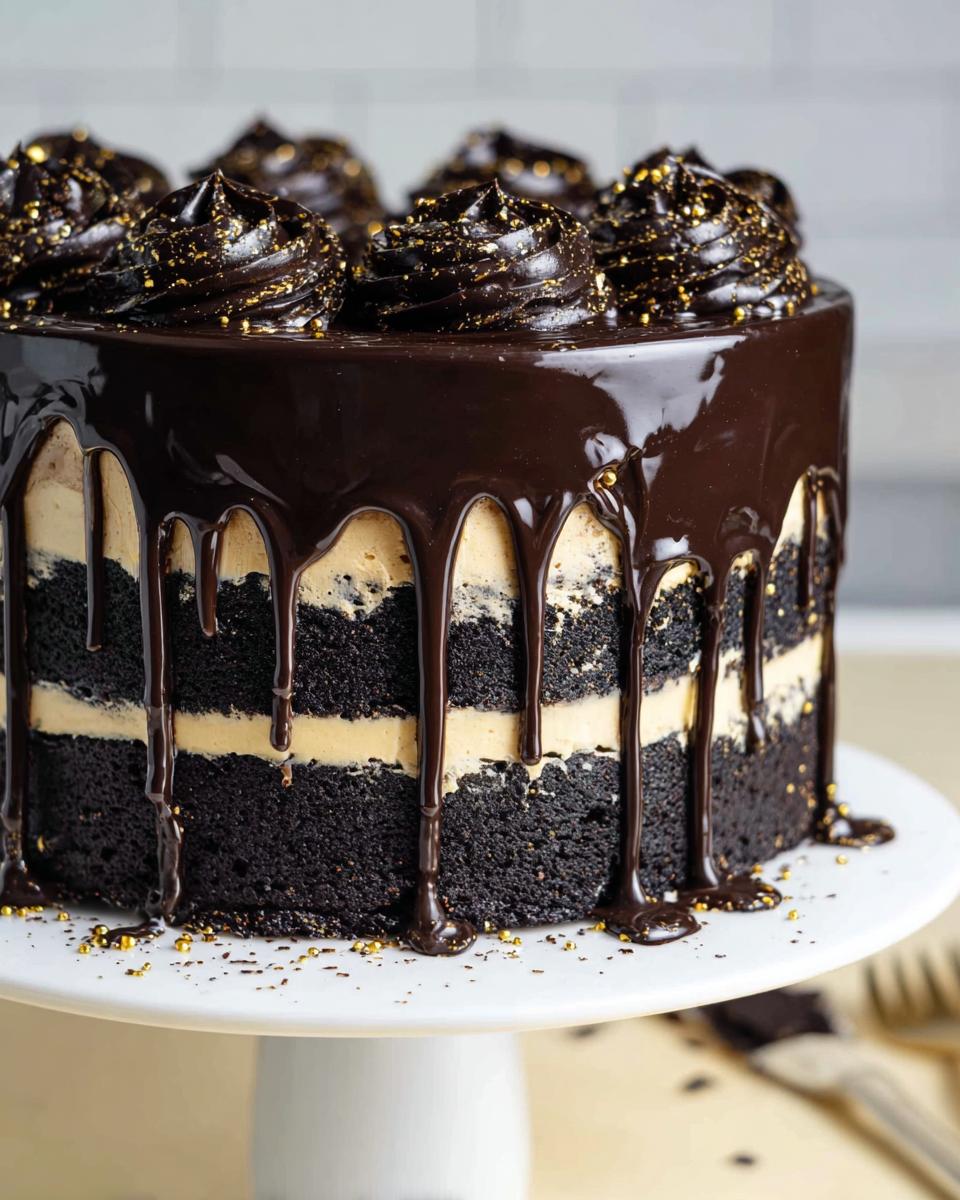
Once the drip has set against the cold cake, bring out your piping bag fitted with that open star tip. Pipe lovely swirls or dollops around the top edge. Finally, it’s time for the wow factor! Mix a small amount of edible gold paint or luster dust with a drop of clear alcohol or lemon extract. Use a small clean brush to lightly dust or paint the edges of your piped swirls and let the gold catch the light right over that deep black background. Isn’t that stunning?
Tips for Success When Decorating Your Black and Gold Drip Cake
Creating showstopper cakes like this Black and Gold Drip Cake definitely requires a few key tricks up your sleeve, especially when dealing with deep colors and precision elements like the drip. I’ve definitely had drips that looked like thin chocolate waterfalls instead of elegant cascades! Don’t worry about those mistakes; we all learn through trial and error. The key is temperature control and patience, which I learned way back in my early baking adventures!
Here are my top non-negotiable tips to ensure your final decorated cake looks exactly like you planned:
- Chill That Cake Firmly: I can’t stress this enough—your final coat of buttercream needs to be ice cold and solid before the warm drip touches it. If the cake surface is soft, the hot ganache will melt the buttercream, sliding everything into a messy puddle instead of creating those clean edge drips.
- Test Your Drip Consistency First: Before you even look at your cake, test the ganache! Put a tiny dollop on a piece of parchment paper or a small chilled plate. If it flows slowly and holds its shape for a second before running, you’re good. If it’s too thin, let it sit longer. If it refuses to move, warm it for just five seconds in the microwave.
- Go Deep with the Black Cocoa: To get that truly deep, velvety black color throughout your cake and buttercream, you might need more black gel food coloring than you think. A little goes a long way in darkening things, but if you want that dramatic shade that contrasts beautifully with gold, be brave! Add the coloring slowly while mixing, until you’ve achieved a color so dark it almost absorbs the light.
- Painting the Gold Requires Patience: When applying the edible gold, don’t just sprinkle it on if you want that metallic sheen. Mix your gold luster dust with a clear, flavorless liquid like high-proof vodka or pure lemon extract until it forms a paint. This mix dries fast and leaves behind that high-impact metallic finish that makes the whole Black and Gold Drip Cake design pop!
Mastering these little details—the cold cake, the slightly warm drip, and the strong black base—is what separates a nice cake from a truly impressive one!
Making This Cake Work for Your Party Theme
Honestly, this design is just too gorgeous to save only for birthdays! The combination of deep black velvet and shimmering gold instantly elevates any event into something truly glamorous. When you’re planning for big nights—maybe an anniversary celebration or those flashy New Year Cake Ideas—this color scheme brings instant sophistication.
You don’t need to reinvent the whole recipe, either. We are using that rich chocolate base, which is so versatile. Think about it: a little switch in toppings or a slight flavor nudge, and suddenly you have a cake perfect for any elegant background. It’s amazing how a simple color palette can feel perfectly tailored for any milestone!
Buttercream Drip Variations and Gold Application
Let’s talk about making the gold application match your exact vision. Painting is my favorite way to get that true metallic shine, but it takes a bit more time. Remember how I mentioned mixing the luster dust with a very small bit of clear alcohol or lemon extract? That creates a liquid gold paint that you can brush onto the piped swirls for a sharp, high-shine look. It feels incredibly luxurious!
However, if you are short on time or just prefer a softer look, a light dusting right after the drip has set can be beautiful too. Use a clean, soft pastry brush and gently dust the edges of the drip only, letting the excess fall away. It gives a softer, almost shimmering effect rather than a bold metallic stripe.
For flavor adjustments that complement this intense look, don’t be afraid to play with the extract in the final buttercream stage. A tiny splash of almond extract alongside the vanilla can give the frosting a slightly marzipan-like note that pairs really well with the dark chocolate. Similarly, if you wanted to change the cake layers slightly, a touch of raspberry liqueur mixed into the buttercream instead of heavy cream can give you a subtle, jewel-toned flavor counterpoint to the rich black cocoa!
Storing and Serving Your Black and Gold Drip Cake
Okay, you’ve made this gorgeous, dramatic Black and Gold Drip Cake, and now you’re wondering how to keep it looking perfect until the party starts. Since we are working with a rich dark chocolate buttercream and that glossy ganache drip, refrigeration is going to be your best friend for food safety and structure! You don’t want that beautiful structure to wilt, especially if you’re keeping it around for a few days.
I usually aim to assemble this cake no more than two days before I need to serve it. If you’ve followed the steps, the cake is well-stacked and the drip is set, so it’s ready for the fridge! Just make sure you cover it loosely—you don’t want condensation ruining your beautiful gold paint job. Plastic wrap directly touching the cake can smear the finish, so tent it loosely with foil or plastic wrap over the top edge.
When it comes to serving this spectacular dessert, there’s one crucial step you absolutely cannot skip. Cold cake is hard cake, and the flavor gets muted when it’s chilled. You want that buttercream to soften just enough to be creamy and that chocolate drip to lose its hardness. When serving, pull your Black and Gold Drip Cake out onto the counter at least one hour before you plan to cut into it. This resting time is key for the best flavor and the perfect texture in every slice.
If you need to store leftovers (if there are any, haha!), wrap the cut pieces tightly and keep them in the fridge. They’ll last about 3 to 4 days kept this way. This recipe is so sturdy, thanks to that dense chocolate base, that it holds up far better than a lighter sponge cake. For quick storage solutions for leftovers, check out these 5-ingredient dinner ideas—sometimes you need a quick savory dinner after a week of cake making!
Frequently Asked Questions About Making a Black and Gold Drip Cake
Whenever I post pictures of this cake, I get so many messages asking about the color and the drip! It’s natural to have questions when tackling something this dramatic, especially when trying to achieve that perfect finish for your desired Party Theme. Don’t let a little confusion stop you; we just need to nail down a few technical spots for that stunning Black and Gold Drip Cake!
Can I use regular cocoa powder instead of black cocoa in this Black and Gold Drip Cake?
Oh, you absolutely *can*, but you have to know what you’re signing up for! Regular unsweetened cocoa powder will give you a beautiful chocolate cake, yes, but it will be brown—a nice dark brown, maybe, but not the intense, near-black shade we are aiming for to contrast with the gold. If you use regular cocoa, you’ll need to lean heavily on the black gel food coloring to reach this look, and that can slightly alter the flavor balance.
The black cocoa powder is treated differently—it’s alkalized, which takes out the acidity and drives the color incredibly dark while mellowing the flavor slightly. If you must substitute, use regular high-quality dark cocoa, but expect a distinctly browner final look unless you add a ton of food coloring. For the true effect of the Black and Gold Drip Cake, seek out the black cocoa powder!
How do I get the drip to look perfectly smooth?
This is all about temperature consistency underneath! Remember when we talked about chilling the cake until the buttercream is rock solid? That’s step one. If the cake surface is soft, the warm ganache will melt it, creating those bumpy, uneven lines or, worse, sliding right down the sides too far.
Step two is the ganache itself. You want it to feel slightly warm, not hot, when it hits that cold cake. Before you apply it, test it on a small piece of parchment paper. A smooth drip flows, but it doesn’t run immediately. If you see bubbles or streaks in your ganache while stirring, you need to stir slightly longer to incorporate all that air out. A perfectly smooth surface underneath equals a perfectly smooth drip on top!
What is the best way to apply edible gold?
Sprinkling the gold powder usually ends up looking a bit dusty or patchy, especially over a very dark surface like this Black And Gold frosting. For that real, metallic, high-end look, you have to paint it on! You can’t just use water; it will make the powder clump.
Here’s the trick: Take a small amount of edible gold luster dust—that’s the fine powder—and mix it into a tiny dish with just a few drops of clear, high-proof alcohol, like vodka, or even lemon extract if you don’t mind a slight citrus hint. The alcohol evaporates super quickly, leaving behind just the pigment. Use a clean, small, dedicated food-safe brush to paint this mixture right onto the edges of your piped swirls or the rim of the cake. It adheres beautifully and gives you that incredible, blinding gold reflection against the black backdrop. It really takes this from a nice cake to a genuine showstopper!
Share Your Stunning Black and Gold Creations
Wow, you made it! If you’ve followed all those steps—from that tricky crumb coat to getting the drip just right—you deserve a huge round of applause. I truly hope this recipe helps you create something gorgeous for your next big event. It’s so rewarding to see your own version of this dramatic dessert come together, right?
Now that you’ve mastered the art of the deep black cake and the glamorous gold accent, I absolutely want to see what you came up with! Tag me on social media when you share your masterpiece. Seeing your spins on the gold application or your perfectly straight buttercream sides makes my day. We all learn so much from seeing how everyone tackles these showstoppers. Happy baking, and I can’t wait to see that gold sparkle!
If you tried out this **Black and Gold Drip Cake**, please take a moment to leave a rating for the recipe below—let me know how sturdy the cake was and how folks loved the flavor! Even a quick comment helps me know what’s working!
And definitely snap a picture! Tag me on social media when you share your masterpiece. Seeing your spins on the gold application or your perfectly straight buttercream sides makes my day. We all learn so much from seeing how everyone tackles these showstoppers. Happy baking, and I can’t wait to see that gold sparkle!
If you’re looking for quick meals to recover after all that decorating effort, check out these crispy and juicy dinner ideas for the week ahead!
Black and Gold Drip Cake
Ingredients
Equipment
Method
- Preheat your oven to 350 F/ 175 C. Line and grease three, eight-inch cake pans. Combine flour, sugar, black cocoa powder, baking powder, baking soda, and salt in a large bowl. Whisk together until combined.
- In a separate bowl, combine warm water, buttermilk, oil, eggs, and vanilla extract. Stir to combine.
- Pour the dry ingredients into the wet ingredients. Mix until fully incorporated. The batter will be thin.
- Divide the batter evenly between the prepared cake pans. Bake for 24-27 minutes. Use a kitchen scale to ensure even batter distribution for uniform cake layers.
- Let the cake layers cool in the pans for 10 minutes. Loosen the edges with an offset spatula and flip them onto wire racks to cool completely. Level the tops of the cake layers with a serrated knife.
- For the buttercream, beat butter until smooth. Add black cocoa, vanilla, and salt. Mix until incorporated.
- Slowly mix in powdered sugar and heavy cream until combined. Next, mix in the cooled, melted semi-sweet chocolate until the desired consistency is reached.
- For a deeper black color, add black gel food coloring. Cover the frosting to prevent crusting.
- For the drip, place chocolate chips in a heatproof bowl. Heat heavy cream until steaming. Pour the hot cream over the chocolate chips and let sit for 1-2 minutes.
- Add black gel food coloring and stir until smooth. Let the mixture cool for about 10 minutes until slightly warm.
- Stack and frost the cake layers on a cake board, using frosting to secure the first layer. Add an even layer of buttercream between each cake layer.
- Apply a thin coat of frosting to cover the cake layers. Smooth with a bench scraper and chill the cake until the frosting is firm.
- Apply a second, thicker layer of frosting and smooth with a bench scraper. Chill the cake again until firm.
- Test the ganache consistency. If needed, gently warm it in the microwave. Add the drips to the chilled cake using a squirt bottle or spoon.
- Decorate as desired. Pipe swirls on top with an open star tip and add edible gold paint or luster dust mixture to the edges.


