Oh, listen up, because I am about to let you in on a glorious secret! If you think that perfectly crusted, unbelievably tender, sliceable roast you get at those fancy steakhouses is impossible to make in your own kitchen, you’ve got another thing coming. We are kicking intimidation to the curb today to master the Boneless Prime Rib — Restaurant-Quality at Home. Trust me, achieving perfection is all about a few simple, non-negotiable steps.
I still remember the first time I decided to tackle a boneless prime rib for a family gathering. With my sports nutrition background, I often roasted lean cuts of meat, but this was different. As I carefully seasoned the roast and let it rest in the oven, the aromas filled my kitchen, and I found myself recalling the joyous family dinners of my childhood. When the moment came to slice into that beautifully cooked rib roast, it was a delight to see everyone’s faces light up with every tender bite. That experience was not just about serving a meal; it was about bringing people together and creating lasting memories, proving to me that quality food nurturing body and spirit can be right at home.
I’m Sarah Johnson, the Keto Performance Chef, and having that background means I’m obsessed with technique—getting the absolute best result out of the fewest, highest-quality ingredients. This method guarantees you pull off an impressive Holiday Roast that tastes like you paid a fortune for it.
Why This Boneless Prime Rib — Restaurant-Quality at Home Recipe Works
Honestly, this recipe is my go-to because it takes something that sounds super fancy—a full prime rib—and makes it totally accessible. You get that unbelievable tenderness you only expect from a top-tier steakhouse, but you’re doing it in your own oven with minimal fuss. It’s all about setting yourself up for success upfront so the actual cooking time isn’t stressful. That’s why this Boneless Prime Rib — Restaurant-Quality at Home method is a total game-changer for any big dinner!
- It handles beautifully when scaling up for a big Prime Rib For A Crowd.
- The prep is surprisingly clean and fast, keeping your kitchen tidy.
- The texture is guaranteed to be perfectly pink edge-to-edge.
- It delivers maximum flavor payoff for Minimal Prep time.

If you want to check out some other game-changing roast guides we love, take a peek at this collection of perfect dinner ideas!
Achieving Perfect Doneness Every Time
This is where the magic happens! We are using the low-and-slow method first. Cooking at a gentle 275F slowly brings the entire roast up to temperature evenly. Then, we blast it hot at the end. That final hot sear creates that crisp, salty crust you love, locking in all the juices we worked so hard to keep inside. It’s the secret to why this roast stays juicy, even when you’re serving 10 people!
Simple Seasoning for Maximum Flavor in Your Boneless Prime Rib — Restaurant-Quality at Home
Don’t sweat complicated spice rubs! We rely on quality ingredients—a good salt and robust herbs. We’re using rosemary and thyme mixed with garlic. You just rub it on, wrap it up tight, and let the flavors mingle overnight. That extended flavor absorption is key to deep, restaurant-quality flavor without spending hours over the meat, making it perfect for your Boneless Prime Rib — Restaurant-Quality at Home experience.
Essential Equipment for Your Boneless Prime Rib — Restaurant-Quality at Home
You don’t need a professional kitchen for this, but having the right tools makes hitting that perfect medium-rare so much less nerve-wracking. For your Boneless Prime Rib — Restaurant-Quality at Home journey, preparation is everything, so pull these items out now! Seriously, investing in a good thermometer is non-negotiable; it’s the only way to know exactly what’s happening inside that big piece of meat.
Here’s the lineup you’ll need to get ready:
- Paper towels (lots of them!) for drying that exterior.
- A small bowl for mixing up our simple rub so nothing gets wasted.
- Plastic wrap for that overnight flavor infusion.
- A good cast iron skillet or a sturdy roasting pan.
- The absolute must-have: an oven-safe meat thermometer—don’t even think about skipping this.
- A wire trivet to keep the roast elevated.
- Aluminum foil for the resting phase.
If you’re looking for more general guidance on kitchen must-haves, check out this guide to essential dinner equipment!
Ingredients for the Best Boneless Prime Rib — Restaurant-Quality at Home
Okay, let’s talk food! This is where we gather our tools for success. I really believe that when you use high-quality meat and keep the seasonings straightforward, you get the best result for your Boneless Prime Rib — Restaurant-Quality at Home. Don’t feel overwhelmed by the sheer look of the roast; the ingredient list is actually quite short, which means less time shopping and more time enjoying the process!
You can see the list below, but always remember we need to group them properly so you’re prepared when it’s time to rub down that fantastic cut of beef.
For more ideas on how to make complex meals simple, check out these 5-ingredient dinner ideas that seriously cannot fail!
For the Roast
- 6 pounds Boneless prime rib roast. Now, if your roast is bigger than this—maybe you’re cooking for a huge Prime Rib For A Crowd—you can absolutely double the spice blend listed here. Just remember that!
- 1 Tablespoon Kosher salt. This is for the initial dry rub, so get that salt distributed evenly!
- 2 teaspoons Dried rosemary. We want that classic, woodsy aroma!
- 1.5 teaspoons Dried thyme leaves.
- 1.5 teaspoons Coarse black pepper. Seriously, use freshly ground if you can; it makes such a difference in the crust.
- 1.5 teaspoons Garlic powder.
- 0.5 teaspoon Paprika. This just helps give that crust a little color boost when we sear it later.
For Cooking
- 1 cup Beef broth. You can totally swap this for plain water if you want, but the broth adds just a tiny bit more savory depth underneath the roast as it cooks low in the pan.
Ingredient Notes and Substitutions
Since we are aiming for that restaurant quality, let’s fine-tune a couple of ingredient choices. For the roast itself, 6 pounds is a fantastic estimate for about 10 people, but if your cut is different, stick to the cooking by temperature method, not just time—that’s the real secret! Also, for salt and pepper, please use Kosher salt over table salt if possible; it adheres better to the meat surface without making it taste overly salty.
And don’t worry about the beef broth being exact; if you run out, just use water! The point of the liquid in the bottom of the pan at that low 275F temperature is mainly to keep the bottom from burning or smoking, not to steam the meat. We want that dry-heat environment for a good crust!
Step-by-Step Cooking Instructions for Boneless Prime Rib — Restaurant-Quality at Home
This is the moment where we put all that planning to work! Don’t rush any of these steps, especially the early ones. If you followed the recipe card, you’ve got a beautiful, seasoned roast waiting in the fridge. We are aiming to get that beautiful interior cooked perfectly so that when we hit it with high heat, we just develop that amazing, savory crust for our Boneless Prime Rib — Restaurant-Quality at Home.
First things first: drying! You absolutely have to get that exterior bone-dry. Take the roast out of the plastic wrap—go ahead and ditch that wrap—and pat every single surface down with lots and lots of paper towels. Seriously dry! Moisture hates developing a crust, and we want a crust worthy of a five-star review. For great insights on how to manage the heat in these steps, check out this excellent prime rib guide.
Also, remember that internal resting time before the sear is non-negotiable! It’s tempting to rush things when you’re hosting, but that rest sets the stage for the final crust.
- Dry the prime rib. Place the roast on several layers of paper towels. Use more paper towels to thoroughly dry all sides of the roast. Don’t be shy here; this is step one for stellar texture!
- Season the roast. Sprinkle that Kosher salt evenly over all sides from about 6 inches above the roast; this helps it fall like snow, not clumps! In a separate small bowl, whisk together your rosemary, thyme, pepper, and paprika rub. Rub this mixture all over the prime rib, pressing it gently into the meat so it really sticks.
- Marinate the roast. This is where we let the flavor sink deep! Tightly wrap the prime rib twice in plastic wrap. Pop it back into the fridge. You need at least 1 hour, but if you can swing it, aim for the full overnight treatment—up to 24 hours, which is 1440 minutes, if you’re measuring like I do! This long rest is what makes this recipe feel so sophisticated.
- Preheat and prep the pan. About half an hour before it’s time to cook, crank that oven up to 275F—nice and low! Remove your roast from the fridge right now so it can warm up a tiny bit. Get your roasting pan ready, place that wire trivet in the bottom, and set the roast right on top, fat side facing upward.
- Add liquid support. Pour the beef broth into the very bottom of the pan, being careful not to splash the meat itself. Now, insert your oven-safe meat thermometer right into the thickest part of the roast, making sure it’s sitting in the meat and *not* touching the bottom or any fat pockets.
- Roast the prime rib. Slide that pan gently into the preheated 275F oven. We are roasting low and slow, aiming for about 24-27 minutes per pound. For our 6-pounder, that means roughly 2 hours and 25 minutes, but you *must* start checking the temperature after the two-hour mark. Keep checking every 10-15 minutes until that thermometer hits 125F—that’s our target for medium-rare before resting.
If you need more help making your cooking foolproof, take a look at these foolproof cooking methods or review our guides on achieving the best crispy, juicy roasts!
The Crucial Resting and Searing Phase
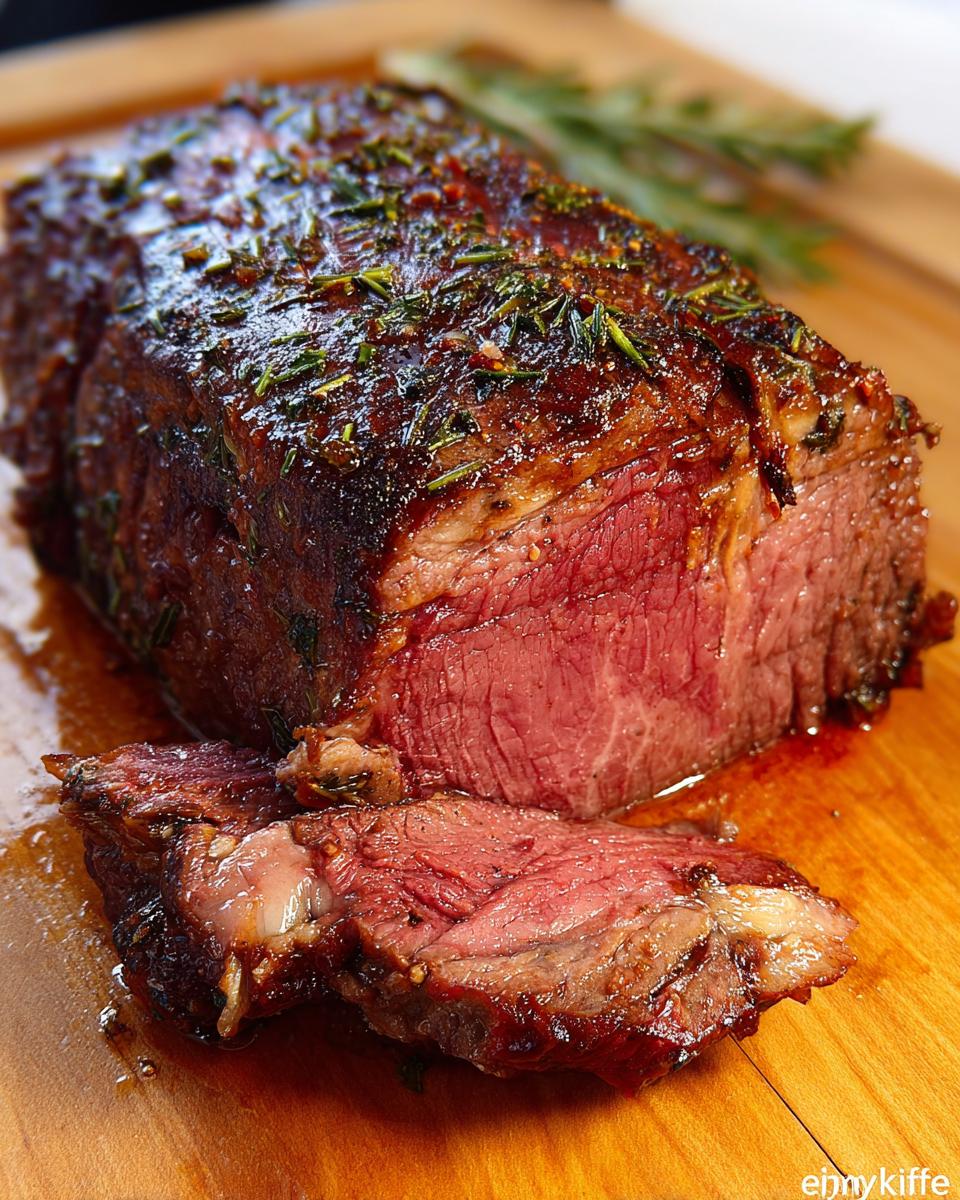
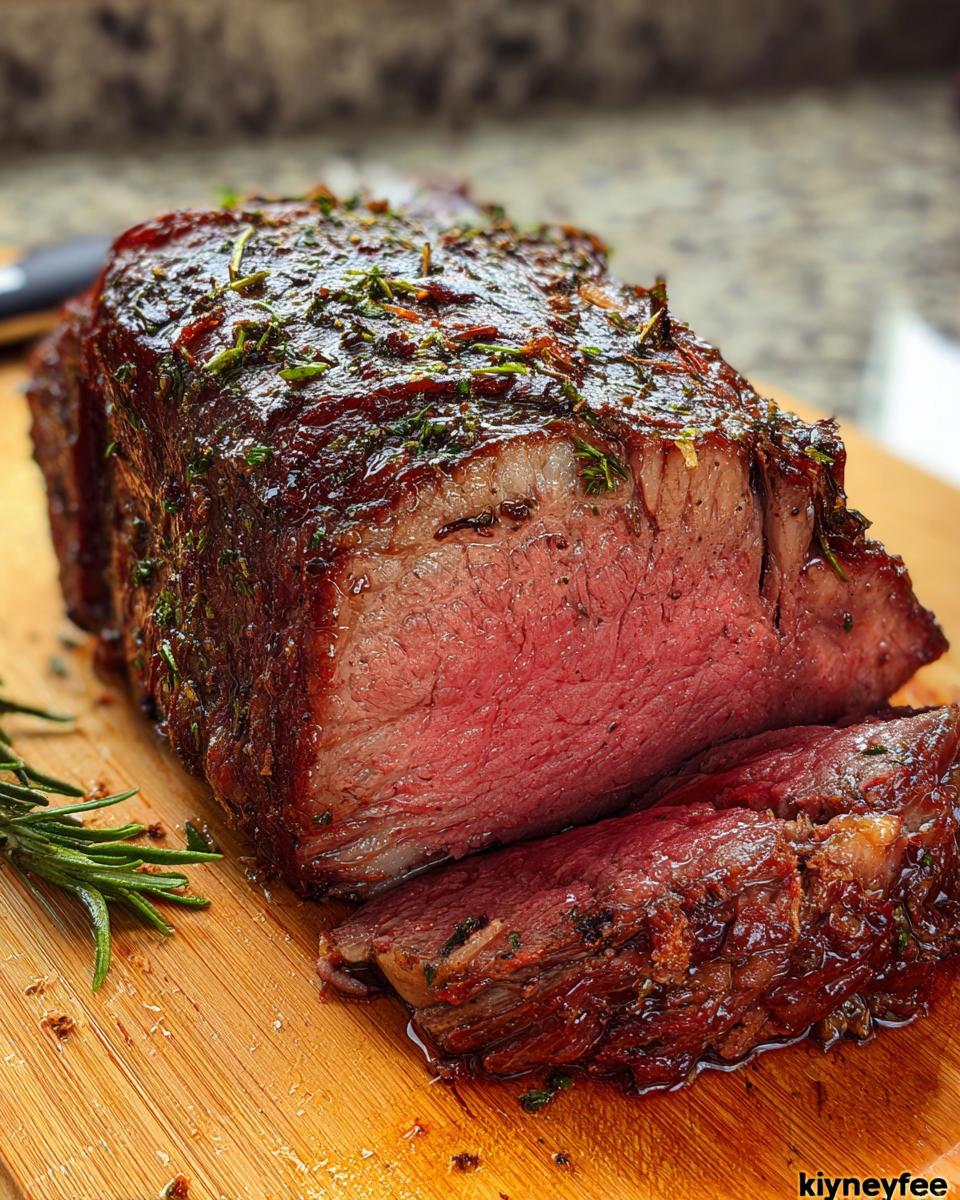
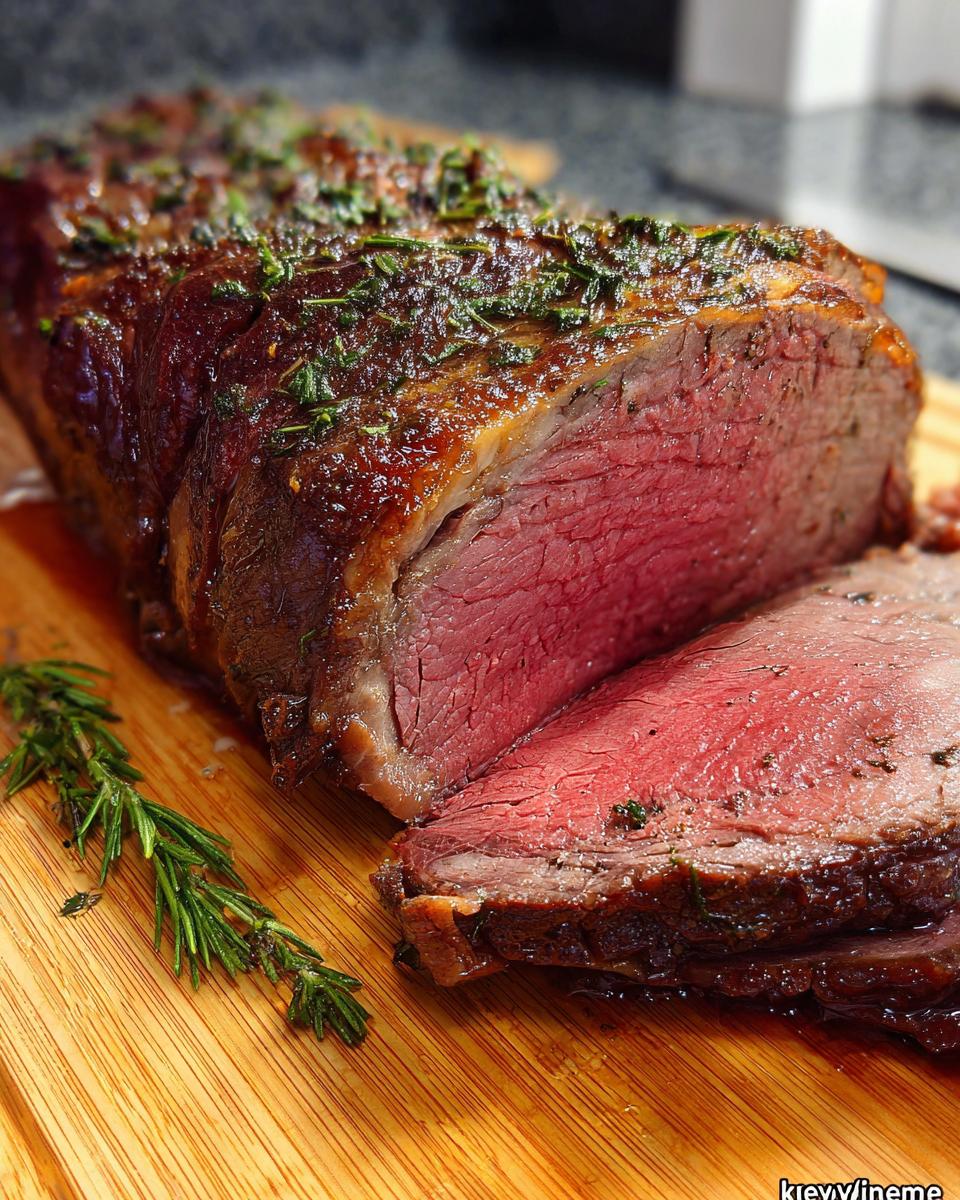
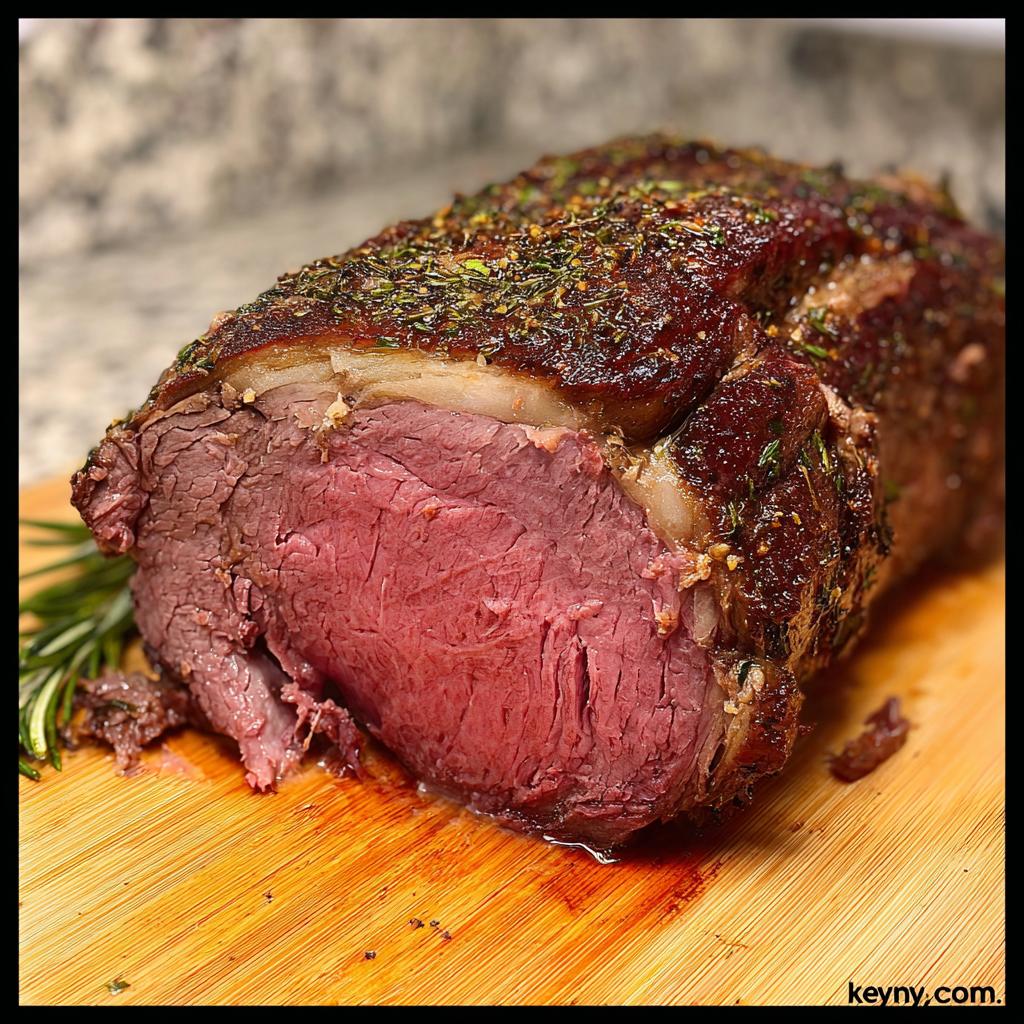
Okay, it hit 125F! Carefully pull that roast out. Now, this next part is where we use that high heat to get the texture just right. While you tent the pan with aluminum foil for 15 to 20 minutes—this resting time is vital for keeping those juices inside—turn your oven way up to 450F. When the oven is roaring hot, you take the foil off the roast, pull out that thermometer, and slide it back in for a quick 5 to 8 minutes. That blast of heat sears the exterior into that dark, wonderful crust you see in restaurants. Seriously, don’t skip that rest, or all that amazing work keeping the inside tender gets undone when you start slicing!
Tips for Success: Mastering Your Boneless Prime Rib — Restaurant-Quality at Home
Getting that restaurant-quality finish on your Boneless Prime Rib — Restaurant-Quality at Home really boils down to listening to your meat, not just the clock. Time estimates are good guidelines, honestly, but temperature is the absolute truth-teller here. You need to trust that thermometer more than anything else!
I spent so much time early on thinking if I just followed the time chart, I’d be golden. Nope! Every oven is different, and every piece of meat has its own personality. So, here are my best hard-won tips to make sure you nail that perfect tender interior and that crisp, brown crust every single time you make this holiday favorite.
Thermometer Placement is Everything
This might sound obvious, right? But I can’t tell you how many times I’ve seen people insert the thermometer sideways! You need to insert the probe deep into the thickest part of the roast—usually right in the center—but you must make sure that metal tip absolutely avoids touching bone (even though this is boneless, sometimes there are leftover connective bits) or any pocket of fat. If it touches something hard, you’ll get a falsely high reading, and you’ll pull the roast too early, ending up with meat that’s waaaay too rare in the middle.
Don’t Rush the Crust Development
Remember that 15 to 20 minute rest after you pull the roast out of the low oven? That time is essential. It allows all those internal juices to redistribute themselves so they aren’t just pouring out onto your cutting board when you slice. Once rested, that 450F blast for 5 to 8 minutes is quick, but it’s intense! Keep an eye on it so the seasonings toast beautifully without burning. If your rub looks like it’s browning too fast, just tent it loosely with foil for a minute or two, but pull the foil off again to finish that sear!
Preheating the Pan for Even Cooking
I always put my roasting pan and trivet into the oven *while* it’s preheating to 275F. Letting the metal get warm before the roast even touches it helps ensure that heat transfer is immediate and even across the bottom of the pan. This little trick helps eliminate any cool spots underneath the roast. For more great guidance on how to manage your kitchen timing, especially when prepping for big meals, check out this article on meal prep friendly dinner routines!
Make Ahead Plan for Your Holiday Roast
When you have a big event, especially a major 4th of July party or a huge Christmas dinner, planning ahead isn’t just smart—it’s essential for keeping your sanity! This rule applies especially to an impressive centerpiece like a Holiday Roast. The great news is that this recipe is built specifically for the planner in you. We do most of the heavy lifting the day before!
Remember that marination step? That’s your golden ticket! You can season that roast up to 24 hours in advance. That means the day *before* your big gathering, you can spend a relaxed 15 minutes rubbing it down with salt and herbs, wrapping it tight, and tucking it into the fridge.
On the actual day of service, your hands-on time is incredibly short. You need maybe 10 minutes to pull it out, settle it in the pan with the broth, and get it into the oven. Then? You literally walk away! The low-and-slow cooking time takes up most of the afternoon, sure, but you aren’t busy actively cooking or stirring. You can focus entirely on those side dishes or just enjoying your guests.
If you’re worried about planning other dishes around this centerpiece, looking at this list of perfect dinner ideas might help you map out the rest of your menu so everything finishes at the same time. Honestly, having a solid Make Ahead Plan is what separates the relaxed host from the stressed-out mess!
Serving Suggestions for Your Boneless Prime Rib — Restaurant-Quality at Home
So you’ve nailed the impossible! Your Boneless Prime Rib — Restaurant-Quality at Home is resting perfectly, ready to be sliced into tender pink portions. Now we need to talk about what goes next to it on the plate! A roast this luxurious deserves side dishes that stand up to its richness but don’t fight it, you know?
Since we are focusing on getting that perfect centerpiece without spending all day in the kitchen—remember our motto is maximum flavor for minimal fuss—I always lean toward sides that are mostly hands-off. Mashed potatoes are a must, but if you’re anything like me and hate washing a million boiling pots, you need companions that are easy cleanup!
Side Dish Staples That Pair Beautifully
When you’re serving beef this good, you want sides that either soak up those delicious pan drippings (which you are absolutely saving for gravy or Au Jus!) or sides that bring a little brightness to cut through the richness.
- Creamy Mashed Sides: Whether you do classic potatoes or maybe even a cauliflower mash if you’re keeping things leaner, you need something soft to absorb that beef juice. Don’t skimp on the butter here; this is a celebration!
- Roasted Root Vegetables: Carrots, parsnips, even some sweet potatoes—toss them in oil, rosemary, salt, and pepper, and roast them right alongside the prime rib container for the last half hour! They get wonderfully caramelized.
- A Green Element: You always need something green to balance things out. If you’re looking for the easiest way to do veggies, check out my recipe for one-pan green beans. They cook up in just minutes with zero fuss!
The Importance of the Au Jus
Honestly, if you skip making a simple gravy or au jus, you’re only halfway there. Remember those drippings you saved? That liquid gold in the bottom of your roasting pan is the flavor base for everything else. It takes about 10 minutes to swirl in a little flour or cornstarch slurry and bring it to a simmer. That salty, beefy sauce poured right over your beautiful slices of Boneless Prime Rib — Restaurant-Quality at Home is the final restaurant-level touch!
Serve it all up hot, and watch your guests be absolutely blown away that this incredible meal came straight from your home oven!
Storing and Reheating Leftover Boneless Prime Rib
This roast is so good, you’ll definitely have leftovers—and knowing how to treat them right is key to avoiding sad, dry reheats later!
First, slice any remaining pieces off the roast and tuck them into an airtight container. Try to avoid overcrowding, as too much contact can sometimes trap moisture that we don’t want. Everything should go into the fridge within two hours of coming off the cutting board. You can safely keep this beef refrigerated for about three to four days.
When you’re ready to eat the leftovers, forget the microwave! The best way to revive that juicy texture is low and slow, just like the original cook! Pop the slices into a shallow baking dish with just a splash—maybe a tablespoon—of beef broth or water. Tent it tightly with foil and put it back in a low oven, maybe 300F, just until it’s warmed through. It keeps that restaurant quality intact, even on day two!
If you’re looking for a whole host of other make-again inspiration, you can browse all my best recipes here!
Frequently Asked Questions About Boneless Prime Rib — Restaurant-Quality at Home
I totally get it; whenever you invest in a beautiful cut of meat like this, you want zero guesswork! Here are a few things folks usually ask me after they’ve mastered the main steps for making Boneless Prime Rib — Restaurant-Quality at Home. If you’ve got more burning questions, feel free to check out my big collection of recipes everyone asks for!
How do I calculate the cooking time for a larger Boneless Prime Rib — Restaurant-Quality at Home?
That’s a great question, especially if you’re making a huge Prime Rib For A Crowd! The crucial thing to remember is that cooking time is just an estimate—temperature is the boss. For a larger cut, the time per pound might drop slightly because the heat has an easier time penetrating the center from the outside, but don’t rely on that! You still want to budget about 24 to 27 minutes per pound initially, but you MUST start checking the temperature early. If your roast is significantly larger, be sure to double up on the herb rub we mix—that’s the only swap you need to make for the seasoning blend!
Can I skip the overnight marinating time?
Oh, I know those last-minute dinner decisions happen! Can you skip the 24-hour marinade? Yes, you technically can, but I wouldn’t recommend it if you’re aiming for that rich, deep flavor profile this recipe promises! That overnight rest allows the salt and herbs to penetrate beyond just the surface crust. If you are truly in a bind and need a quick Holiday Roast, apply the rub and let it sit on the counter, unwrapped, for at least an hour while the oven preheats. It won’t be *as* flavorful as the marinated version, but it will still cook perfectly based on temperature!
Estimated Nutritional Information
I need to throw a quick, serious disclaimer out here, even though this roast is clearly the star of the show and not exactly something we calculate macros for every day! Because this recipe is based around a large cut of beef, the final numbers change dramatically based on how much fat you decide to trim away, and frankly, how much your guests eat!
As the Keto Performance Chef, I always keep numbers in mind, so based on a 6-pound roast yielding 10 standard servings, here is a very rough estimate of what you’re looking at per serving before adding any side dishes or gravy, such as Au Jus:
- Calories: Approximately 361
- Carbohydrates: Roughly 4.1 grams
- Protein: A whopping 48.8 grams!
- Fat: About 16.3 grams
Please remember, these are just estimates derived from the raw product before cooking. If you use a leaner butcher’s cut, or if you’re serving up a massive plate because everyone loves that perfect slice, those numbers will certainly go up or down. This is why I always say: enjoy the deliciousness first, and worry about the exact breakdown later! It’s about balance, right?
Share Your Restaurant-Quality Roast Success
So, you did it! You conquered the giant hunk of beef and pulled off a stunning, tender, perfectly crusted Boneless Prime Rib — Restaurant-Quality at Home. I am just so incredibly proud of you for taking on a roast that usually scares folks off!
Now, I really need to know how it went. Did you get that beautiful pink center? Did your family stare in silent awe when you brought it to the table? Seriously, don’t keep all that success to yourself!
Please, jump down into the comments section below. Tell me your biggest win with the seasoning, or if you’ve got a tip for the resting phase that I missed. Rating the recipe is the best way you can signal to other home cooks that they should absolutely try this method for their next big dinner or Holiday Roast.
Show Off Your Masterpiece!
And if you took a picture—and I bet you did!—please share it! Tag me on social media! Seeing your gorgeous finished product is genuinely what keeps me inspired to share these challenging recipes in a way that feels easy and fun. Every time I see someone successfully serve up a perfect slice, I remember the joy of that first roast I made for my family.
If you have questions about the logistics or just want to chat about where to source your next fantastic cut of meat, you can always reach out directly through my contact page. Happy cooking, and here’s to many more restaurant-quality meals made right at home!
Boneless Prime Rib — Restaurant-Quality at Home
Ingredients
Equipment
Method
- Dry the prime rib. Place the roast on several layers of paper towels. Use more paper towels to thoroughly dry all sides of the roast.
- Season the roast. Sprinkle salt evenly over all sides from about 6 inches above the roast. In a small bowl, combine rosemary, thyme, pepper, and paprika. Stir to combine. Evenly sprinkle the rub over the prime rib. Use your fingers to gently spread the rub and massage it into the meat.
- Marinate the roast. Tightly wrap the prime rib twice in plastic wrap. Place the roast on a plate and refrigerate overnight, or for at least 1 hour, but preferably at least 6 hours and up to 24 hours. This allows the roast to absorb the flavors.
- Preheat the oven and prepare the pan. Half an hour before cooking, preheat your oven to 275F. Remove the roast from the refrigerator and unwrap it. Place a wire trivet in the bottom of a large cast iron skillet, roasting pan, or shallow oven-safe pan. Place the roast, fat side up, in the center of the trivet.
- Add liquid and vegetables. Pour the beef broth into the bottom of the pan, avoiding the meat. If using vegetables, toss them with oil, salt, and pepper, then place them around the roast. Insert an oven-safe meat thermometer into the center of the roast, ensuring it does not touch any fat.
- Roast the prime rib. Place the roast in the oven. Cook for about 2 hours and 25 minutes (approximately 24-27 minutes per pound) until the internal temperature reaches 125F for medium-rare. Check the temperature regularly, starting after about 2 hours, and monitor every 10-15 minutes until the desired temperature is reached. The roast will continue to cook as it rests.
- Rest and sear. Carefully remove the roast from the oven. Tent the pan with aluminum foil. Turn the oven heat up to 450F. Let the oven preheat while the roast rests for 15-20 minutes, or until the internal temperature reaches 130-135F. Remove the foil and thermometer. Return the roast to the oven to sear for 5-8 minutes, until the crust is brown and crispy.
- Serve. Carefully remove the roast from the oven. Transfer the prime rib to a cutting board and any vegetables to a serving dish. Save the drippings for Au Jus. Slice the roast against the grain using a sharp knife. Garnish with fresh rosemary if desired and serve hot with your chosen sides and Au Jus.