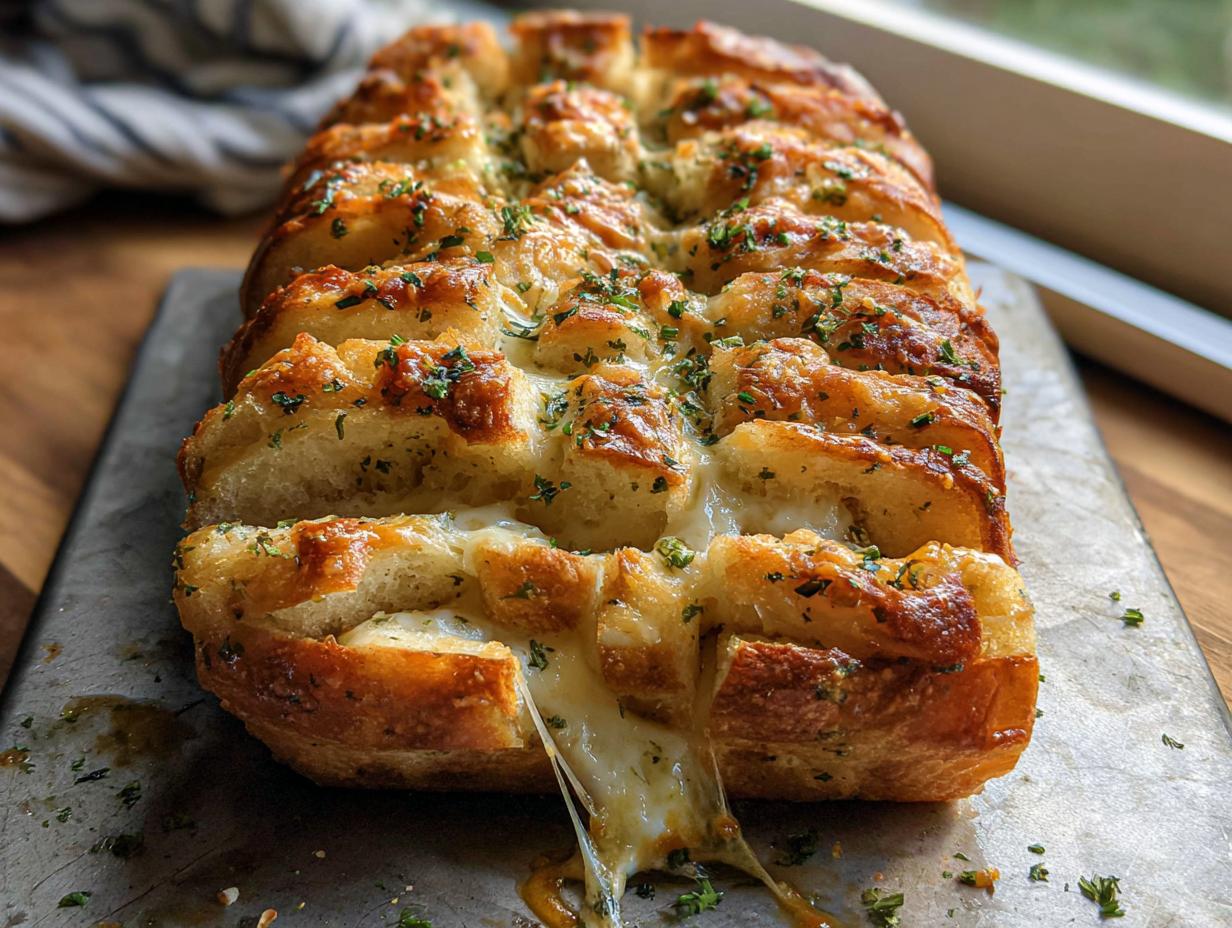
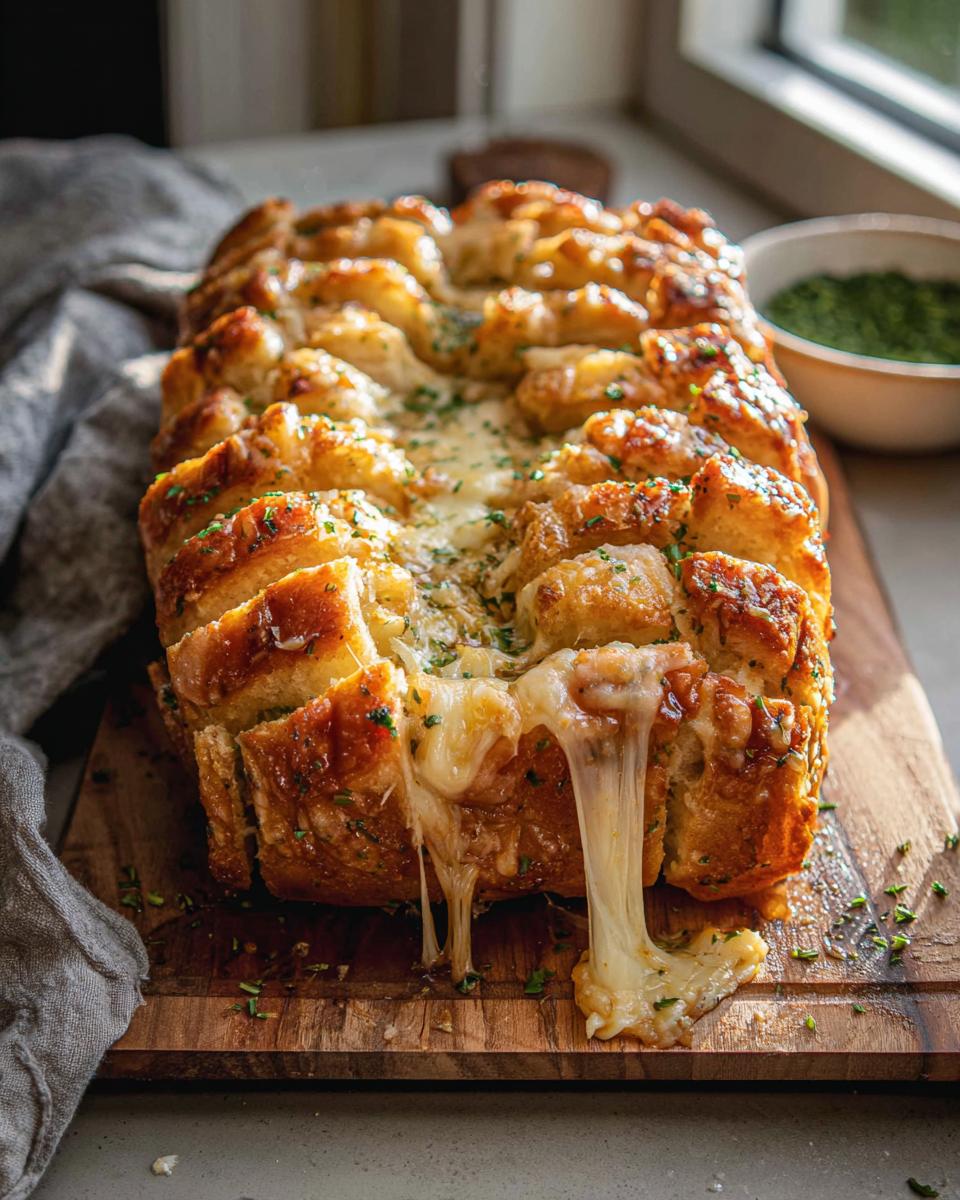
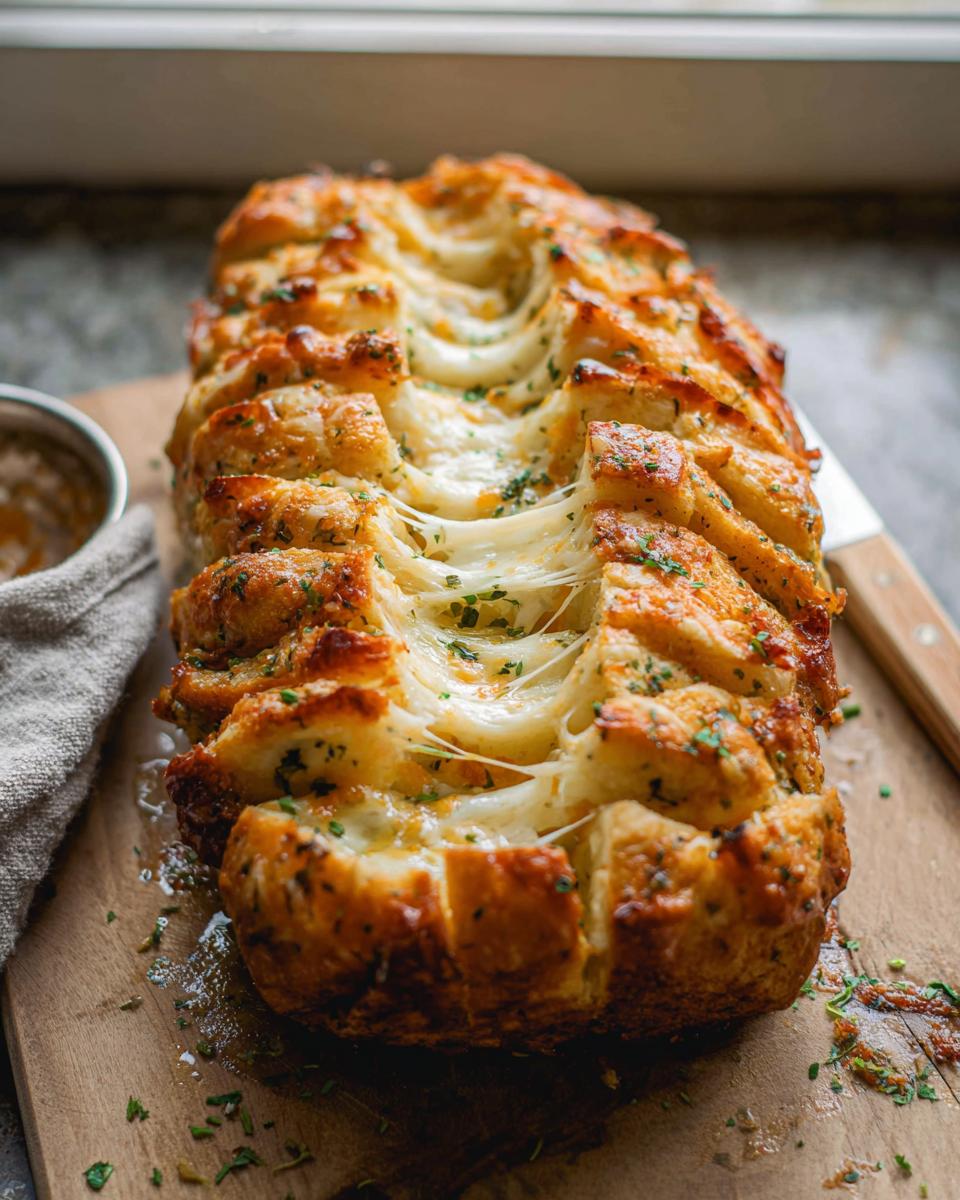
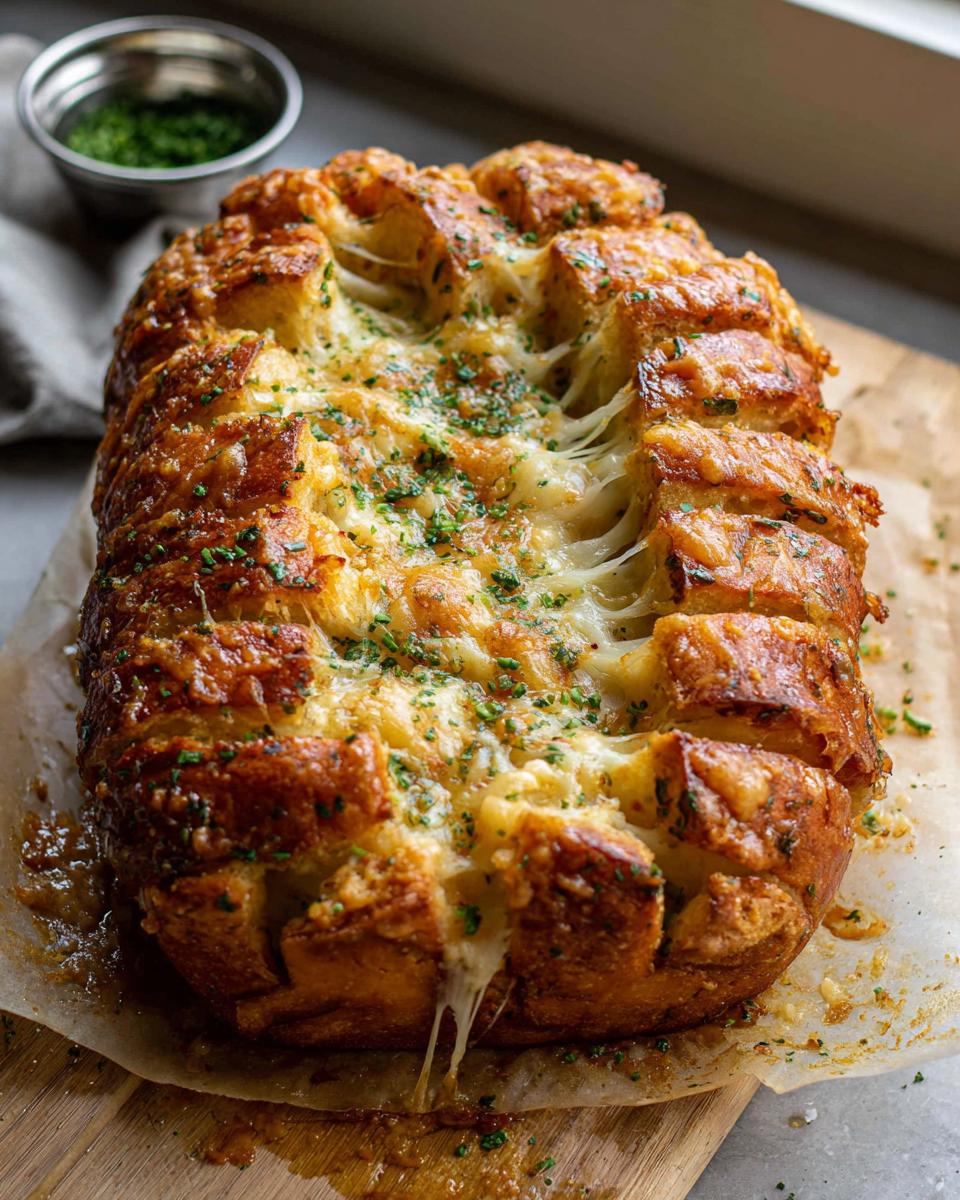
Oh, my goodness, if you are looking for that kind of food that just hugs you from the inside out, you’ve come to the right place! Nothing beats warm, yeasty bread, especially when it’s loaded with cheese. This recipe for Cheesy Pull-Apart Bread is seriously my go-to when I need something impressive but secretly super easy to make.
I’ll never forget the first time I made this for a cozy get-together with friends. I wanted something that would evoke warmth and bring everyone together, and as the bread baked, my kitchen filled with the mouthwatering aroma of melted cheese and fresh herbs. Wow! When I pulled it out of the oven, the bread was golden brown, and the stretchy cheese brought smiles all around. That evening turned into a delightful memory of laughter, shared stories, and the realization that good food truly brings people closer. It’s a recipe I cherish and revisit whenever I want to create a special atmosphere in my home. You need this bread in your life!
If you’re looking to bake up something magical, take a peek at the rest of my favorite recipes here: more comfort favorites!
Why This Cheesy Pull-Apart Bread is Your Next Party Favorite
Honestly, this bread goes fast! It’s designed for sharing, which is half the fun—watching everyone reach in for a gooey piece. Forget fussy centerpieces; this Cheesy Pull-Apart Bread is the whole show. It’s comforting, easy to manage, and guaranteed to disappear quickly at any gathering. It’s truly the ultimate low-stress Party Favorite.
- It’s ridiculously dippable and messy in the best way.
- The dough does most of the work while it rises.
- That garlic butter smell signals pure happiness!
Quick Tips for Perfect Pull Apart Bread
You want those gorgeous, defined strings of cheese, right? Here are my secrets for making sure your Pull Apart Bread is perfect every time.
First, room temperature ingredients make a huge difference in the dough’s texture. Make sure your milk isn’t too hot, or you’ll kill the yeast before it even gets started. Second, try mixing your cheeses right before you go to assemble—pre-shredded cheese often has coatings that stop it from melting quite as beautifully. Trust me on the shredding!
Gathering Ingredients for Your Cheesy Pull-Apart Bread
Okay, let’s talk ingredients! Getting the simple parts right here means the complex, gooey, cheesy results later. Since we are making bread from scratch, measurements are super important, especially for the yeast to wake up properly. Don’t worry, I’ve organized everything just like it’s written on my trusty recipe card so you won’t miss a thing. If you want to check out some of my quicker dinner ideas later, you can find them right here—but for this bread, let’s focus!
We have three main components: the soft Dough, the cheesy Filling, and the Finishing Touches. I even found a great guide on making bread from scratch if you’re feeling extra adventurous!
Dough Components
This is the foundation, so treat it right! You need 2.25 cups of all-purpose flour, 2 tablespoons of sugar, and 2 teaspoons of instant yeast. The crucial liquid is 0.75 cup of whole milk—it has to be warm, between 105°F and 115°F! Too hot and the yeast naps forever. Finish the dough with 1.5 tablespoons of softened unsalted butter and 1.5 teaspoons of kosher salt.
The Gooey Cheese Filling for Cheesy Pull-Apart Bread
Now for the heart of the matter! We need 0.5 cup of softened unsalted butter to make that amazing garlic spread. Mix that with 1 tablespoon each of minced garlic and chopped parsley, plus 0.5 teaspoon of kosher salt. Then, for that perfect Gooey Cheese pull, combine 1 cup of shredded mozzarella with 0.5 cup of sharp cheddar cheese. I love the sharpness the cheddar adds!
Finishing Touches and Toppings
These last few items go on right when the bread comes out of the oven to seal in all that amazing flavor. You just need 1 tablespoon of melted unsalted butter for brushing and an extra dash of kosher salt for a little crunch on top. Don’t forget a tiny bit of extra parsley for garnish, just to make it look as good as it smells!
Step-by-Step Instructions for Making Cheesy Pull-Apart Bread
This is where the magic really starts! We’re going to take simple flour and turn it into the most incredible, shareable appetizer. Don’t be intimidated by the yeast; we just need a little patience. We’ll use the stand mixer since it makes this dough handling so much easier, but if you’re doing it by hand, just be ready for a good arm workout!
Mixing and First Rise of the Dough
Grab your stand mixer and fit it with that dough hook attachment. Into the bowl go your flour, sugar, salt, and instant yeast. Mix those dry things first! Now, we add the wet stuff: the warm milk—remember, 105°F to 115°F—and the softened butter. Start it slow so you don’t get a flour cloud, okay? Once it comes together, switch the mixer to medium speed, and let it knead for a solid 5 to 6 minutes. You want the dough to look smooth and feel elastic when you touch it. If it seems stiff, add milk just a tablespoon at a time. When it looks perfect, pop it into a greased bowl, cover it tight with plastic wrap, and stick it somewhere warm. It needs a good hour and a half to double in size!
Preparing the Garlic Butter and Cheese Mixture
While that beautiful dough is working hard, let’s get our filling ready. This is important for time management! Take your 0.5 cup of softened butter—that’s a full stick—to a small bowl. Mash in your tablespoon of minced garlic, your tablespoon of chopped parsley, and that 0.5 teaspoon of salt. Mix it until it’s a beautifully fragrant paste. In a separate bowl, just toss your cup of mozzarella and half cup of cheddar together. That combination ensures great flavor and that amazing stringy texture. Set both bowls aside!
Assembling Your Cheesy Pull-Apart Bread Loaf
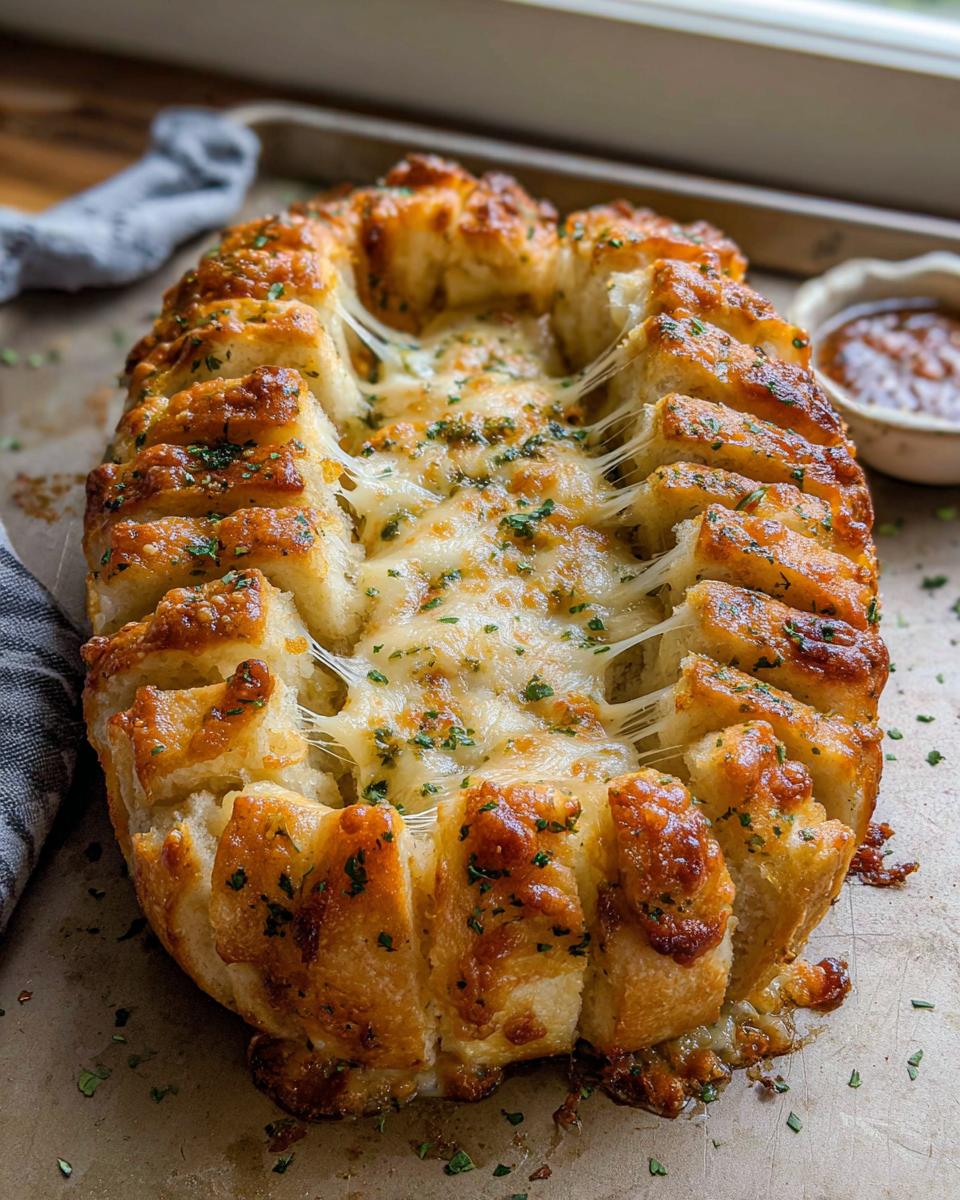
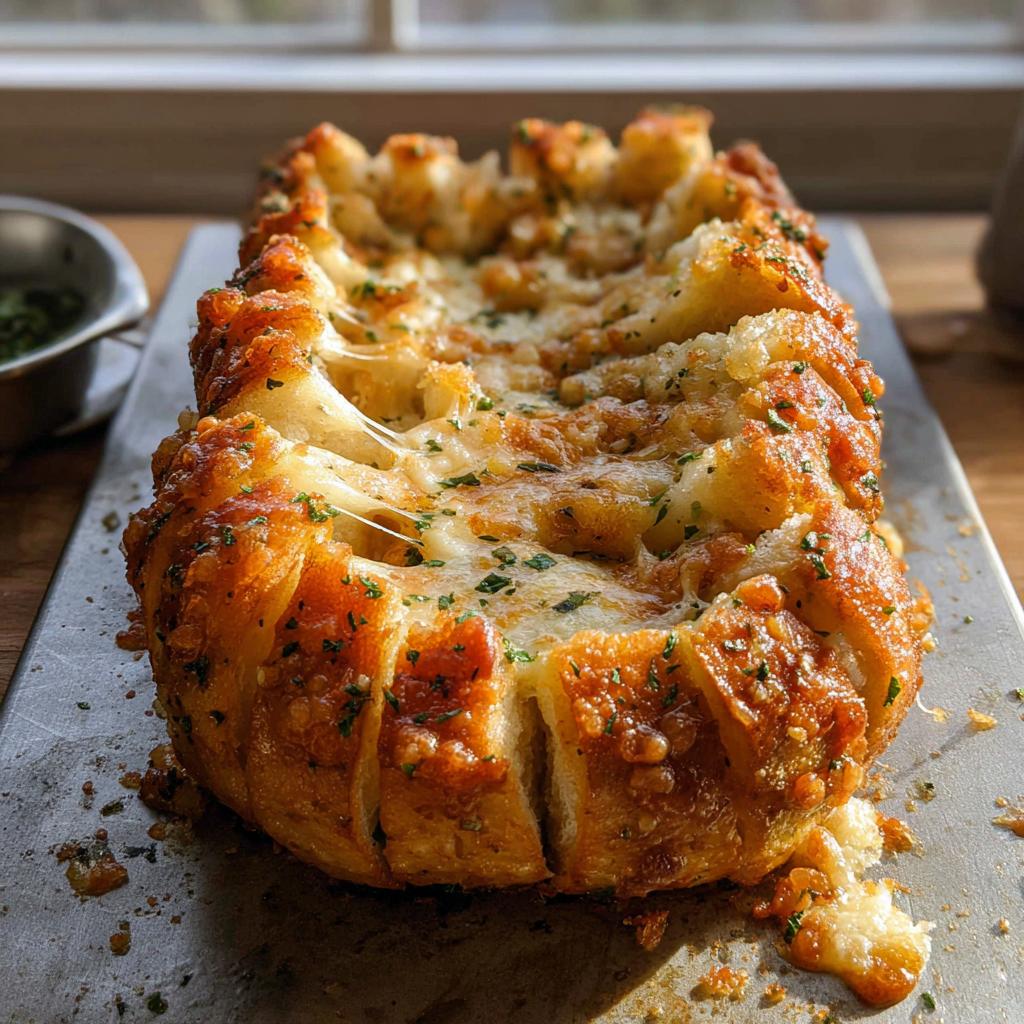
Once the dough has doubled, gently punch it down. Seriously, just deflate it. Now, turn it out onto the counter and use a pastry cutter or knife to divide it exactly into 12 equal pieces. This is critical for even baking, so take your time! Flatten each small piece into roughly a 4-inch round disc. Place these circles flat onto a parchment-lined sheet pan for now. Now, take that garlic butter and spread a nice layer thinly over each dough circle. Then, sprinkle an equal amount of your mixed cheese over every single one. Okay, time to stack! Make two towers, each six discs high, stacking buttered-and-cheesed faces together. Carefully lay those two towers side-by-side into your prepared loaf pan. Cover the whole pan loosely and let it sit for another 45 minutes for that second rise. It swells up nicely!
Baking and Finishing the Cheesy Pull-Apart Bread
Just before that second rise is up, crank your oven up to 325°F so it’s ready to go. Bake that loaf for about 45 to 50 minutes. Keep an eye on the top, though—sweet, cheesy bread browns fast! If the top looks too dark before the middle is done, just loosely drape a piece of aluminum foil over it. Once it passes the toothpick test—clean knife in the center!—pull it out. Move the whole pan onto a wire rack, let it cool for just a minute, and then it’s time for the finish line. Brush that last tablespoon of melted butter all over the top and give it a final, generous sprinkle of kosher salt and the rest of your fresh parsley. It smells heavenly, right?
If you want more tips on foolproof baking, check out my guide on making foolproof meals!
Ingredient Notes and Substitutions for Cheesy Pull-Apart Bread
One thing I always tell people is that baking is science, but cheese is art! For top-notch Cheese Bread, the quality really shows. If you are stuck, can you skip the milk? Not really; the yeast needs that slight warmth and richness to bloom properly. Whole milk is best, but 2% works in a pinch if you warm it just a tiny bit longer!
Now, let’s talk cheese substitutes. While the mozzarella/cheddar mix is my favorite for stretch and flavor balance, you can swap the cheddar for Monterey Jack if you want it milder. Please, please, please grate your own cheese! Pre-shredded cheese has anti-caking agents that prevent that gorgeous, oozy texture we are aiming for. Also, if you don’t have active dry yeast but only instant, don’t worry! You can usually skip proofing the yeast in the warm milk first. Just toss the instant yeast right in with the flour, as done in the recipe instructions, and you’re good to go learn more about ingredient temperatures here.
Tips for Success When Making Cheesy Pull-Apart Bread
Even when following the recipe exactly, sometimes the baking gods aren’t smiling on us, right? Don’t let a little hiccup ruin your day! Making perfect Pull Apart Bread comes down to a couple of key checks, primarily focused on temperature and how much you handle that lovely dough once it’s mixed.
My biggest piece of advice for anyone struggling with heavy dough is to check your yeast activation. If the milk was way too hot (over 120°F), you might have killed the yeast, and your dough won’t rise. It needs that gentle warmth! If it doesn’t puff up during the first rise after 90 minutes, you might have to start over with fresh yeast in warmer milk. We can’t force yeast to work if it’s unhappy!
Another common point of failure is over-handling the dough during assembly. When you’re flattening those 12 little rounds, be gentle! If you knead or press them too hard, you are pushing all that beautiful air right out. The goal is to gently shape while keeping the internal structure light. You want those airy pockets to bake up fluffy, not cement-like.
Also, remember that second rise is important! It gives the yeast time to generate gas in those stacked layers so they separate nicely while baking. If you rush it, the bread bakes into one dense square. If you’re ever curious about foolproof heat settings in general, I have a whole guide on temperatures you might find helpful: making foolproof meals.
Finally, watch the oven! 325°F is lower than many breads bake at, which helps the cheese melt all the way through without the top burning off. If you pull it out and the edges look done but the middle feels soft, that just means it needs another five minutes. You got this!
Serving Suggestions for Your Shareable Appetizer
This Cheesy Pull-Apart Bread is spectacular all on its own, but serving it up with the right companions just elevates the whole party experience! Since it’s so rich, you actually want things that are a little bright or brothy to cut through that glorious cheese factor. This truly is the ultimate Shareable Appetizer.
For a true comfort meal vibe, I always serve it alongside a big, steaming bowl of creamy tomato soup—dipping those buttery pieces is just heaven! If you’re planning a bigger spread, pull out some simple marinara sauce for dipping; the garlic and herbs in the bread are lovely with tomato acidity. And don’t forget to check out my ideas for homemade soup pairings for the perfect cozy night!
Storage and Reheating Instructions for Leftover Cheesy Pull-Apart Bread
Oops! Did you actually have leftovers? That’s incredibly rare, but if you do manage to save some of this wonderful bread, keeping it fresh is simple. You want to trap that moisture in, because dried-out cheesy bread is just sad!
The first day, just wrap the remaining loaf tightly in plastic wrap, and then maybe cover it again with a layer of aluminum foil. This keeps the air out! Because this recipe uses yeast, it’s really best eaten within two days. Any longer than that, and the structure starts to get a little heavy.
Now, reheating is where you bring back the magic. You absolutely cannot just microwave this; it gets tough texture-wise fast. The best way to restore that fresh, gooey cheese is to use the oven or an air fryer. Wrap the pieces you plan to eat loosely in aluminum foil—just enough to keep them from drying out on top.
Pop it into a preheated oven at about 300°F for about 10 to 12 minutes. If you’re using an air fryer, it’s even faster—try 325°F for maybe 5 minutes. Watch it closely! You want the cheese gooey and stretching again, not oily or hardened. If you’re planning ahead for busy nights, check out my tips on how to make meals ahead of time!
Frequently Asked Questions About Cheesy Pull-Apart Bread
I get so many messages asking about small details, so I figured I’d just put the most common ones right here! Trust me, once you troubleshoot these little things, you realize making this Cheese Bread is actually foolproof.
What if I don’t have a stand mixer? Can I still make this?
Oh, absolutely you can! I learned to bake before mixers were super common. You’ll just need a sturdy wooden bowl and a strong arm! Once the wet ingredients are combined with the dry, you’ll need to knead by hand on a floured surface for closer to 10 to 12 minutes, or until it feels smooth and passes the windowpane test (stretch a small piece thin enough to just see light through it without tearing). It takes longer, but you get a great workout!
Can I really use pre-shredded cheese in this Pull Apart Bread?
You technically *can*, but I really, really discourage it if you want the best result. Pre-shredded cheese is coated with things like potato starch or cellulose to keep it from clumping in the bag. That coating stops it from achieving that amazing, melty, stringy texture we want. Do yourself a favor and shred the mozzarella and cheddar fresh—it melts like a dream then!
How long does the dough take to rise exactly?
That’s a great point because rising time is never exact! The recipe calls for about 1 hour and 30 minutes for the first rise, but what dictates it is **warmth**. If your kitchen is chilly, it could take two hours. If your kitchen is warm (like near the oven after it’s been on), it might only take an hour. You aren’t looking at the clock; you’re looking for it to be doubled in size. The second rise, after you stack everything in the pan, is usually quicker—about 45 minutes, but again, watch the volume, not the timer!
How do I keep this Shareable Appetizer warm for a party?
If you are hosting a big event and need to keep it warm without drying it out, here’s my trick: Bake the bread about 30 minutes before your guests arrive. When it comes out, let it cool for only 10 minutes. Then, wrap the entire loaf loosely in foil and place it on the absolute lowest setting in your oven (around 170°F). It will stay warm and soft for over an hour! If you need to make sure things are ready fast next time, check out my speedy meal ideas!
Share Your Experience Making This Cheesy Pull-Apart Bread
Now that you have mastered the art of the perfect, gooey batch of Cheesy Pull-Apart Bread, I would absolutely *love* to hear about it! Seriously, knowing that my favorite party favorite is now showing up at your family dinners makes all my testing in the kitchen worthwhile.
Did you manage that perfect cheese pull? Did the garlic butter permeate every single layer? Don’t be shy! Head down to the comments section and tell me what you thought. Leaving a rating helps other bakers find this recipe, too, which is always a huge plus!
And if you took bragging rights photos—which I know you did—please share them on social media! Tag me so I can see your incredible work. You can find me (Jenny Miller) baking up more comfort food magic right here: check out my latest adventures. Happy baking, friends!
Cheesy Pull-Apart Bread
Ingredients
Equipment
Method
- In the bowl of a stand mixer fitted with a dough hook, combine flour, sugar, yeast, and salt.
- With the mixer on low speed, mix in the warm milk and butter until just combined. Knead on medium speed for 5-6 minutes, or until smooth and elastic. If the dough is too dry, add more milk, 1 tablespoon at a time. Or, add more flour if too wet until the dough reaches the desired consistency.
- Transfer dough to a greased medium bowl. Cover with plastic wrap and let rise in a warm spot until doubled in size, about 1 hour and 30 minutes.
- While the dough rises, combine softened butter, minced garlic, chopped parsley, and salt in a small bowl. Set aside.
- In a separate bowl, combine mozzarella and cheddar cheese. Set aside.
- Spray an 8 ½ x 4 ½-inch loaf pan with nonstick cooking spray. Set out a sheet pan lined with parchment paper. Set aside.
- Punch down the risen dough and transfer to a clean surface. Divide the dough into 12 equal pieces.
- Flatten each piece into a 4-inch round disc and place onto the lined baking sheet.
- To each round disc of dough, spread the garlic butter mixture. Then, top each with an equal amount of the shredded cheese mixture.
- Create 2 stacks of 6 discs of dough. Carefully place the dough stacks horizontally into the prepared loaf pan. Gently separate the pieces slightly. Cover the pan and let rise again until almost doubled in size, about 45 minutes.
- While the dough rises for the second time, preheat the oven to 325°F.
- Bake the loaf for 45-50 minutes, or until golden brown. Cover the pan loosely with aluminum foil if the top starts to brown too quickly.
- Transfer the loaf pan to a wire rack and let cool slightly. Brush with melted butter, sprinkle with salt, and garnish with parsley before serving.