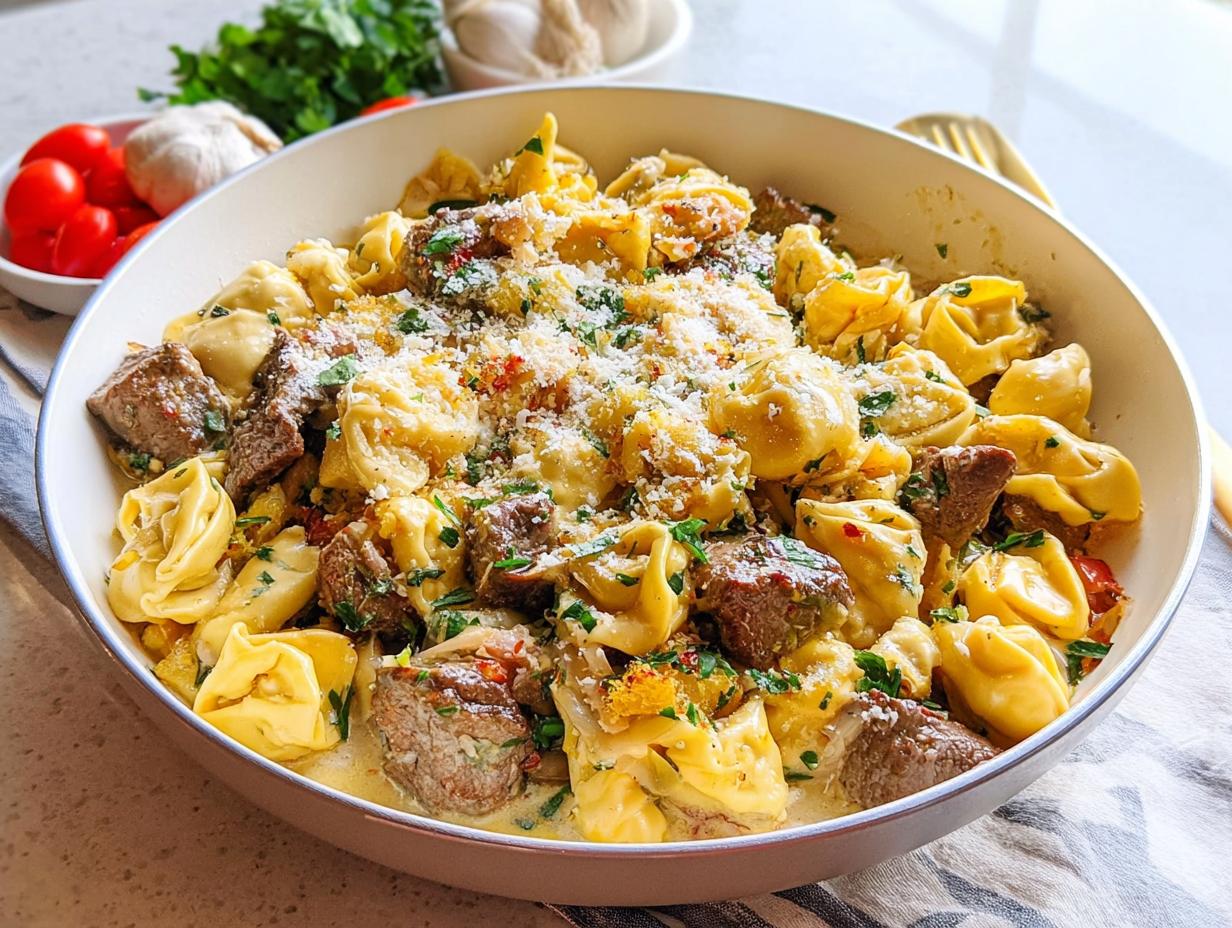
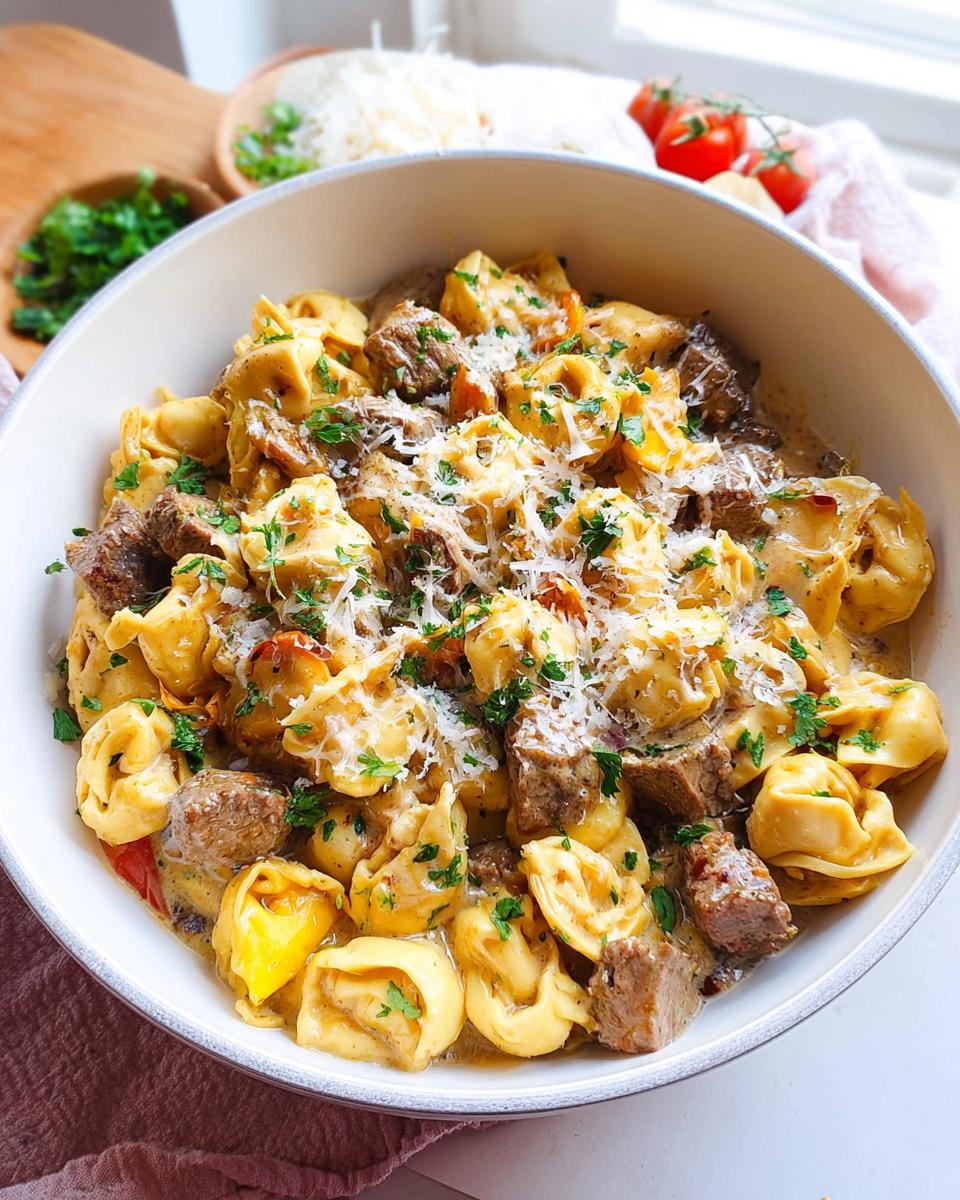
Okay, friends, gather ’round because I’ve got a dish for you that’s going to change your weeknight dinners forever. We’re talking about my famous Garlic Steak Tortellini, and trust me, it’s one of those meals that looks way more fancy than it actually is to make! I remember the very first time I whipped this up for my family – the kitchen was filled with this amazing garlic aroma, and seeing everyone’s faces light up as they dug in was just pure joy. It’s become a go-to for me, a delicious reminder that really good food doesn’t need hours in the kitchen. As Jenny Miller, I’ve cooked a lot of things, but this one always feels special and brings us all together, and I can’t wait for you to experience it too!
Why You’ll Love This Garlic Steak Tortellini
Okay, so why is this Garlic Steak Tortellini recipe such a winner? Let me tell you:
- Ridiculously Fast: Seriously, you can have this on the table in under an hour, perfect for those crazy busy nights.
- Super Easy: All the steps are straightforward, and there’s no super-fancy technique involved.
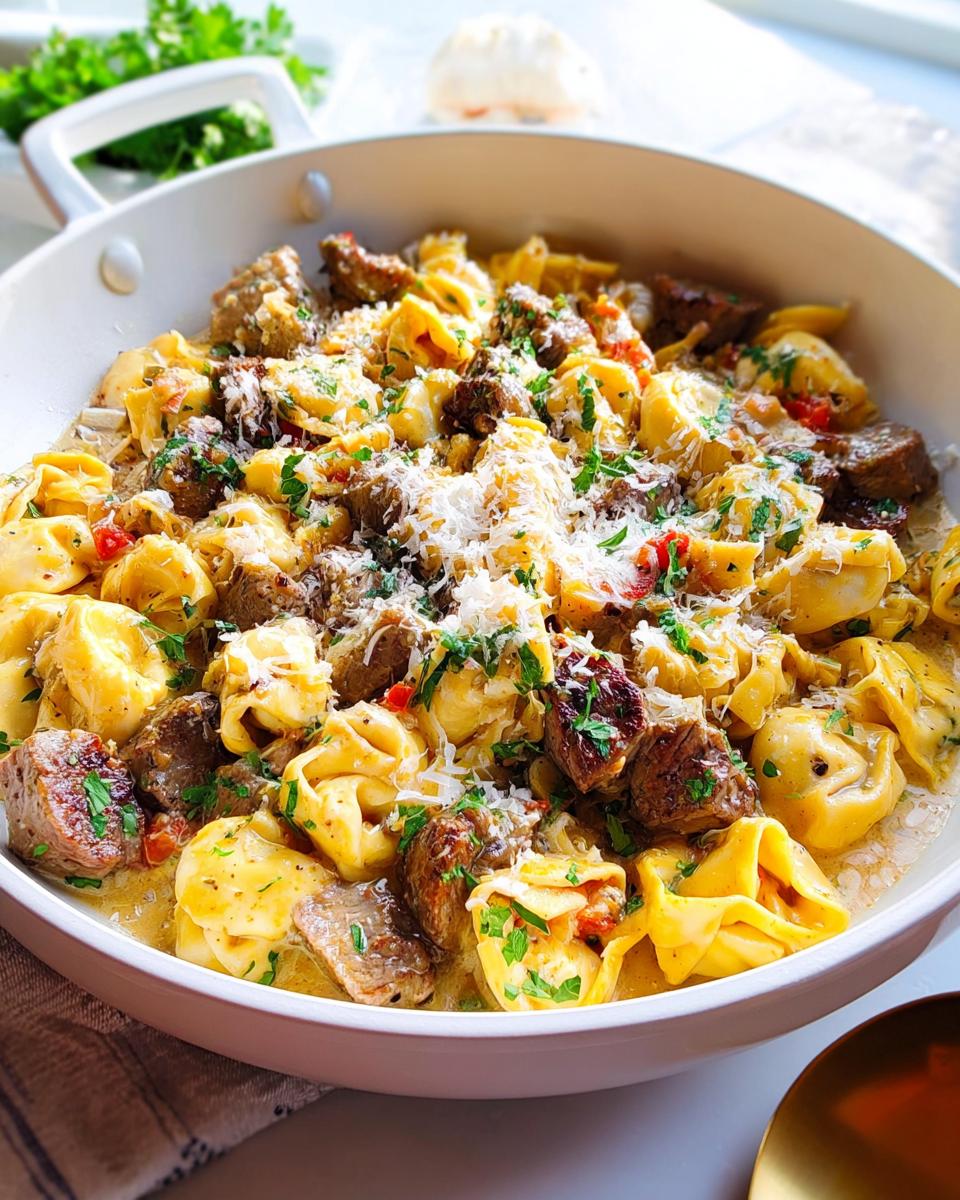
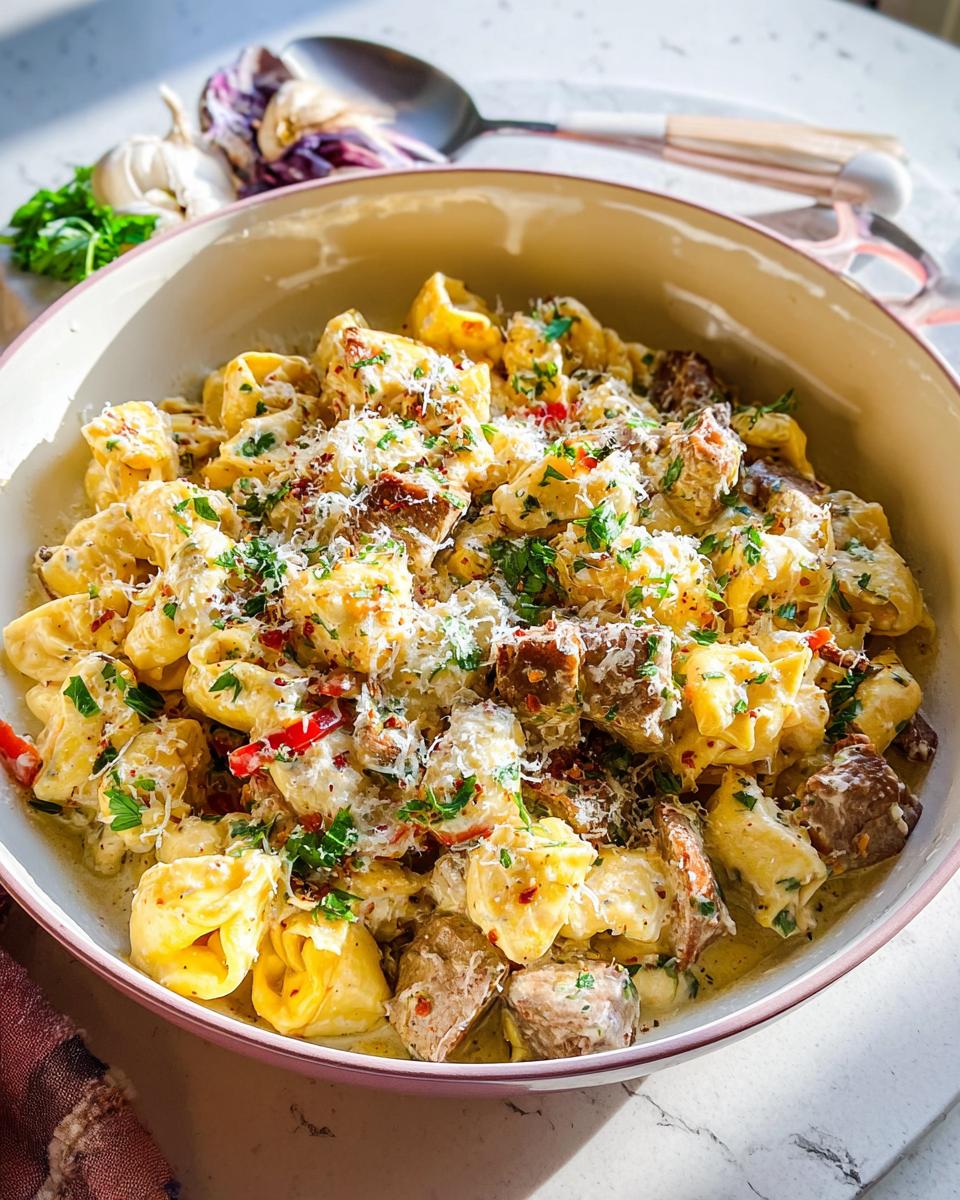
- Big Flavor: That garlic cream sauce? Chef’s kiss! It’s rich, savory, and totally satisfying.
- Impressive Results: Your family and friends will think you slaved away for hours.
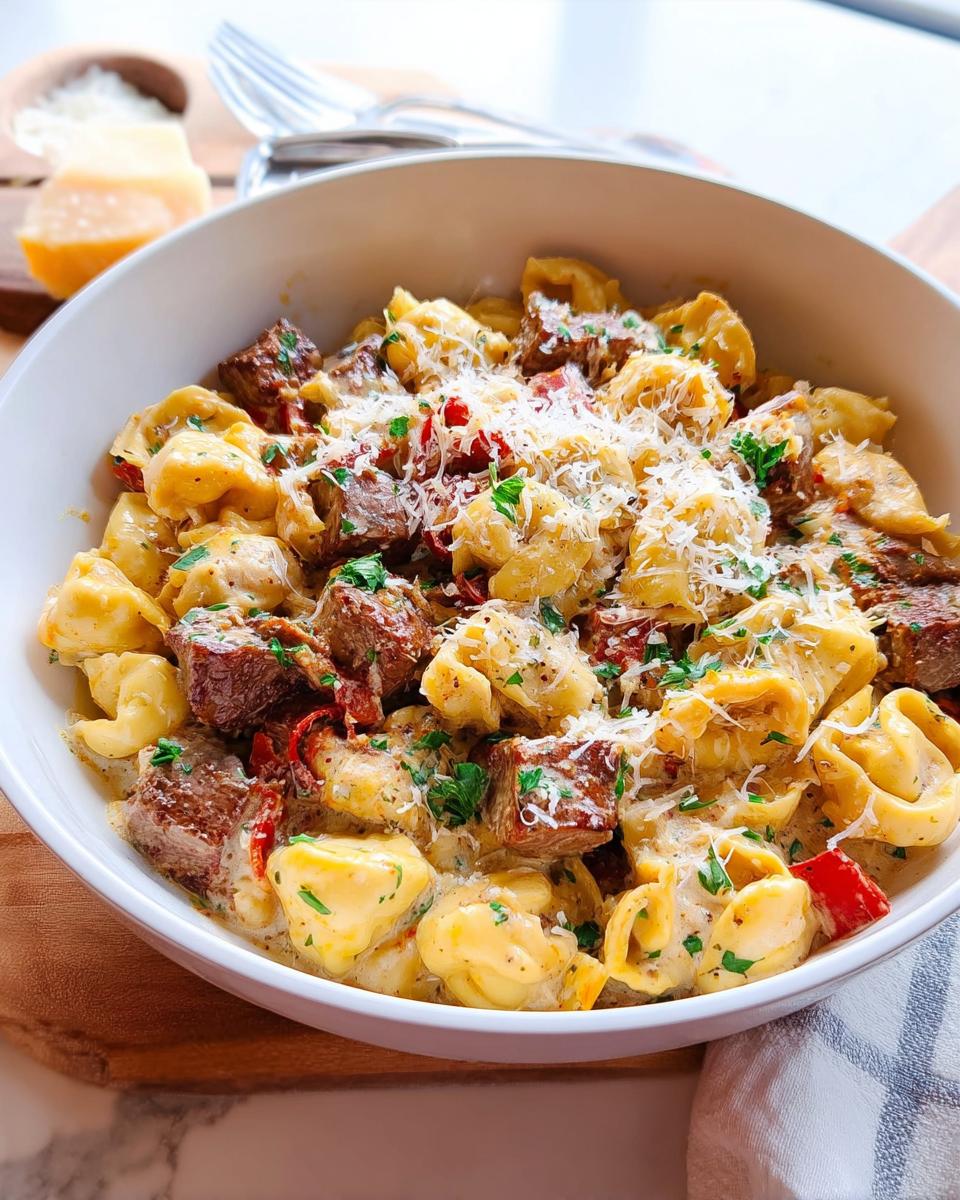
- Hearty & Filling: Tender steak, plump tortellini, creamy sauce – it’s a complete meal.
- Customizable: Easily tweak the spice level or add your favorite veggies.
Ingredients for Garlic Steak Tortellini
Alright, let’s talk ingredients! These are the stars that make our Garlic Steak Tortellini so darn delicious. I like to keep things simple and focus on quality, so here’s what you’ll need:
For the Steak:
- 2 lbs steak of your choice (I love a good sirloin or ribeye for this!)
- Salt, pepper, and garlic powder, for seasoning
For the Tortellini & Sauce:
- 24 oz fresh tortellini (Seriously, go for fresh if you can find it—major texture difference!)
- 8 oz butter (Yes, a whole stick! Don’t skimp here.)
- Plenty of minced garlic (I usually use about 4-6 cloves, but you do you!)
- 2 tsp garlic powder
- 1.5 tsp smoked paprika (Gives it that lovely depth!)
- 1 tsp black pepper
- 0.5 tsp red pepper flakes (Or more if you like a little kick!)
- 1.5 cups chicken broth
- 1 cup heavy cream (For that luscious, creamy sauce.)
- Zest from 1 small lemon
- Juice from 1/2 lemon (This brightens everything up!)
- 1 tbsp Dijon mustard
Optional Toppings:
- Grated Parmesan cheese
- Fresh chopped parsley
Essential Equipment for Making Garlic Steak Tortellini
To make this incredible Garlic Steak Tortellini, you don’t need a whole professional kitchen, but a couple of key players will make your life so much easier. First up, you’ll want a fantastic RecTeq Dual Fire Pellet Grill if you have one – it gets a beautiful sear on the steak! If not, any grill or even a hot cast-iron skillet will work wonders. Then, you absolutely need a large saute pan. This is where all the magic happens, from building that dreamy sauce to plumping up the tortellini. Trust me, having these on hand makes the whole process super smooth!
How to Prepare the Perfect Garlic Steak Tortellini
Alright, let’s get cooking! Making this amazing Garlic Steak Tortellini is way easier than you think. Just follow these simple steps and you’ll be enjoying a restaurant-worthy meal in no time. It’s a delightful dish that comes together almost as quickly as some of those restaurant-style soup recipes at home you might love.
Preparing the Steak
First things first, let’s get that steak ready! Give your chosen steak a good rubdown with salt, pepper, and a little garlic powder. If you’re using a pellet grill, get it nice and hot. Cook it to your perfect doneness, then let it hang out and rest on a cutting board for at least 10 minutes. This is key for juicy steak!
Crafting the Garlic Cream Sauce
Now for the star of the show – that glorious sauce! Grab a big saute pan and melt that butter over medium-low heat. Once it’s all melty, toss in your minced garlic. Stir it around until it smells absolutely heavenly – just a minute or two, don’t let it burn! Next, whisk in the garlic powder, smoked paprika, black pepper, and those little red pepper flakes for a hint of heat. Pour in the chicken broth and heavy cream, and stir it all together until it’s smooth and beautiful. Finally, stir in the lemon zest, lemon juice, and Dijon mustard. This last bit really brightens up the whole sauce, making it sing! It’s kind of like the magic that happens in some one-pot meals, but all focused on this incredible sauce.
Cooking the Tortellini and Finishing the Dish
Now for the fun part! Bring that sauce to a gentle simmer – you don’t want a rolling boil. Carefully add your fresh tortellini right into the pan. Give everything a good stir to make sure each little pasta hugger is coated. Pop a lid on the pan and let them simmer and plump up for about 10 minutes. Give it a stir every few minutes just to make sure nothing sticks to the bottom. Once the tortellini are tender and have soaked up some of that amazing sauce, slice up your rested steak into bite-sized chunks. Add those yummy steak pieces right into the pan with the tortellini and sauce. Stir it all up gently to coat everything. And there you have it – perfect Garlic Steak Tortellini, ready to wow!
Tips for Success with Garlic Steak Tortellini
You know, making this Garlic Steak Tortellini is all about embracing a few simple tricks that make a world of difference. First off, don’t be shy with the garlic! Fresh minced garlic is your best friend here, but also a good quality garlic powder adds depth. When you’re cooking the steak, remember that resting period is super important – it keeps all those lovely juices inside. And for the sauce? Keep it at a gentle simmer; we’re plumping the tortellini, not boiling them into oblivion. If you love that rich, comforting flavor, this dish is right up there with mastering how to make soup recipes like a pro. A little care goes a long way!
Ingredient Notes and Substitutions
So, you wanna tweak this Garlic Steak Tortellini a bit? Totally doable! For the steak, if you can’t get your hands on your favorite cut, honestly, any nice sirloin, flank steak, or even a tenderloin will work beautifully. Just make sure to slice it against the grain after resting. If you’re looking for a dairy-free sauce, you can try using full-fat coconut milk or a good quality unsweetened oat cream, though it will change the flavor profile a little. And while fresh tortellini is amazing, if you’re in a pinch, dried tortellini works too, just adjust the cooking time so it doesn’t get mushy. It’s all about making it work for you! If you love easy cooking, you might also enjoy exploring these air fryer chicken recipes for beginners.
Serving Suggestions for Garlic Steak Tortellini
Now that you’ve made this amazing Garlic Steak Tortellini, what should you serve alongside it? Keep it simple and fresh! A crisp green salad with a light vinaigrette is always a winner, cutting through the richness of the sauce. Some crusty garlic bread is also fantastic for soaking up any leftover sauce – pure heaven! If you’re looking for more ideas, check out this list of 100 side dish recipes. For drinks, a medium-bodied red wine like a Chianti or even a crisp Pinot Grigio would be lovely.
The Story Behind Grandma’s Carrot Pound Cake
Every family recipe tells a story, and our carrot pound cake holds decades of cherished memories in its moist, spiced crumb. This recipe stands apart from ordinary desserts. It represents our family gatherings and the woman who created it.
Why this recipe means so much to our family
Sunday afternoons at Grandma’s house always featured this special carrot pound cake on her vintage cake stand. The recipe became our family’s love language. We celebrated milestones and comforted each other with it during tough times.
The carrot pound cake appeared at my sister’s college graduation. It waited for cousin Tom when he returned from overseas. We even chose it over a traditional tiered cake at my wedding. The familiar scent of cinnamon and nutmeg takes us back to her kitchen. We gathered around the farmhouse table and shared stories there.
My children now see this dessert as a sign of special occasions. This recipe connects four generations of bakers in our family. The handwritten recipe card has spots of vanilla extract and butter stains. Each time I use it, I feel Grandma’s presence guiding my hands through the familiar steps.
How Grandma developed her version of carrot cake pound cake
Grandma’s experience with this recipe started in the 1950s during a tough harvest season. She had plenty of carrots but limited pantry items. She needed something special for the church social. She tried a traditional carrot cake first but didn’t like its delicate structure.
“Cakes should stand tall and proud,” she always said. She started testing different versions by adding elements from her famous pound cake. She used a seven-egg formula that created the perfect density. She made a breakthrough when she cut back on leavening agents and added more fat. This created a sturdier yet tender crumb.
She brilliantly added crushed pineapple out of necessity. One spring, apples weren’t available for moisture, so she used canned pineapple from her pantry. The subtle tartness matched the sweet carrots perfectly. She shared dozens of test batches with willing neighbors. She ended up finding the exact measurements of dark brown sugar and butter that became her signature.
Grandma kept improving the spice blend. She found the perfect mix of cinnamon, nutmeg, and ginger mentioned in our family cookbook. The cream cheese glaze came later, inspired by a women’s magazine in the 1970s. She often preferred a simple dusting of powdered sugar on top.
This recipe shines not just because it tastes incredible. It shows Grandma’s resourcefulness, creativity, and love for feeding those around her.
Grandma’s Secret Ingredients and Why They Matter
The magic of Grandma’s carrot pound cake comes from her technique and her strict rules about certain ingredients that she wouldn’t change or substitute. My search through her handwritten recipe cards showed ingredients underlined twice – her way of saying “don’t even think about changing these.”
Freshly grated carrots for moisture and texture
Grandma would scoff at pre-shredded carrots from the grocery store. “Those dry little sticks?” she’d say with a dismissive wave. She grated carrots by hand right before mixing them into the batter. Fresh carrots release natural moisture while baking and create that distinctive tender crumb that makes carrot pound cake so special.
I can still picture her orange-stained knuckles as she worked the box grater. She never wanted help because she needed to “feel” when the carrots were perfect. The medium holes were her choice – not too fine to disappear in the batter, not too coarse to stay crunchy after baking. This careful attention meant every bite had visible orange specks, a true mark of authentic carrot pound cake.
The role of pineapple and raisins in her original recipe
“Secret weapons,” Grandma called them. Crushed pineapple brings a subtle tang that balances the cake’s sweetness. The extra moisture keeps the pound cake fresh even days after baking.
Grandma’s raisins had to soak in warm water (or bourbon for adult parties) before going into the batter. This step stops them from pulling moisture from the cake. She roughly chopped them too – “so they surprise you in every few bites rather than overwhelming the cake.”
Why she always used dark brown sugar and real butter
“Baking with white sugar is like singing without vibrato,” Grandma often remarked. Dark brown sugar’s higher molasses content adds rich complexity that white sugar can’t match. These caramel notes blend perfectly with the carrots’ natural sweetness.
Real butter stood as the most important rule in Grandma’s kitchen. She’d roll her eyes at margarine advertisements and mutter about “newfangled substitutes.” Butter adds richness and helps structure the carrot pound cake. Her method of creaming it with sugar made tiny air pockets that expanded during baking, giving her cake its unique dense-yet-light texture.
Years of baking proved that these core ingredients – handled with care – turn a simple carrot pound cake into something magical.
Step-by-Step: How Grandma Made It Perfect Every Time
My grandmother’s kitchen became her canvas, and watching her work was like seeing an artist create a masterpiece. Her carrot pound cake technique was way beyond the reach and influence of a simple recipe. She combined intuition, precision, and time-honored methods that passed through generations.
Creaming butter and sugar the old-fashioned way
The foundation of her carrot pound cake demanded patience. “This step makes or breaks your cake,” she’d remind me while setting butter out hours before baking. The butter’s consistency needed to be just right – soft enough to leave an indent with one finger, yet slightly cool without becoming greasy or melted.
She grabbed her wooden spoon and sturdy mixing bowl to beat the butter until smooth. Dark brown sugar went in gradually as she worked with purpose until the mixture turned pale yellow and fluffy. “When it’s right, it looks like whipped honey,” she’d say. The process took 2-3 minutes by hand, creating those vital air bubbles that gave the carrot pound cake its perfect texture.
Alternating dry and wet ingredients for balance
“Add everything at once, and you’ll end up with cement, not cake!” came her warning. She followed a strict pattern with her carrot pound cake, alternating between dry ingredients and liquid. The dry mixture always started and finished the process.
This method kept the batter from separating and becoming dense. She explained how adding all liquid at once would oversaturate the creamed butter mixture. Dumping all dry ingredients risked overmixing and developing too much gluten. Each addition required just enough stirring to combine, with some flour streaks visible until the final mix.
How she tested doneness without a thermometer
The toothpick test served as just the beginning. “Cakes talk to you if you listen,” she always insisted. She looked for signs that the carrot pound cake had pulled slightly away from the pan’s edges – a good indication of readiness.
Her signature touch test followed, as she pressed gently with fingertips to feel for springy resistance. A thin knife near the center completed her check. “Moist crumbs are what you want,” she’d say, “not wet batter, but not bone-dry either.” This three-step verification ensured her carrot pound cake achieved the perfect balance – fully baked yet irresistibly moist.
Modern Tweaks That Still Honor the Original
My grandmother’s time-tested techniques are precious, and I’ve found modern methods that keep her carrot pound cake recipe authentic. These small changes make baking easier without losing the amazing taste and texture she worked so hard to perfect.
Using cake goop or parchment for easy release
My grandmother always used butter and flour to prepare her cake pans. I’ve found that homemade cake goop gives me perfect results every time. This simple mixture needs equal parts flour, vegetable oil, and shortening (or margarine) mixed into a smooth paste. A thin layer applied with a silicone brush works great, especially in the detailed crevices of my Bundt pan.
High-sugar recipes like carrot cake can be tricky with sticking. Adding a parchment circle to the bottom of larger pans gives you extra protection. This method, which some people call “homemade pan release,” works perfectly with my grandmother’s recipe and saves you from dealing with broken cakes.
Optional cream cheese glaze vs Grandma’s simple dusting
My grandmother loved a simple dusting of powdered sugar on her carrot pound cake. The cream cheese glaze became popular in the 1970s, and it’s a delicious addition. You can make a simple glaze by beating cream cheese until smooth, then adding powdered sugar, vanilla, and just enough milk to make it pourable.
The glaze gets even better with orange zest and juice for special occasions. These flavors work beautifully with the carrot’s natural earthiness. You can leave the glaze at room temperature since its high sugar content acts as a preservative.
How to adapt the recipe for loaf pans or Bundt pans
My grandmother’s carrot pound cake recipe works great in different pans. A classic 10-cup Bundt pan needs about 42 ounces of batter. Deeper pans like loaf pans need more time in the oven because heat takes longer to reach the center.
Loaf pans work best with parchment paper hanging over the edges for easy removal. Moving between different pan sizes is simple once you know the volume or surface area. A 9×13 inch pan’s batter fits perfectly into two 9-inch round pans.
Conclusion
Our family’s legacy of love shines through Grandma’s carrot pound cake recipe. She first mixed seven eggs with freshly grated carrots decades ago. Her meticulous approach to ingredients and technique still teaches younger generations about patience and precision in the kitchen today.
Grandma knew exactly what she was doing. The cake remains unmatched thanks to fresh ingredients, careful temperature control, and her methodical mixing method. Modern tools like cake goop and parchment paper simplify the baking process now, but her recipe’s essence stays true to its roots.
This carrot pound cake shows how cherished family recipes can grow without losing their heart. The familiar scent of cinnamon and nutmeg fills my kitchen as I bake it now. My kids instantly recognize these aromas that connect them to their great-grandmother’s creative spirit from those simple harvest days. Whether I stick to her classic powdered sugar dusting or add a cream cheese glaze, each batch brings back memories of those sweet Sunday afternoons in her kitchen.
FAQs
What makes this carrot pound cake recipe special?
This carrot pound cake recipe is special because it’s a family heirloom, developed by Grandma in the 1950s. It features a unique combination of seven eggs and fresh butter for perfect texture, along with freshly grated carrots, crushed pineapple, and dark brown sugar for exceptional flavor and moisture.
How do you ensure the carrot pound cake turns out moist?
The key to a moist carrot pound cake is using freshly grated carrots, which release natural moisture during baking. Additionally, the recipe includes crushed pineapple, which adds extra moisture and prevents the cake from drying out, even days after baking.
Can I use pre-shredded carrots for this recipe?
It’s best to avoid pre-shredded carrots and instead grate them fresh just before mixing into the batter. This ensures maximum moisture and the right texture. Grate the carrots on medium-sized holes for visible orange specks in each bite.
What’s the secret to the perfect texture in this carrot pound cake?
The perfect texture comes from properly creaming the butter and sugar, alternating dry and wet ingredients while mixing, and using the right proportion of eggs and butter. The creaming process creates tiny air pockets that expand during baking, resulting in a dense yet light texture.
How can I adapt this recipe for different pan sizes?
The recipe can be adapted for various pan sizes. For a standard 10-cup Bundt pan, you’ll need about 42 ounces of batter. When using loaf pans, line them with parchment paper and adjust baking times as deeper pans require longer baking. You can also split the batter between two 9-inch round pans if you prefer.
Frequently Asked Questions about Garlic Steak Tortellini
Got questions about this delectable Garlic Steak Tortellini? You’ve come to the right place! Here are some answers to common queries to help you nail this recipe every single time. It’s one of my go-to’s for those busy nights when you need something quick and impressive, just like those easy dinner recipes in 25 minutes.
Can I use a different type of pasta?
Absolutely! While fresh tortellini is dreamy and plumps up so beautifully in the sauce, you totally can use dried tortellini. Just make sure to cook it according to the package directions and drain it really well before adding it to the sauce to finish cooking. Other short pasta shapes like penne or fusilli would also work in a pinch!
How can I make this recipe spicier?
Ooh, I love a bit of heat too! For a spicier Garlic Steak Tortellini, I’d suggest increasing the red pepper flakes. You could double them, or even add a pinch of cayenne pepper to the sauce when you add the other spices. Another fun trick is to serve it with some fresh sliced jalapeños on the side for anyone who wants to kick it up even more!
What kind of steak is best for this recipe?
Honestly, the beauty of this dish is that it’s pretty forgiving. I tend to go for cuts like sirloin, ribeye, or flank steak because they have great flavor and cook up nicely. The key is to not overcook it, and to let it rest! You want that juicy, tender steak to complement that rich garlic cream sauce perfectly.
Nutritional Information
Just a friendly heads-up, the nutritional info for this amazing Garlic Steak Tortellini is an estimate, of course! Depending on the exact steak cut, brand of ingredients, and portion sizes, the numbers can wiggle around a bit. But generally, you’re looking at a hearty meal packed with protein and flavor!
Garlic Steak Tortellini
Ingredients
Equipment
Method
- Season your steak with salt, pepper, and garlic. Cook the steak to your desired temperature on the pellet grill, then set it aside to rest.
- In a large saute pan, melt the butter over medium-low heat.
- Add the minced garlic to the melted butter and stir until it becomes fragrant.
- Stir in the garlic powder, smoked paprika, black pepper, and red pepper flakes. Then, add the chicken broth and heavy cream. Stir until combined.
- Add the lemon zest, lemon juice, and dijon mustard to the sauce. Stir well.
- Add the fresh tortellini to the simmering sauce. Bring the mixture to a gentle simmer.
- Cover the pan and let the tortellini plump up for about 10 minutes. Stir every few minutes to prevent sticking.
- Once the steak has rested, cut it into chunks. Add the steak pieces to the tortellini and stir to coat everything evenly in the sauce.
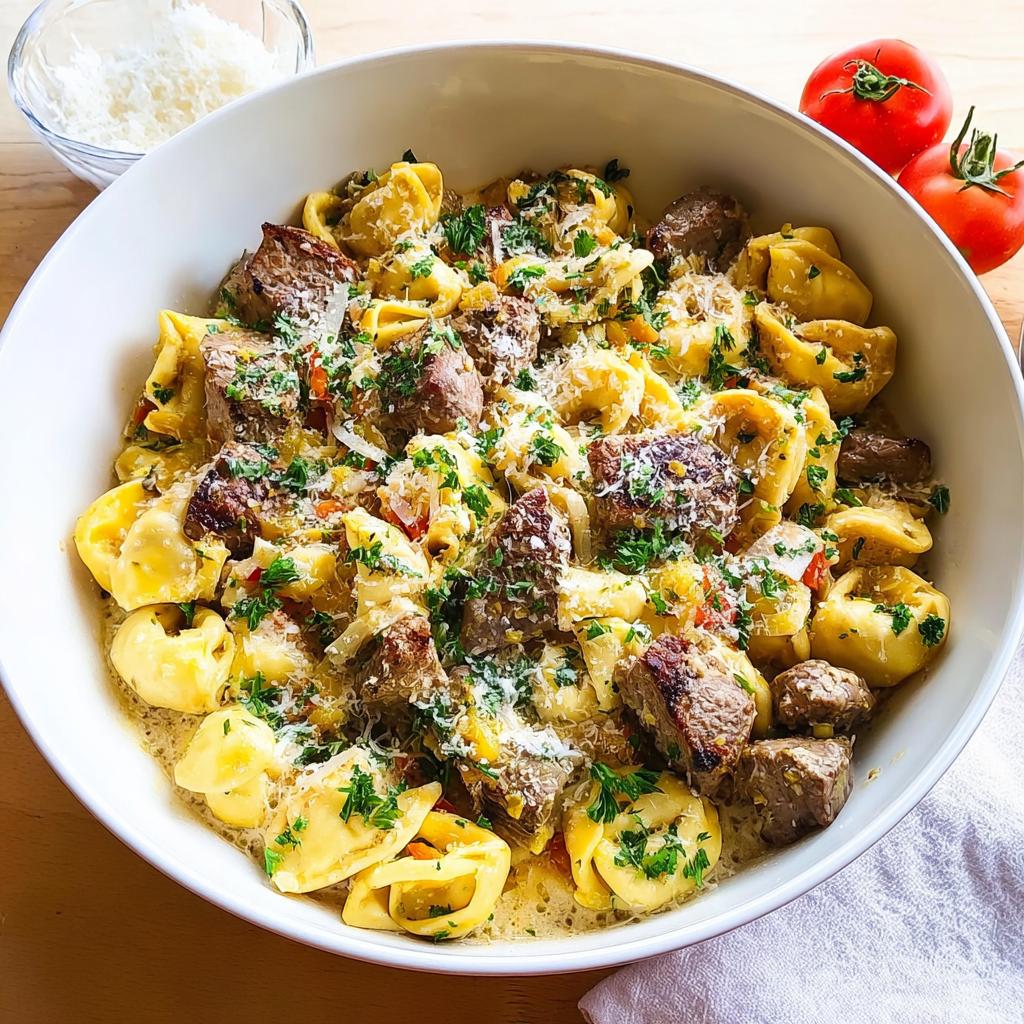
- Serve the Garlic Steak Tortellini topped with grated Parmesan and fresh parsley, if desired. Enjoy!