Halloween is just around the corner, and you know what that means – it’s time for some spooky, fun food! If you’re like me, Jenny Miller, and love to whip up something festive without spending hours in the kitchen, then you’re going to adore these Mini Mummy Bites (2025). Seriously, these little guys are my secret weapon for any Halloween party or just a fun Tuesday night treat. I first threw these together for a neighborhood potluck where everything had to be finger food with a fright, and let me tell you, they were a massive hit! They’re so incredibly easy to make using just a few pantry staples, and they look absolutely adorable.

Why You’ll Love These Mini Mummy Bites (2025)
Trust me, these little mummy guys are a total lifesaver when you need a festive treat fast! Here’s why they’ll become your new Halloween go-to snacks:
- Super Speedy! Seriously, you can whip these up in about 20 minutes, start to finish. Perfect for last-minute party prep!
- Crazy Easy: Even if you’re not a kitchen whiz, you can totally nail these. My nieces help me make them every year – it’s that simple!
- Totally Kid-Friendly: They’re small, they’re fun, and kids LOVE making and eating them. Think happy little faces!
- Festive Fun: Hello, Halloween vibes! They look so CUTE and scream spooky season without being too scary.
- Minimal Mess: The cleanup is ridiculously easy. Just a baking sheet to wash and you’re good to go.
Gather Your Spooky Supplies: Ingredients for Mini Mummy Bites
Alright, time to raid your kitchen for these adorable little mummy mouthfuls! You don’t need anything fancy here, just a few everyday goodies. It’s honestly amazing how these simple ingredients transform into something so fun:
- 1 container Stonefire mini naan dippers (about 7.05 oz): These are perfect because they’re already tiny and just begging to be wrapped up!
- 5 sticks String cheese: You’ll want to tear these into strips and then cut them in half. This gives you those perfect mummy wrappings.
- 1 can Sliced black olives (2.25 oz, drained): These are for our mummy’s eyes! Make sure they’re drained well.
- 1 jar Pizza/pasta sauce (14 oz): This is for dipping, of course! A yummy red sauce makes the little mummies even spookier.

These are all great things to have stocked, and if you’re curious about building up your pantry, you might want to check out these essential pantry items that make cooking a breeze!
Crafting Your Mini Mummy Bites (2025): Step-by-Step
Ready to get these cute little mummies ready for their close-up? It’s actually super simple! First thing’s first, get that oven preheating to 350 degrees F. While it’s heating up, go ahead and lay out all your mini naan dippers on a baking sheet. It’s like setting the stage for our spooky little stars!
Now for the fun part – the wrapping! Grab those halved string cheese strips and start laying them over the naan breads in a zig-zag pattern, kind of like you’re wrapping up a mummy with bandages. Don’t worry about it being perfect; wobbly lines just add to their charm! Then, just pop two of those drained black olive halves near the top of each naan to make their eyes. This is where I let my nieces get creative – they love giving each mummy its own silly expression!
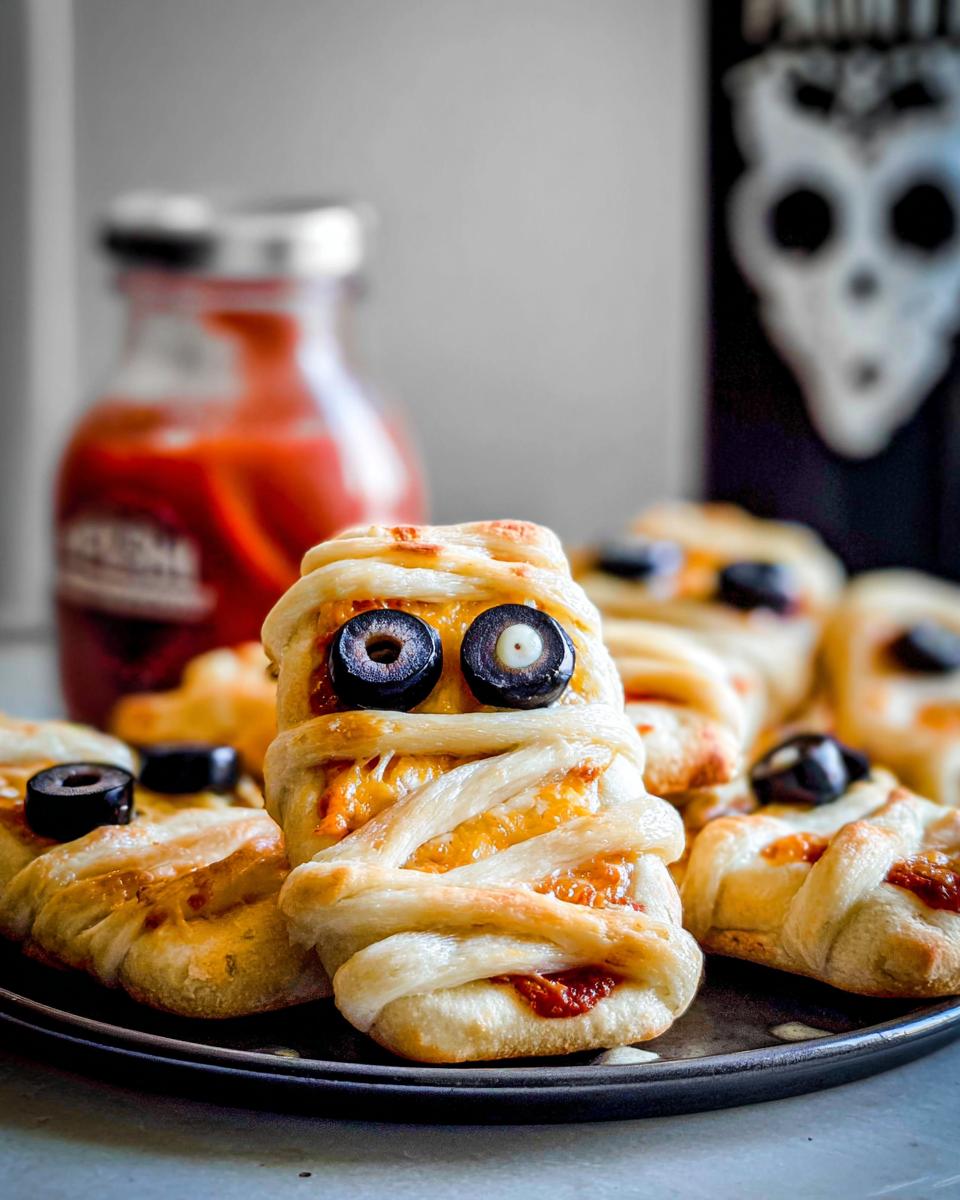
Once they’re all wrapped and eyed, pop that baking sheet into the oven for about 8 to 10 minutes. You’re looking for the cheese to melt beautifully and maybe get just a little bit golden. When they come out bubbly and looking super spooky, serve ‘em up with your favorite pizza or pasta sauce for dipping!
For an extra spooky touch, you can find even more fun mummy ideas here!
Tips for Perfect Mini Mummy Bites
Okay, so these Mini Mummy Bites are pretty forgiving, but let me tell you a few little tricks I’ve learned that make them extra special. First off, when you’re laying down those string cheese strips, try to keep the layers close together without completely overlapping. This helps the cheese melt into one gooey, mummy-like layer instead of leaving big gaps. And for the olives? Make sure they’re pressed down just a tiny bit so they stick and don’t slide off when they’re all melty. You don’t want any one-eyed mummies, right? Also, keep an eye on them in the oven – ovens can be so different! You just want that cheese melted and maybe a hint of golden brown, not burnt. They bake up so fast!
Make-Ahead and Storage for Mini Mummy Bites
Okay, party planning can be a total whirlwind, right? The good news is, these Mini Mummy Bites (2025) are totally make-ahead friendly! You can totally wrap up your mummies and get them all ready to go *before* the Halloween party chaos begins. Just place them on your baking sheet, cover them loosely with plastic wrap, and pop them in the fridge for up to 24 hours. When you’re ready to bake, just pop them straight into the preheated oven. They might need an extra minute or two since they’ll be starting from cold.
Have leftovers? Happens to the best of us! These guys are best enjoyed warm, so reheating is key. My favorite way is to pop them back into a toaster oven or a regular oven set to a low temperature, around 300°F (150°C), for just a few minutes. You want them warmed through and maybe a little bit crisped up again. Microwaving can make them a bit soft, so I usually skip that if I can help it. Nobody wants a soggy mummy!
Serving Suggestions for Your Mini Mummy Bites
These spooky little Mini Mummy Bites are perfect for a Halloween party appetizer, a fun school lunch addition, or just a themed snack any day in October! They’re fantastic served with a side of marinara for dipping, alongside other goodies from our recipe collection, or piled high on a Halloween-themed platter. They just scream festive!

Frequently Asked Questions about Mini Mummy Bites
Got a question swirling around about these adorable Mini Mummy Bites? I’ve got you covered! Here are some common things people ask:
Can I use a different type of bread for Mini Mummy Bites?
Absolutely! While the mini naan dippers are super convenient, you could totally use small pita rounds, English muffin halves, or even just cut up pieces of larger flatbread. Just make sure they’re small enough to be “bite-sized” and adjust baking time if needed!
What are some fun variations for these Mini Mummy Bites?
Oh, the possibilities are endless! For different “eyes,” try tiny dots of cream cheese with a speck of black sesame seed, or even small pieces of bell pepper. You could also try a drizzle of ranch or a spicy sriracha sauce for dipping if you’re feeling adventurous!
Are Mini Mummy Bites suitable for young children to make?
Totally! This is such a fun recipe to get the kids involved with. They’ll love laying out the cheese strips to make the mummy wraps and placing the olive eyes. Just supervise with the oven, of course!
Nutritional Information (Estimated)
Alright, so while these Mini Mummy Bites (2025) are more about spooky fun than counting every calorie, I can give you a ballpark idea! Keep in mind that these numbers are estimates and can change depending on the *exact* brands of naan dippers, string cheese, and olives you use. Generally, you’re looking at roughly 100-150 calories per bite, with a good mix of carbs from the naan and some fat and protein from the cheese (hello, Mummy eyes!). They’re a fun treat, perfect for parties!
Share Your Spooky Creations!
Okay, now it’s your turn to get spooky in the kitchen! I just *love* seeing your amazing creations. Did you make these Mini Mummy Bites (2025)? Did your little ones have a blast making them? Please, spill the spooky tea in the comments below! I’m dying to hear all about it, and if you snap a pic, be sure to tag me on social media – your mummy bites deserve their moment in the spotlight!

Mini Mummy Bites
Ingredients
Equipment
Method
- Preheat your oven to 350 degrees F. Arrange the mini naan breads on a baking sheet.
- Starting from the wider part of the naan breads, lay the half strips of string cheese over breads in a zig-zag pattern.
- Place two olives near the top of each naan for the eyes.
- Bake for 8-10 minutes, or until the cheese is melted and starting to brown. Serve with red sauce for dipping!