If you’re anything like me, the moment warm weather hits, I start demanding handheld, easy-to-manage desserts. Forget the spills and the giant serving spoons! That’s why I immediately fell in love with constructing the Strawberry Shortcake Trifle in a Jar. It takes all the nostalgic flavor of classic shortcake and packs it into perfect, portable mason jar treats. I still remember the first time I brought these to a summer picnic last year; I was nervous since I mixed a keto-friendly cake for my friends who have different diets. Watching everyone reach for their own little jar and then seeing their sheer delight made it worthwhile! Honestly, this layered trifle recipe proves that the best desserts are the ones that bring people together. I’m Jenny, and I cook for moments like those.
Why This Strawberry Shortcake Trifle in a Jar is Your New Favorite Summer Party Dessert
Look, these aren’t just any desserts; these are built-in portion control units! I absolutely adore bringing these to anything outdoors. They look so charming lined up on a platter, and honestly, they travel like a dream. No more worrying about melting slices or dusty sheet cakes sitting uncovered. If you are looking for amazing summer party desserts inspirations, bookmark this one!
- They make for stunning table décor because you can see all those decadent layers!
- Serving is zero-stress—just grab a jar and go.
- They look way more fancy than the amount of effort you put in, trust me.
That’s why the Strawberry Shortcake Trifle in a Jar has become my go-to for any gathering. If you want the best of layered trifle recipes but need portability, this is the answer.
Perfect Portions for Picnics and Parties
The real game-changer for me was the realization that I didn’t need to fuss with cutting and plating on site. If I’m going to a picnic or a potluck, I just pop a lid on the jar, toss those little gems in the cooler, and we are good to go! Clean up is the best part—just toss the empty jars in the wash bin. It’s just so easy!
Building the Ultimate Strawberry Shortcake Trifle in a Jar
The beauty of making a Strawberry Shortcake Trifle in a Jar is that you control every single layer! Since we are building from scratch, we get to choose the quality of the cake, the freshness of the berries, and the decadence of that whipped cream. Keep reading, because I’m going to walk you through exactly how I put together these unbelievable layered trifle recipes.
Ingredients for Your Strawberry Shortcake Trifle in a Jar Components
Alright, this is where we gather our treasures before the fun starts! Since we are making individual servings, we have three distinct parts to tackle: the delicious vanilla cake you use for the base, the sweet, syrupy strawberry sauce, and finally, the heavenly cream and fresh berries that make this a true strawberry shortcake dessert.
Take note of the temperatures and weights here; that’s the key to these layered trifle recipes coming out perfectly balanced!
For the Vanilla Cake Base
- 3 cups all purpose flour (that’s 390g, so measure carefully because this is a big cake!)
- 1/4 tsp baking soda
- 2 3/4 tsp baking powder
- 1 tsp salt
- 1 1/2 cups unsalted butter, room temp – Remember, room temperature, not melted, or your creaming won’t work! (That’s 336g of pure gold.)
- 2 cups sugar (414g)
- 4 egg whites
- 3 tsp vanilla extract
- 1 1/2 cups milk (360ml)
For the Sweet Strawberry Sauce
This sauce is simple but so important for soaking into that cake layer!
- 1 lb strawberries, pureed (make sure they are smooth!)
- 1/2 cup sugar (104g)
- 3/4 tsp vanilla extract
For the Whipped Cream and Assembly of the Strawberry Shortcake Trifle in a Jar
Here’s where you need to grab the cold stuff for the best results when making your Strawberry Shortcake Trifle in a Jar!
- 2 3/4 cups heavy whipping cream, cold (660ml – keep this frosty!)
- 1 1/2 cup powdered sugar (173g)
- 1 tbsp vanilla extract
- 2 lbs strawberries, chopped (about 5 cups—we use these fresh on top of the sauce!)
Step-by-Step Instructions for Layered Trifle Recipes
Okay, are you ready to see this magic happen? Putting together these layered trifle recipes is fun, but you have to follow the order or the whole thing gets messy fast! We tackle the cake first, then the sauce, then the cream, and then we assemble. Remember, rushing any step means we might end up with soggy layers, and we certainly don’t want that!
Baking the Vanilla Cake
First things first: grab that oven mitt! Preheat your oven to 350°F (176°C) and make sure that 9×13 cake pan is greased up nice. We start by mixing your dry ingredients in one bowl, and then for the wet stuff, we cream that room-temperature butter and sugar for a full two minutes until it looks pale and fluffy—this step is non-negotiable for a good cake! After slowly adding your egg whites, you alternate adding the flour mix and the milk, just a little bit at a time. Don’t overmix, please! Bake for about 35 to 40 minutes. When a toothpick comes out clean, pull it out and let it chill completely.
Preparing the Strawberry Sauce
While that cake is cooling off, we can make the sauce. Get your strawberry puree, the sugar, and the vanilla into a medium saucepan. Pop it on medium heat and stir until it just starts to bubble up—we only want a quick one-minute boil, then take it right off the burner. You want it more like a thin syrup than a jam, so it soaks into the cake beautifully later. Let this cool right down too; hot sauce on cold cake is never the way to go!
Making the Whipped Cream
This is the payoff! Take that rock-solid cold heavy whipping cream, powdered sugar, and vanilla, and get them into your large mixer bowl. Seriously, whip this on high speed until you see really stiff peaks forming. If you can hold the whisk upside down and the cream doesn’t move? Perfect! That’s what we need for stabilizing our Strawberry Shortcake Trifle in a Jar later.
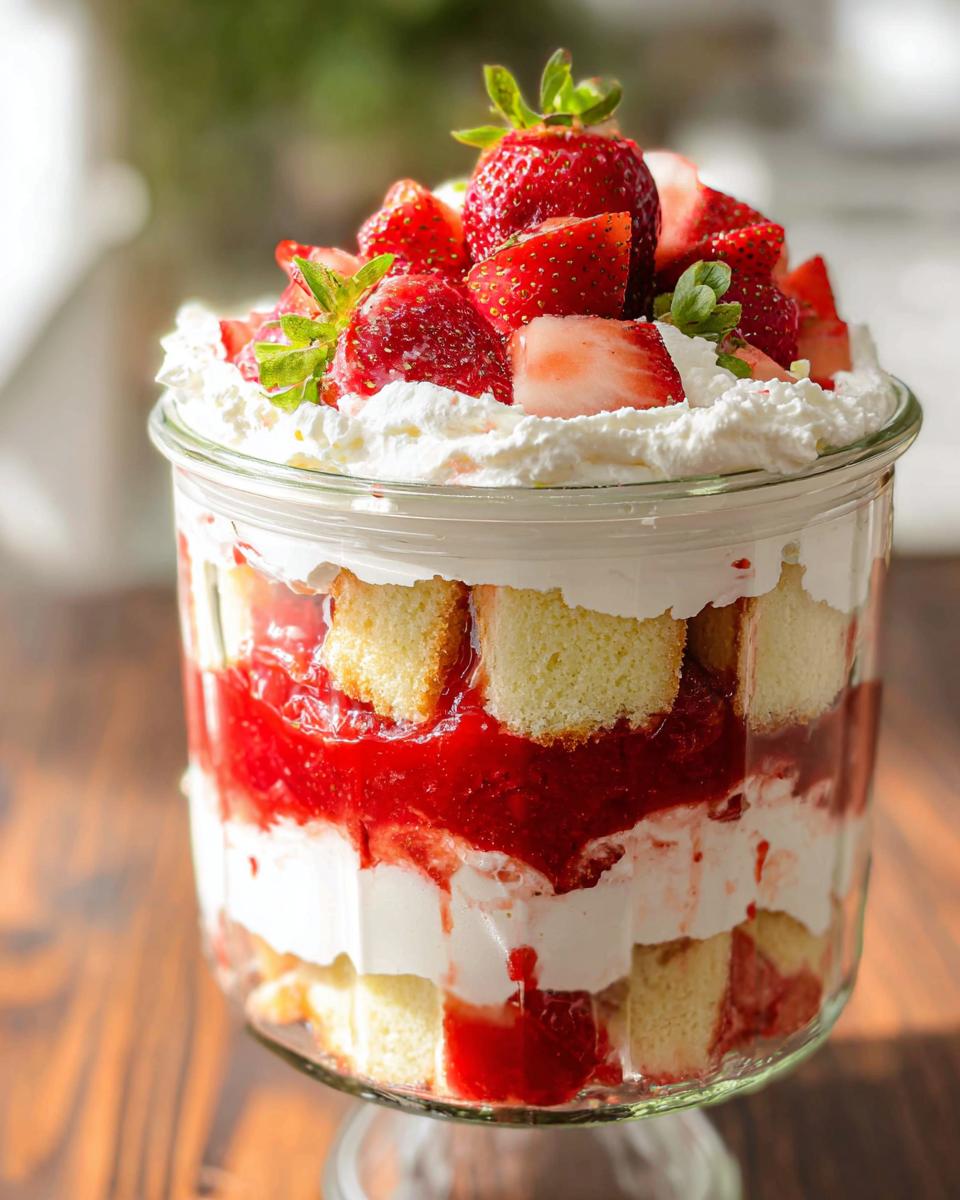
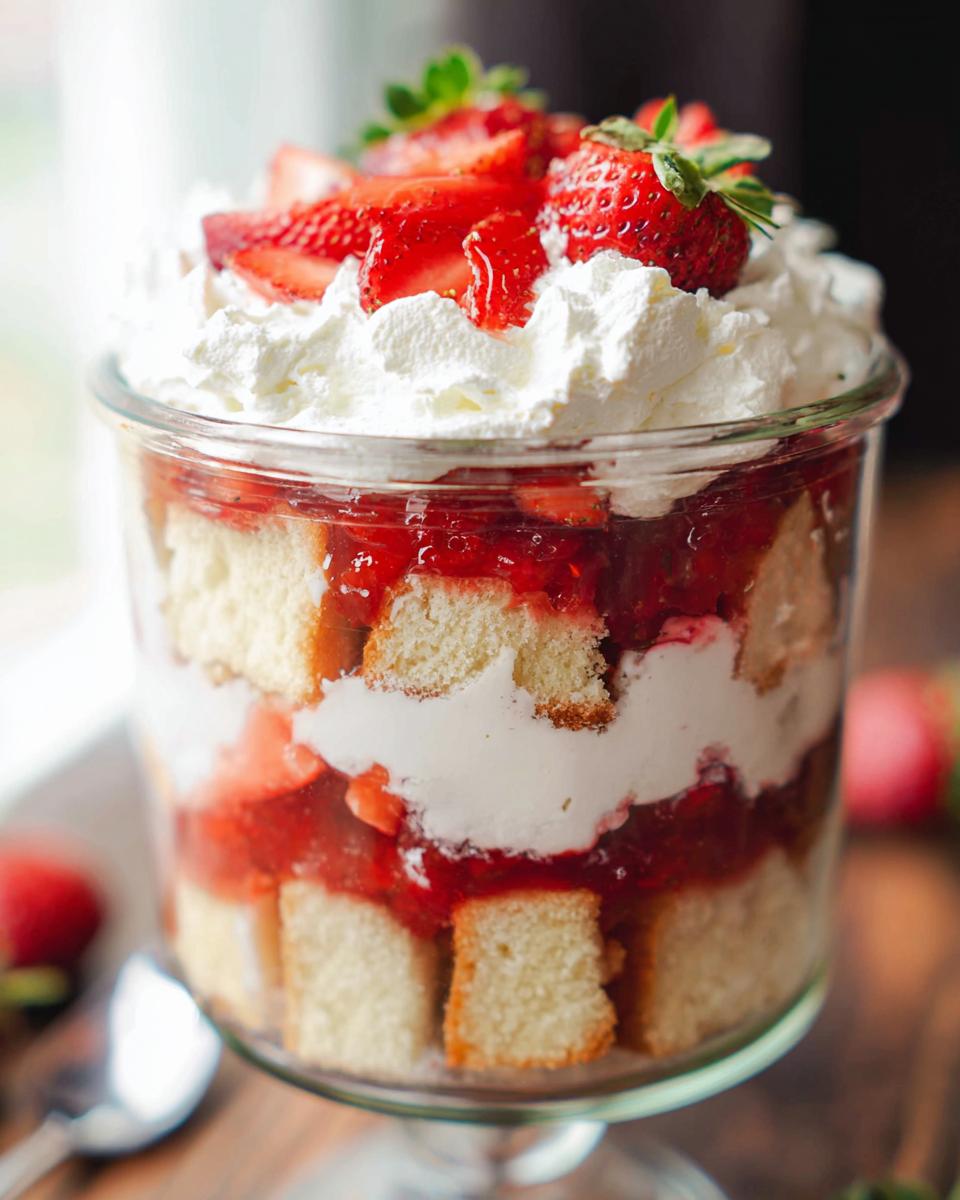
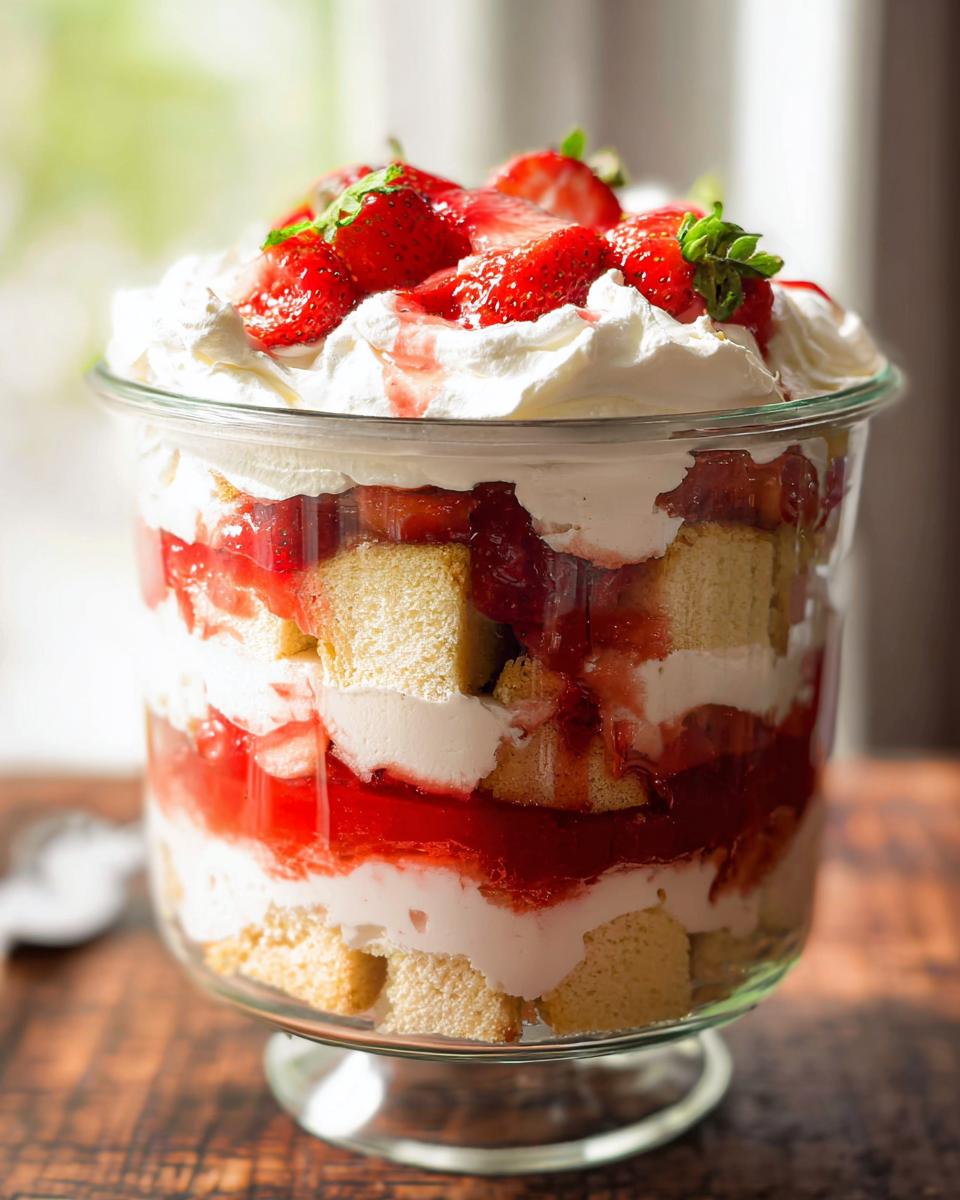
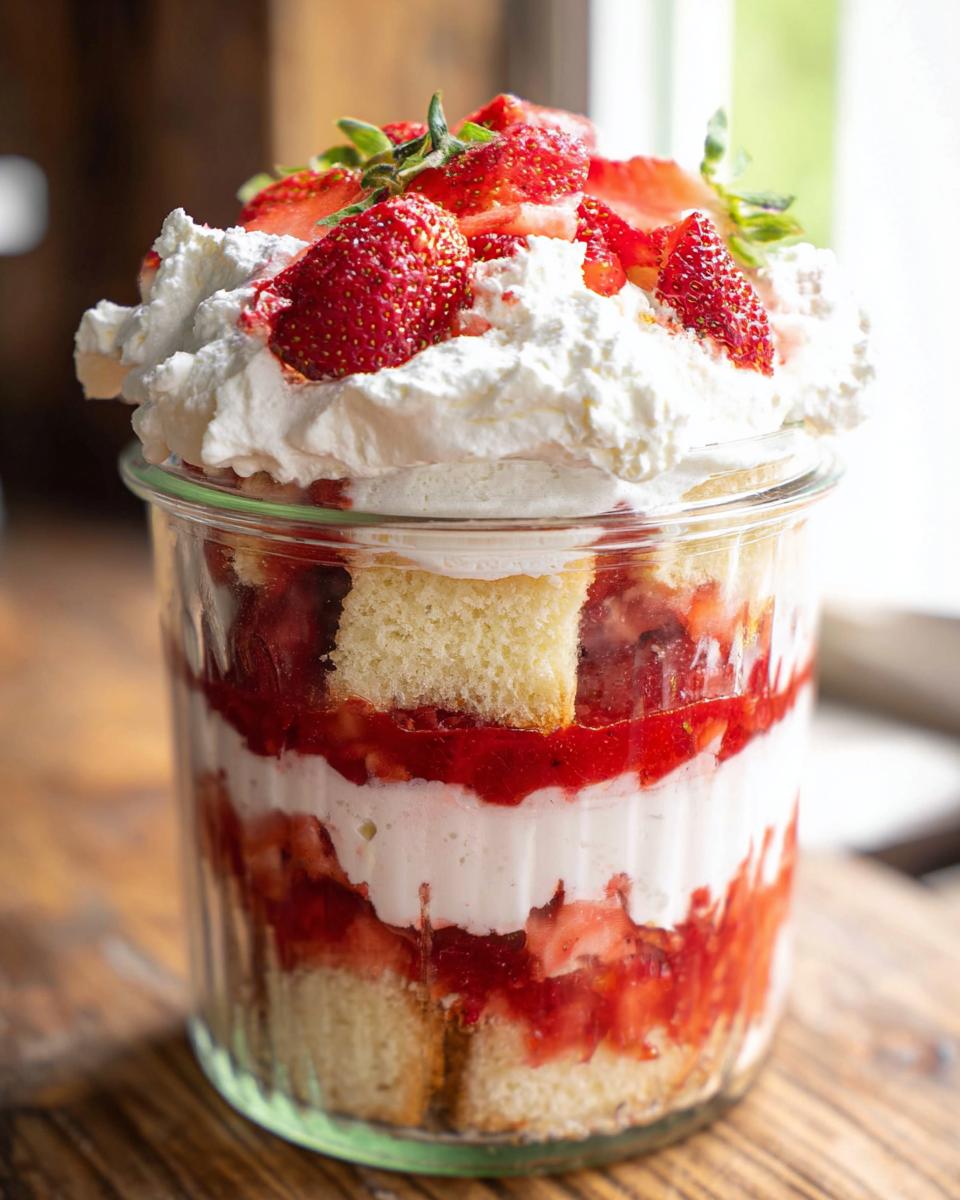
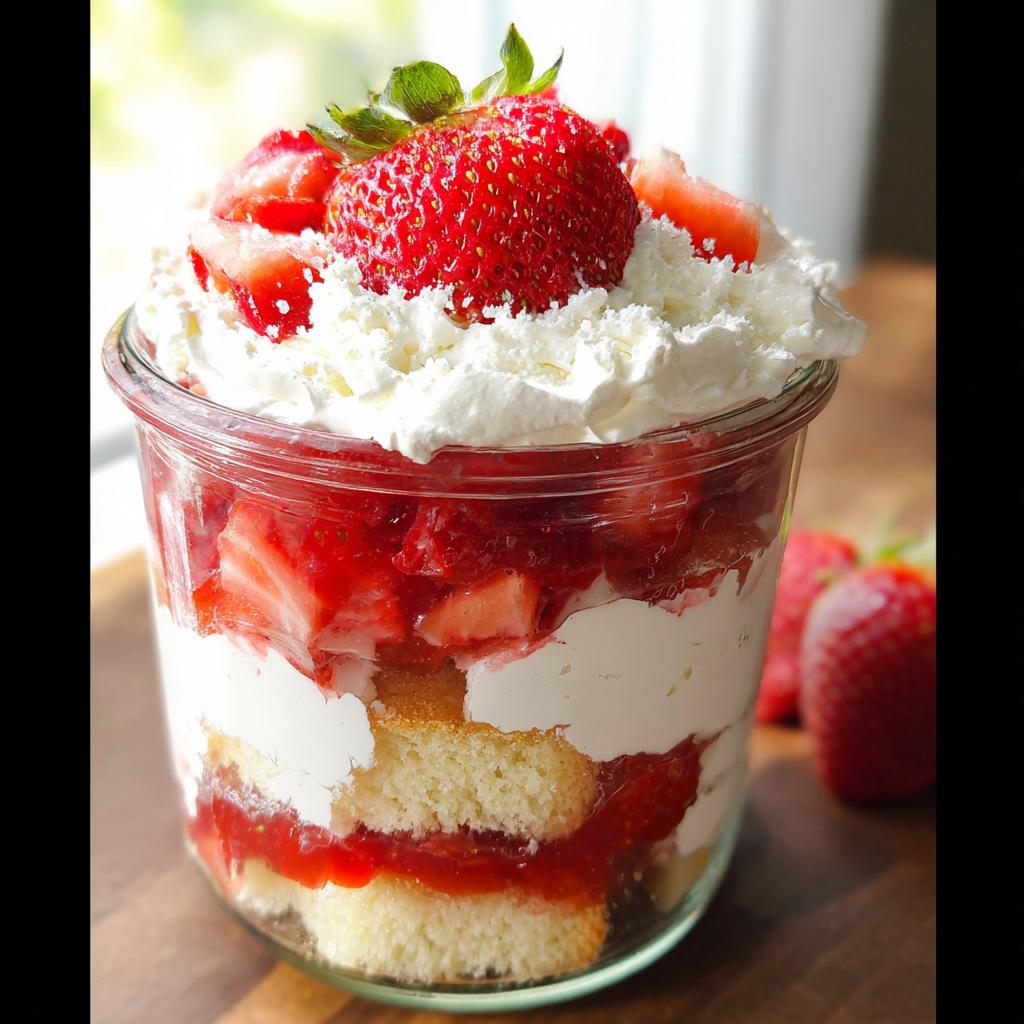
Assembling Your Strawberry Shortcake Trifle in a Jar
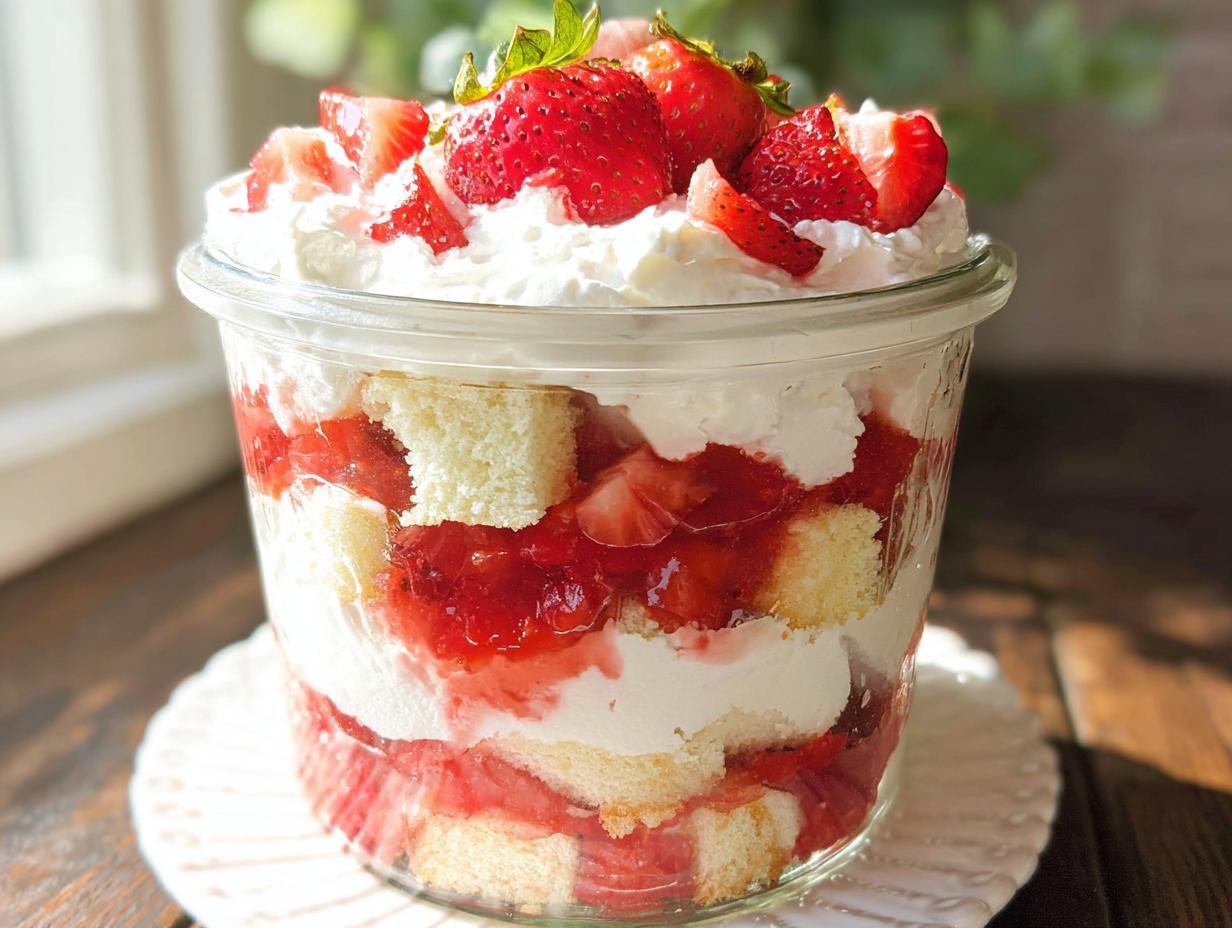
Now for the fun part of these layered trifle recipes! Pick your prettiest jars. Start with a layer of cake pieces on the bottom. Don’t press them down! Next, sprinkle half of your fresh, chopped strawberries over the cake. Drizzle about half the cooled strawberry sauce on top of those berries. Then, spread on half of your glorious whipped cream. Repeat that whole sequence: cake, berries, sauce, cream. Finish the top of your Strawberry Shortcake Trifle in a Jar with a pretty swirl of the remaining cream and maybe one perfect strawberry right on top for show!
Tips for Perfect Strawberry Shortcake Trifle in a Jar Execution
Listen, assembling these beauties looks easy, but trust me, there are a couple of little tricks I learned after making a few sad, soupy messes early on. If you forget these two steps when making your Strawberry Shortcake Trifle in a Jar, you risk deflated cream or mushy cake, and we absolutely cannot have that! If you need to reach out with troubleshooting tips later, you can always find me on the contact page.
Cooling Components Before Layering
This is my number one rule! You must let everything cool down completely—I mean stone cold! If your cake is even slightly warm, it melts the whipped cream instantly. And hot sauce turns your beautiful cake bits into strawberry mush almost immediately. Patience here means a beautifully defined, structured dessert.
Choosing the Right Jar Size
I usually stick to clear 8-ounce wide-mouth jars. Why? Because you want to see those beautiful layers you worked so hard on! If you use something too narrow, you end up just dumping ingredients in, and you lose the visual appeal of these layered trifle recipes. The 8oz size is also the perfect single serving for a big indulgence!
Equipment Needed for Mason Jar Treats
If you’re going to make these amazing little mason jar treats, you need to have your tools ready to go before you start mixing the batter. I’ve found that having the right containers just makes the flow of the recipe so much smoother, saving you from having to wash things mid-way through! You don’t need a million fancy gadgets for this recipe, thank goodness, but these three happen to be the absolute essentials for getting the cake and cream just right.
You’ll definitely want to pull these items out of the cupboard before you start anything:
- A standard 9×13 cake pan. This gives us plenty of surface area for baking a thin cake that we can easily cut into those perfect shortcake chunks. If the cake is too deep, it takes forever to bake!
- A reliable medium saucepan. We use this strictly for coaxing that beautiful, syrupy strawberry sauce together on the stovetop.
- Your good old large mixer bowl. Whether you use a stand mixer or a hand mixer, you need generous space to cream that butter and sugar and then bring the heavy whipping cream up to those stiff peaks we talked about.
Gathering these few pieces of equipment is honestly half the battle won when preparing your layered trifle recipes. If you want a shortcut for delicious pairings later, you should check out my recipe for garlic butter mushrooms—totally different menu, but fantastic if you need a savory side dish!
Ingredient Notes and Substitutions for Your Strawberry Shortcake Trifle in a Jar
I always encourage home cooks to know their ingredients inside and out, especially when we are playing around with something as iconic as a strawberry shortcake dessert. This recipe uses great basic components, but I know life happens, and sometimes you need flexibility!
For instance, if you are absolutely in a rush, sure, you *could* use a store-bought vanilla cake or angel food cake, but let me tell you, the homemade version—the one we just walked through—has a texture that really holds up better against the fruity sauce. The quality of that cake layer makes all the difference in these layered trifle recipes.
I get asked a lot about reducing sugar, but honestly, the sugar in the sauce and the cream balances the tartness of the berries perfectly. If you are trying to reduce carbs or sugar, you’ll need to swap out the flour in the cake section for a specific low-carb blend, which is a whole different ballgame (and I cover those specific swaps in detail elsewhere!). For this standard, easy version of the Strawberry Shortcake Trifle in a Jar, stick to the provided measurements!
You can also substitute the milk for buttermilk if you want a slight tang in your cake, though I usually just stick to whole milk for reliability in this particular recipe. Just please, please use real heavy whipping cream for those stiff peaks—there is zero room for substitutes when you are aiming for that perfect cloud-like topping on your Strawberry Shortcake Trifle in a Jar!
Serving Suggestions for This Strawberry Shortcake Dessert
I love serving these individual trifles because they stand beautifully on their own, but sometimes you want a little something extra alongside that sweet, creamy goodness. Since the strawberry shortcake dessert is so rich, I usually pair it with something light and refreshing, honestly!
Skip the heavy cookies or rich brownies, they just compete with the trifle. Instead, think simple and bright. A light mint tea on the side is perfect for cooling down your palette after that rich cream. If you are looking for a savory snack to round out the table, I always suggest making some snappy Caprese skewers—the fresh basil just perks everything right up!
Storage and Make-Ahead Options for Strawberry Shortcake Trifle in a Jar
One of the major reasons I adore these little numbers is how well they manage make-ahead logistics! Planning for a party can be stressful, but preparing these Strawberry Shortcake Trifle in a Jar desserts ahead of time saves the actual day for actual fun. I call that winning!
If you’re layering these bad boys up, you need to be strategic about timing to keep everything looking as pristine as it did when you first piped that cream.
Let’s break down what can be done early and what needs to happen right before serving. This way, your layered trifle recipes look fabulous when it’s time for dessert!
Making Components Ahead of Time
You can absolutely get a head start on this! The vanilla cake? Bake it the day before, wrap it tightly once fully cool, and leave it on the counter. It will be perfect for cutting up the next day. The strawberry sauce is even better if made ahead; in fact, it needs time to chill down properly.
Here’s my recommendation for prepping components: Make the cake and the sauce on Day 1. Store both covered in the fridge. Do not whip the cream until the day you plan to serve these Strawberry Shortcake Trifle in a Jar!
Assembled Trifle Shelf Life
This is the tricky part. Once you layer that sauce and cream together, things start getting soft fast. If you assemble the entire Strawberry Shortcake Trifle in a Jar, I wouldn’t keep it past 12 hours in the fridge. Why? Because that cake layer, while delicious, will start soaking up too much sauce overnight and turn into a pudding, which is tasty, but we are aiming for distinct layers here!
If you are hosting a brunch party the next morning, assemble them late the night before, but make sure the lids are sealed tight. If you need them to last longer than that, keep the components separate and assemble them an hour before you plan to serve them. You can check out my thoughts on making desserts ahead of time on my post about chocolate mousse—the principles are the same for moisture management!
The Best Preparation Window
Honestly, the sweet spot for presentation glory is assembling these beautiful Strawberry Shortcake Trifle in a Jar creations two to three hours before you plan to serve them. This gives the cake just enough time to kiss the sauce and absorb some flavor, but it keeps the whipped cream firm and beautifully piped on top. Trust me on this time window; it prevents the tragic collapse of a perfectly layered dessert!
Frequently Asked Questions About Layered Trifle Recipes
I know when you look at something beautiful like a Strawberry Shortcake Trifle in a Jar, you naturally have questions! That’s okay! These layered trifle recipes are fun, but making sure they look perfect when you serve them is key to success. I’ve pulled together the most common things folks ask me when they’re planning to make these adorable mason jar treats.
Can I make the cake component ahead of time?
Absolutely, yes! The cake is the one component that actually benefits from being made ahead. Bake that vanilla cake base the day before you plan to assemble everything. Once it’s completely cool, just wrap it up tightly in plastic wrap and keep it on the counter at room temperature—or in the fridge if your kitchen is super hot. This ensures it’s perfectly ready to crumble and soak up that sauce the next day when you are putting your layered trifle recipes together!
Are these considered good summer party desserts?
Oh, they are not just good; they are the absolute best kind of summer party desserts! Because they are individually portioned in the jar, they handle heat and transport much better than a traditional sheet cake. Plus, a big plus for me is the portion control; everyone gets a perfectly stacked visual serving without me having to awkwardly slice and serve things!
Can I use fresh strawberries instead of pureed for the sauce?
You can definitely use fresh, chopped strawberries instead of pureeing them all, but you’ll need to cook them down with the sugar and vanilla just like we did in the recipe instructions. The pureed ones give you that lovely smooth texture that soaks into the cake edges better, but if you prefer chunks throughout your sauce, go right ahead and chop them up before cooking!
How far in advance can I assemble these?
This is important for presentation! If you assemble the whole Strawberry Shortcake Trifle in a Jar more than a day ahead, the cake will get overly saturated and lose its structure. I always aim to build them no more than 3 to 4 hours before serving. That way, the cake is slightly soft but the whipped cream on top is still proud and stiff! Check out my recipe for classic deviled eggs if you need an easy savory side to transport alongside these!
Share Your Strawberry Shortcake Trifle in a Jar Creations
Now that you have the secrets to making the most beautiful and delicious Strawberry Shortcake Trifle in a Jar, I absolutely want to see what you’ve made! Honestly, nothing feeds my soul more than hearing how you’ve adapted these recipes or seeing your gorgeous layers lined up ready for a picnic.
Don’t be shy! Head down to the comments section right now and give this recipe a quick rating—did you use 8-ounce jars? Did you add a little extra vanilla to the cream? Your feedback helps everyone else who tries these wonderful mason jar treats!
And seriously, if you snap a picture of your finished layered trifle recipes sitting under the summer sun, please tag me online! I love sharing reader photos because your creativity inspires me to keep experimenting at the kitchen counter. Happy baking, and enjoy every last spoonful of that shortcake magic!
If you’re looking for another fantastic, easy appetizer to serve alongside these sweet jars, you absolutely must check out my recipe for bacon-wrapped dates!
Strawberry Shortcake Trifle in a Jar
Ingredients
Equipment
Method
- Preheat the oven to 350°F (176°C). Grease a 9×13 cake pan.
- Combine the flour, baking soda, baking powder and salt in a medium sized bowl. Set aside.
- Beat the butter and sugar in a large bowl on medium speed about 2 minutes, until light and fluffy. Scrape down the sides of the bowl.
- Add the egg whites and vanilla and beat on medium speed until well combined and smooth.
- Add about a third of the flour mixture to the batter and beat on medium speed until incorporated.
- Add about half of the milk and beat on medium speed until incorporated.
- Add another third of the flour mixture and beat until incorporated, scraping down the sides of the bowl as needed.
- Add the remaining milk and beat on medium speed until incorporated.
- Add the remaining flour mixture and beat until well combined, scraping down the sides of the bowl as needed.
- Bake the cake for 35-40 minutes, or until a toothpick inserted in the center comes out clean. The cake will be browned on top.
- When the cake is done, set aside to cool.
- To make the strawberry sauce, add the strawberry puree, sugar and vanilla extract to a medium saucepan. Cook over medium heat until it begins to boil, stirring occasionally.
- Allow sauce to boil for one minute, then remove from heat and set aside to cool.
- When everything has cooled, make the whipped cream. Add the heavy whipping cream, powdered sugar and vanilla extract to a large mixer bowl and whip on high speed until stiff peaks form.
- To layer everything in the trifle dish, add a layer of cake on the bottom, then about half of the chopped strawberries, about half of the strawberry sauce, then about half of the whipped cream.
- Add a second layer of cake, strawberries and strawberry sauce, then pipe the remaining whipped cream on top in swirls. Add a few additional strawberries on top as decoration.